在v0.1.1开始,TLS 成为implant的默认选项, 将于cert管理功能深度联动
在v0.1.1我们添加了证书管理功能,能够通过命令行显示证书列表,生成证书,删除证书,更新证书。你也可以给pipeline指定证书,重新启动pipeline,使用tls功能。目前我们支持自签名证书和用户自行导入证书。
listener config配置
目前listener需要通过IoM的Server的同级目录下的config.yaml来控制, 以下是listener的config示例配置
listeners:                  # listener 配置, 可独立生效
  name: listener
  auth: listener.auth
  enable: true
  ip: 127.0.0.1
  auto_build:
    enable: true
    build_pulse: true
    target:
      - x86_64-pc-windows-gnu
    pipeline:
      - tcp
      - http
  tcp:                      # tcp example
    - name: tcp             # tcp pipeline
      port: 5001
      host: 0.0.0.0
      protocol: tcp
      parser: malefic       # auto/malefic/pulse
      enable: true
      tls:                  # tls配置, 按照配置生成证书或者使用已有的证书文件
        enable: true
        # 自签名证书
        CN: "test"
        O: "Sharp Depth"
        C: "US"
        L: "Houston"
        OU: "Persistent Housework, Limited"
        ST: "State of Texas"
        # 自定义证书
        cert_file: ""
        key_file: ""
        ca_file: ""
      encryption:           # 加密配置, 需要与implant对应
        - enable: true
          type: aes
          key: maliceofinternal
        - enable: true
          type: xor
          key: maliceofinternal
  http: # http example
    - name: http
      enable: true
      host: 0.0.0.0
      port: 8080
      parser: malefic       # auto/malefic/pulse
      tls:
        enable: true
        CN: "test"
        O: "Sharp Depth"
        C: "US"
        L: "Houston"
        OU: "Persistent Housework, Limited"
        ST: "State of Texas"
        cert_file: ""
        key_file: ""
        ca_file: ""
      encryption:
        - enable: true
          type: aes
          key: maliceofinternal
        - enable: true
          type: xor
          key: maliceofinternal
      error_page: ""

    - name: http-pulse
      enable: true
      host: 0.0.0.0
      port: 8081
      parser: pulse
      encryption:
        enable: true
        type: xor
        key: maliceofinternal
      error_page: ""

  bind:                    # bind 启动配置
    - name: bind_pipeline
      enable: true
      encryption:
        enable: true
        type: aes
        key: maliceofinternal

  website:                 # website 启动配置
    - name: default-website
      port: 80
      root: "/"
      enable: true

  rem:                     # rem 启动配置
    - name: rem_default
      enable: true
      console: tcp://0.0.0.0:12345
基础参数配置
listeners:
  name: listener           # listener名称
  auth: listener.auth      # listener证书信息路径
  enable: true
  ip: 127.0.0.1            # listener外网ip
autobuild 配置
目前启动一个listener时,可以通过autobuild的配置,来控制是否编译与当前listener通信的implant。以下是autobuild配置示例。
  auto_build:
    enable: true
    build_pulse: true
    target:
      - x86_64-pc-windows-gnu
      - x86_64-unknown-linux-musl
    pipeline:
      - tcp
      - http
enable 控制是否进行autobuild。
build_pulse 控制是否编译对应pipeline的pulse artifact。
target 控制自动编译的implant的系统架构,支持多个系统架构一起编译。
pipeline 控制自动编译的implant对应的通信pipeline,选择了几个pipeline就会生成对应数量的beacon implant。
autobuild的编译平台优先级为docker > github action > saas,若使用saas编译,需确保服务端的config.yaml配置了saas,并且服务端未启动docker,也没有在config.yaml中配置github仓库信息。
pipeline config配置
pipeline 负责与implant的通讯,可以与server分离部署, 也可以同时部署。
当前支持多种信道, 以及基于rem实现的拓展信道。 - 基本信道 - tcp - http - rem: 支持rem支持的所有信道 https://wiki.chainreactors.red/rem/ - udp - http - tcp - tls - smb - unix - websocket - icmp - ... - bind, 用于正向连接 - website, 用于分发artifact与挂载文件
tcp
最常用的 pipeline, 适用于主体程序交互的 pipeline。
tcp 是目前支持了最多特性的 pipeline。
单个 tcp pipeline 配置:
  tcp:
  - name: tcp_default       # tcp 名字
        port: 5001          # tcp 监听的端口
        host: 0.0.0.0       # tcp 监听的host
        parser: malefic     # implant协议
        enable: true        # tcp 是否开启
        tls:                # tls配置项,留空则自动生成
          enable: false
          CN: "test"
          O: "Sharp Depth"
          C: "US"
          L: "Houston"
          OU: "Persistent Housework, Limited"
          ST: "State of Texas"
          cert_file: ""
          key_file: ""
          ca_file: ""
        encryption:
          enable: true
          type: aes
          key: maliceofinternal
http
http是支持http协议通信的pipeline,和tcp一样支持最多特性。
单个http pipeline配置:
  http:
    - name: http          # http 名字
      enable: true        # http 是否开启
      host: 0.0.0.0       # http 监听的host
      port: 8080          # http 监听的端口
      parser: malefic     # implant协议
      tls:                # tls配置项,留空则自动生成
        enable: true
        CN: "test"
        O: "Sharp Depth"
        C: "US"
        L: "Houston"
        OU: "Persistent Housework, Limited"
        ST: "State of Texas"
        cert_file: ""
        key_file: ""
        ca_file: ""
      encryption:
        - enable: true
          type: aes
          key: maliceofinternal
        - enable: true
          type: xor
          key: maliceofinternal
website
IoM 允许将一些文件挂载 web 服务上
  websites:
    - name: test                     # website 名字
      port: 10049                    # website 端口
      root: "/test"                  # website route根目录
      enable: false                  # website 是否开启
      content:                       # website 映射内容
        - path: '\images\1.png'      # 文件在website的映射路径
          file: 'path\to\file'       # 文件的实际路径
          type: raw                  # 文件类型
        - path: '\images\2.png'
          file: 'path\to\file'
          type: raw
bind (Unstable)
主动发送数据的 pipeline, 不同于 tcp 监听端口. bind 会主动向目标发送对应协议序列化后的数据.
  bind:
    -
      name: bind_default            # bind 名字
      enable: true                  # bind 是否开启
      encryption:
        enable: true
        type: aes
        key: maliceofinternal
rem (Unstable)
rem在 IoM 中一类扩展型 pipeline,它和 tcp、http 不同,是一个 通用通信框架,它把 IoM 的 implant 通信能力对接到了 rem 项目,因此可以复用 rem 提供的多种隧道和代理功能。
  rem:
    - name: rem_default              # rem 名字
      enable: true                   # rem 是否开启
      console: tcp://0.0.0.0:12345   # rem 控制台监听地址和连接协议
listener 命令管理
在确保 Malice-Network 服务器已经运行后,在终端输入以下指令:
.\malice-network listener add [listener_name]
执行命令成功后,服务端会输出以下信息并在所处文件夹下生成对应 auth 配置文件:
也可以删除用户, 使其无法登录 server
.\malice-network listener del [listener_name]
列出所有可用的用户配置
.\malice-network listener list
pipeline 命令管理
pipeline 生命周期管理
pipeline 创建后可以通过以下命令进行启停和删除:
# 列出所有 pipeline
pipeline list

# 列出指定 listener 下的 pipeline
pipeline list listener_id

# 启动 pipeline(可指定证书)
pipeline start tcp_test
pipeline start tcp_test --cert-name cert-name

# 停止 pipeline
pipeline stop tcp_test

# 删除 pipeline
pipeline delete tcp_test
基本用法
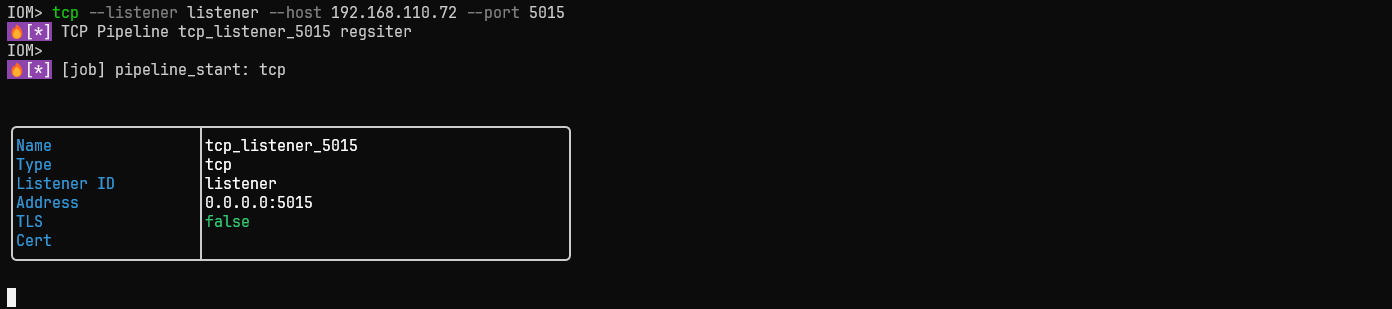
新建tcp
tcp --listener listener --host 127.0.0.1 --port 5015
gui:
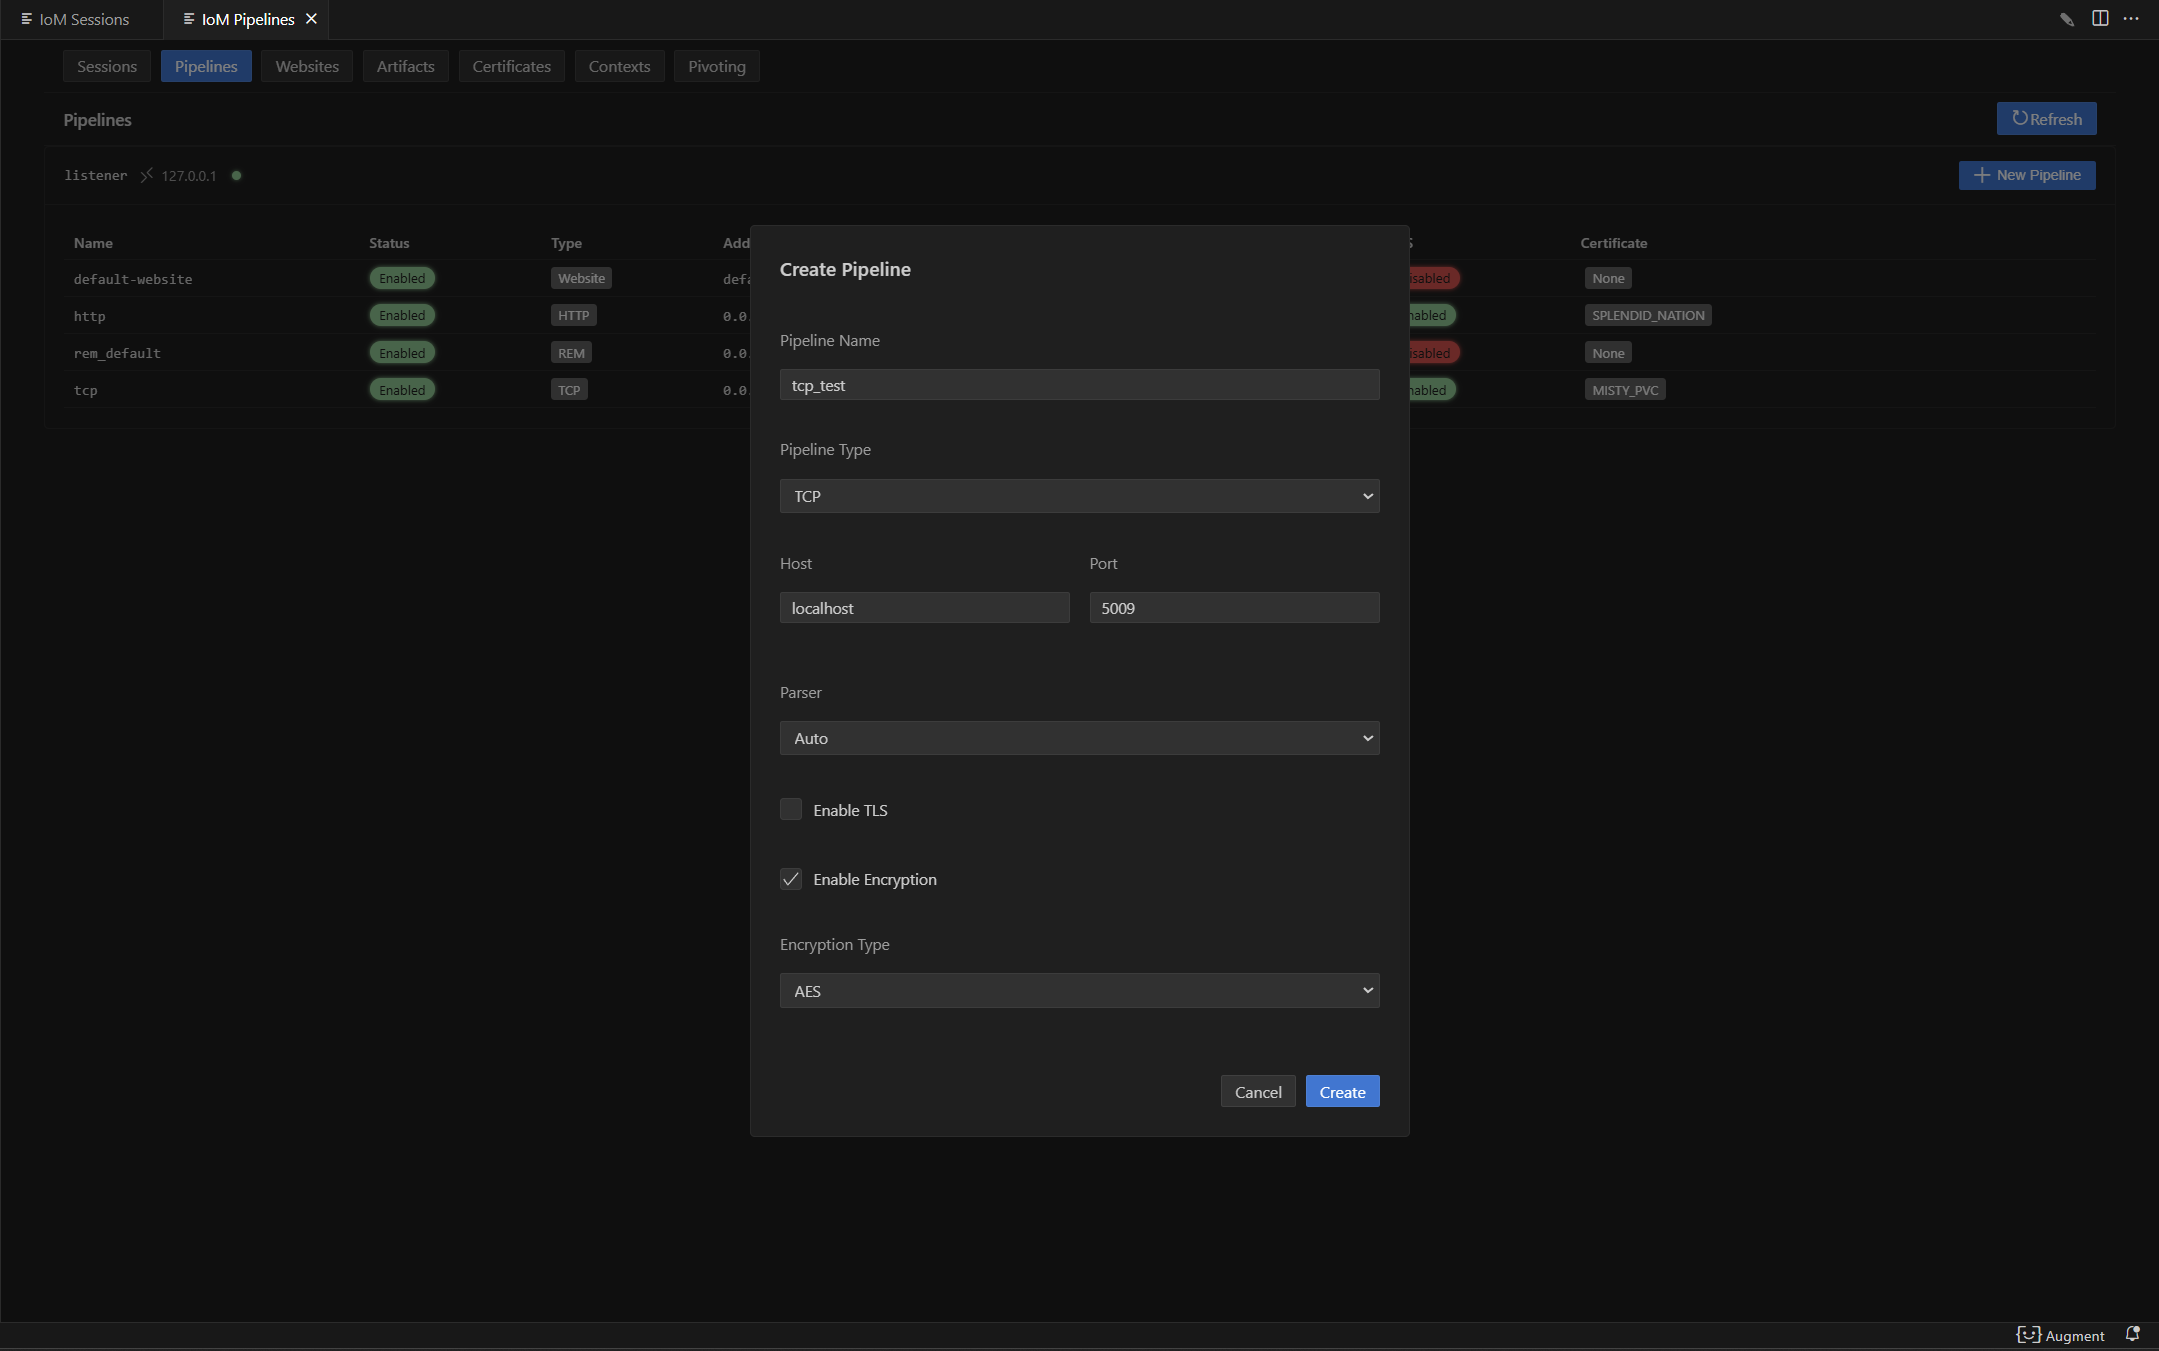
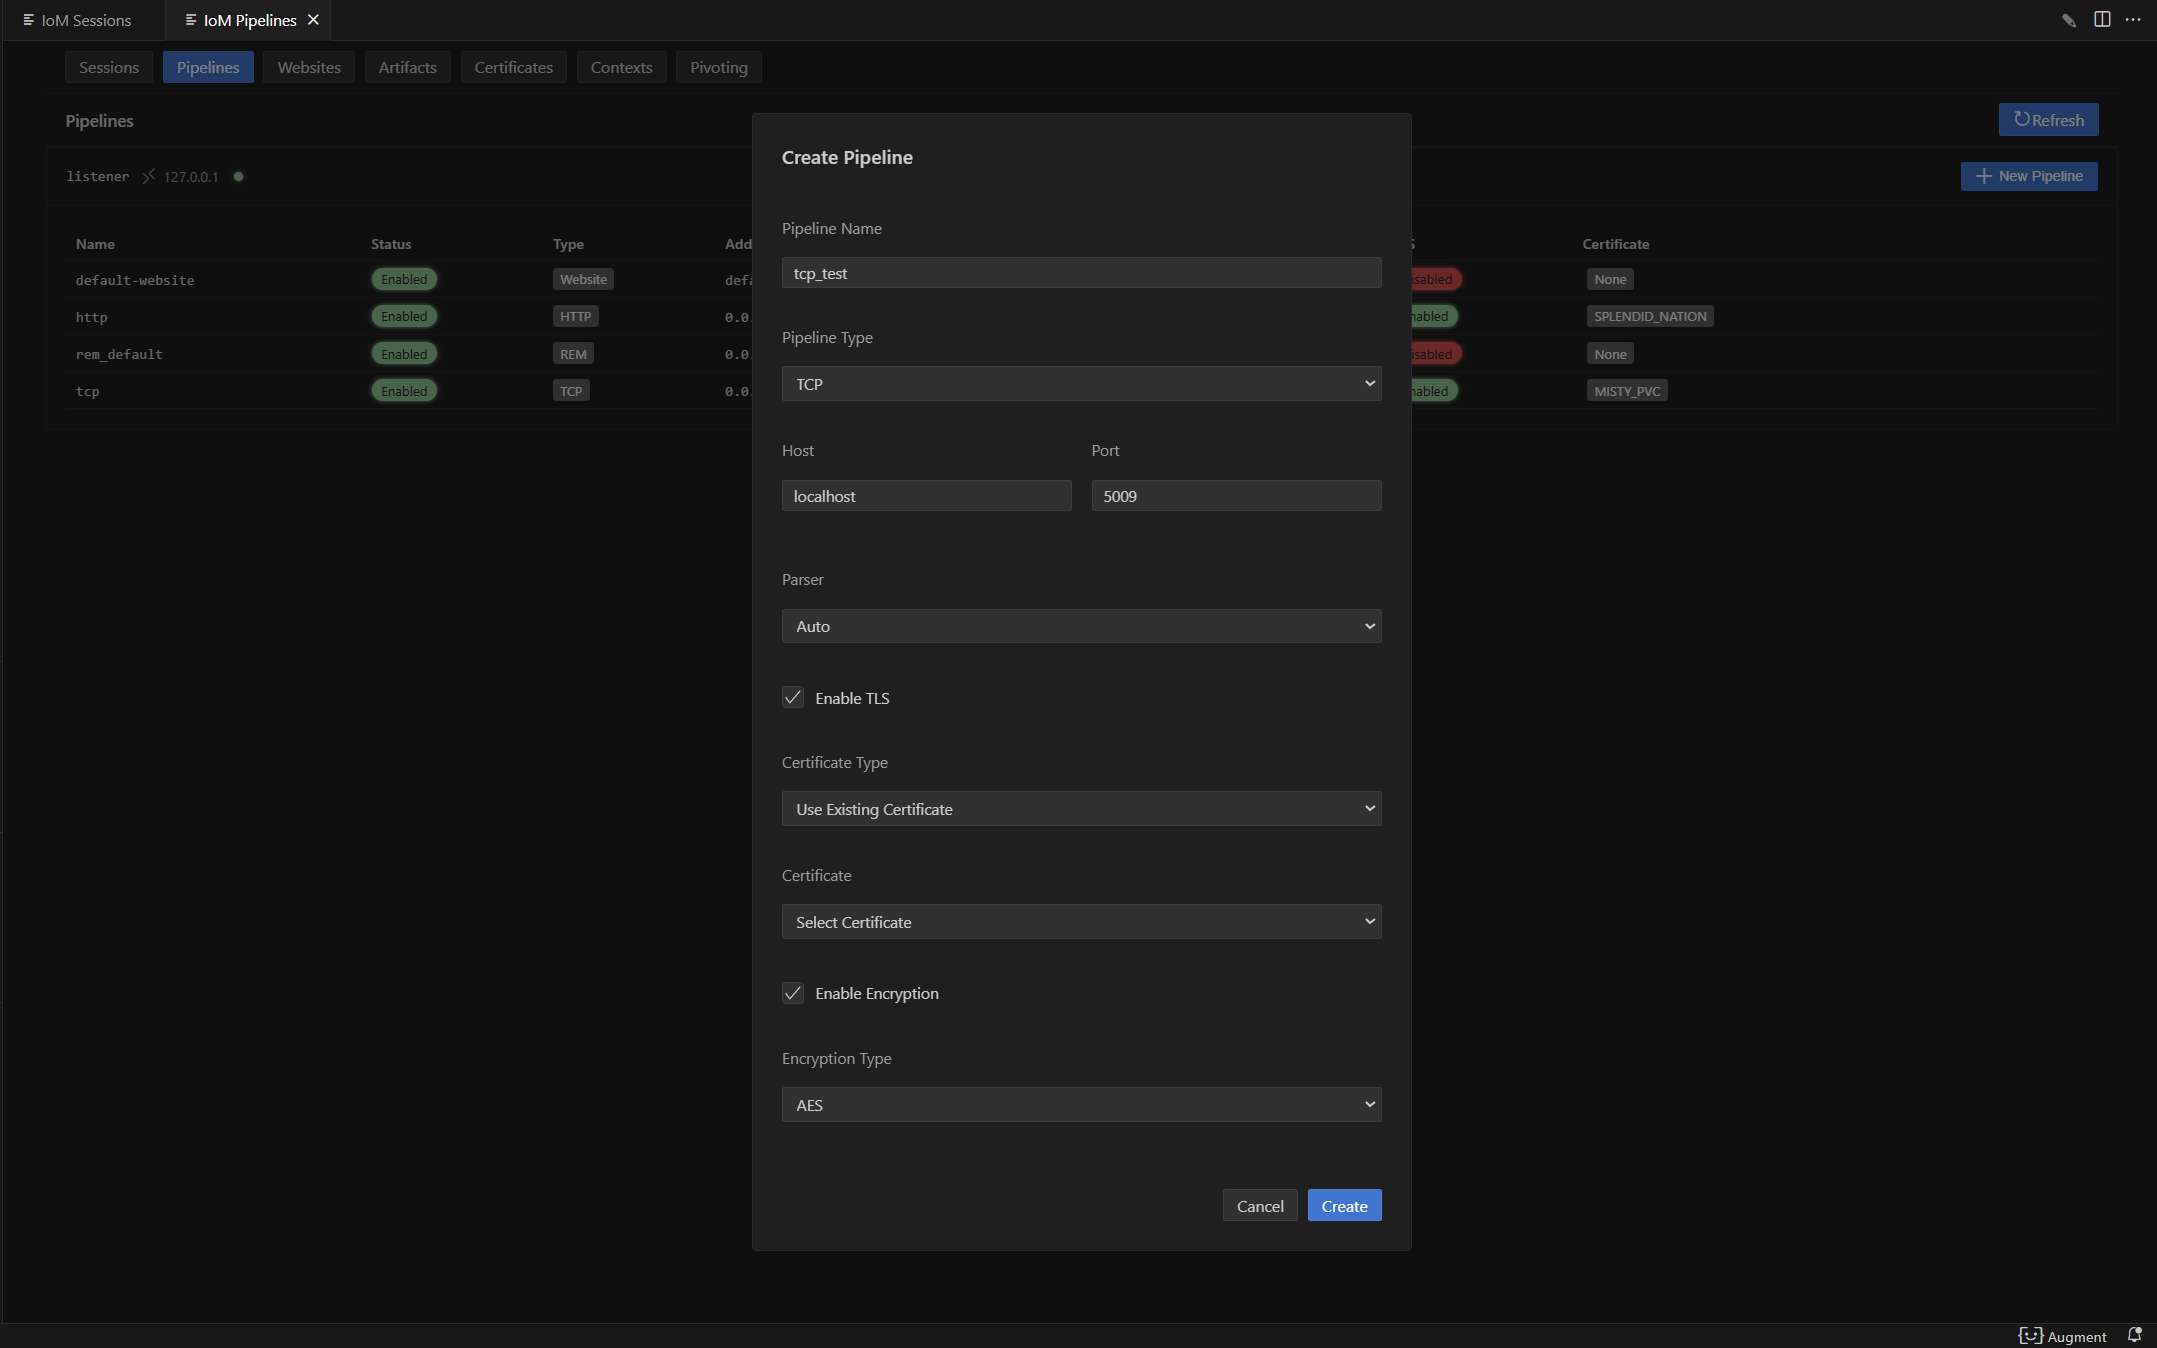
新建tcp并开启tls
其他pipeline打开tls方式相同
tcp --listener listener --host 127.0.0.1 --port 5015 --tls --cert-name cert-name

gui:
新建http
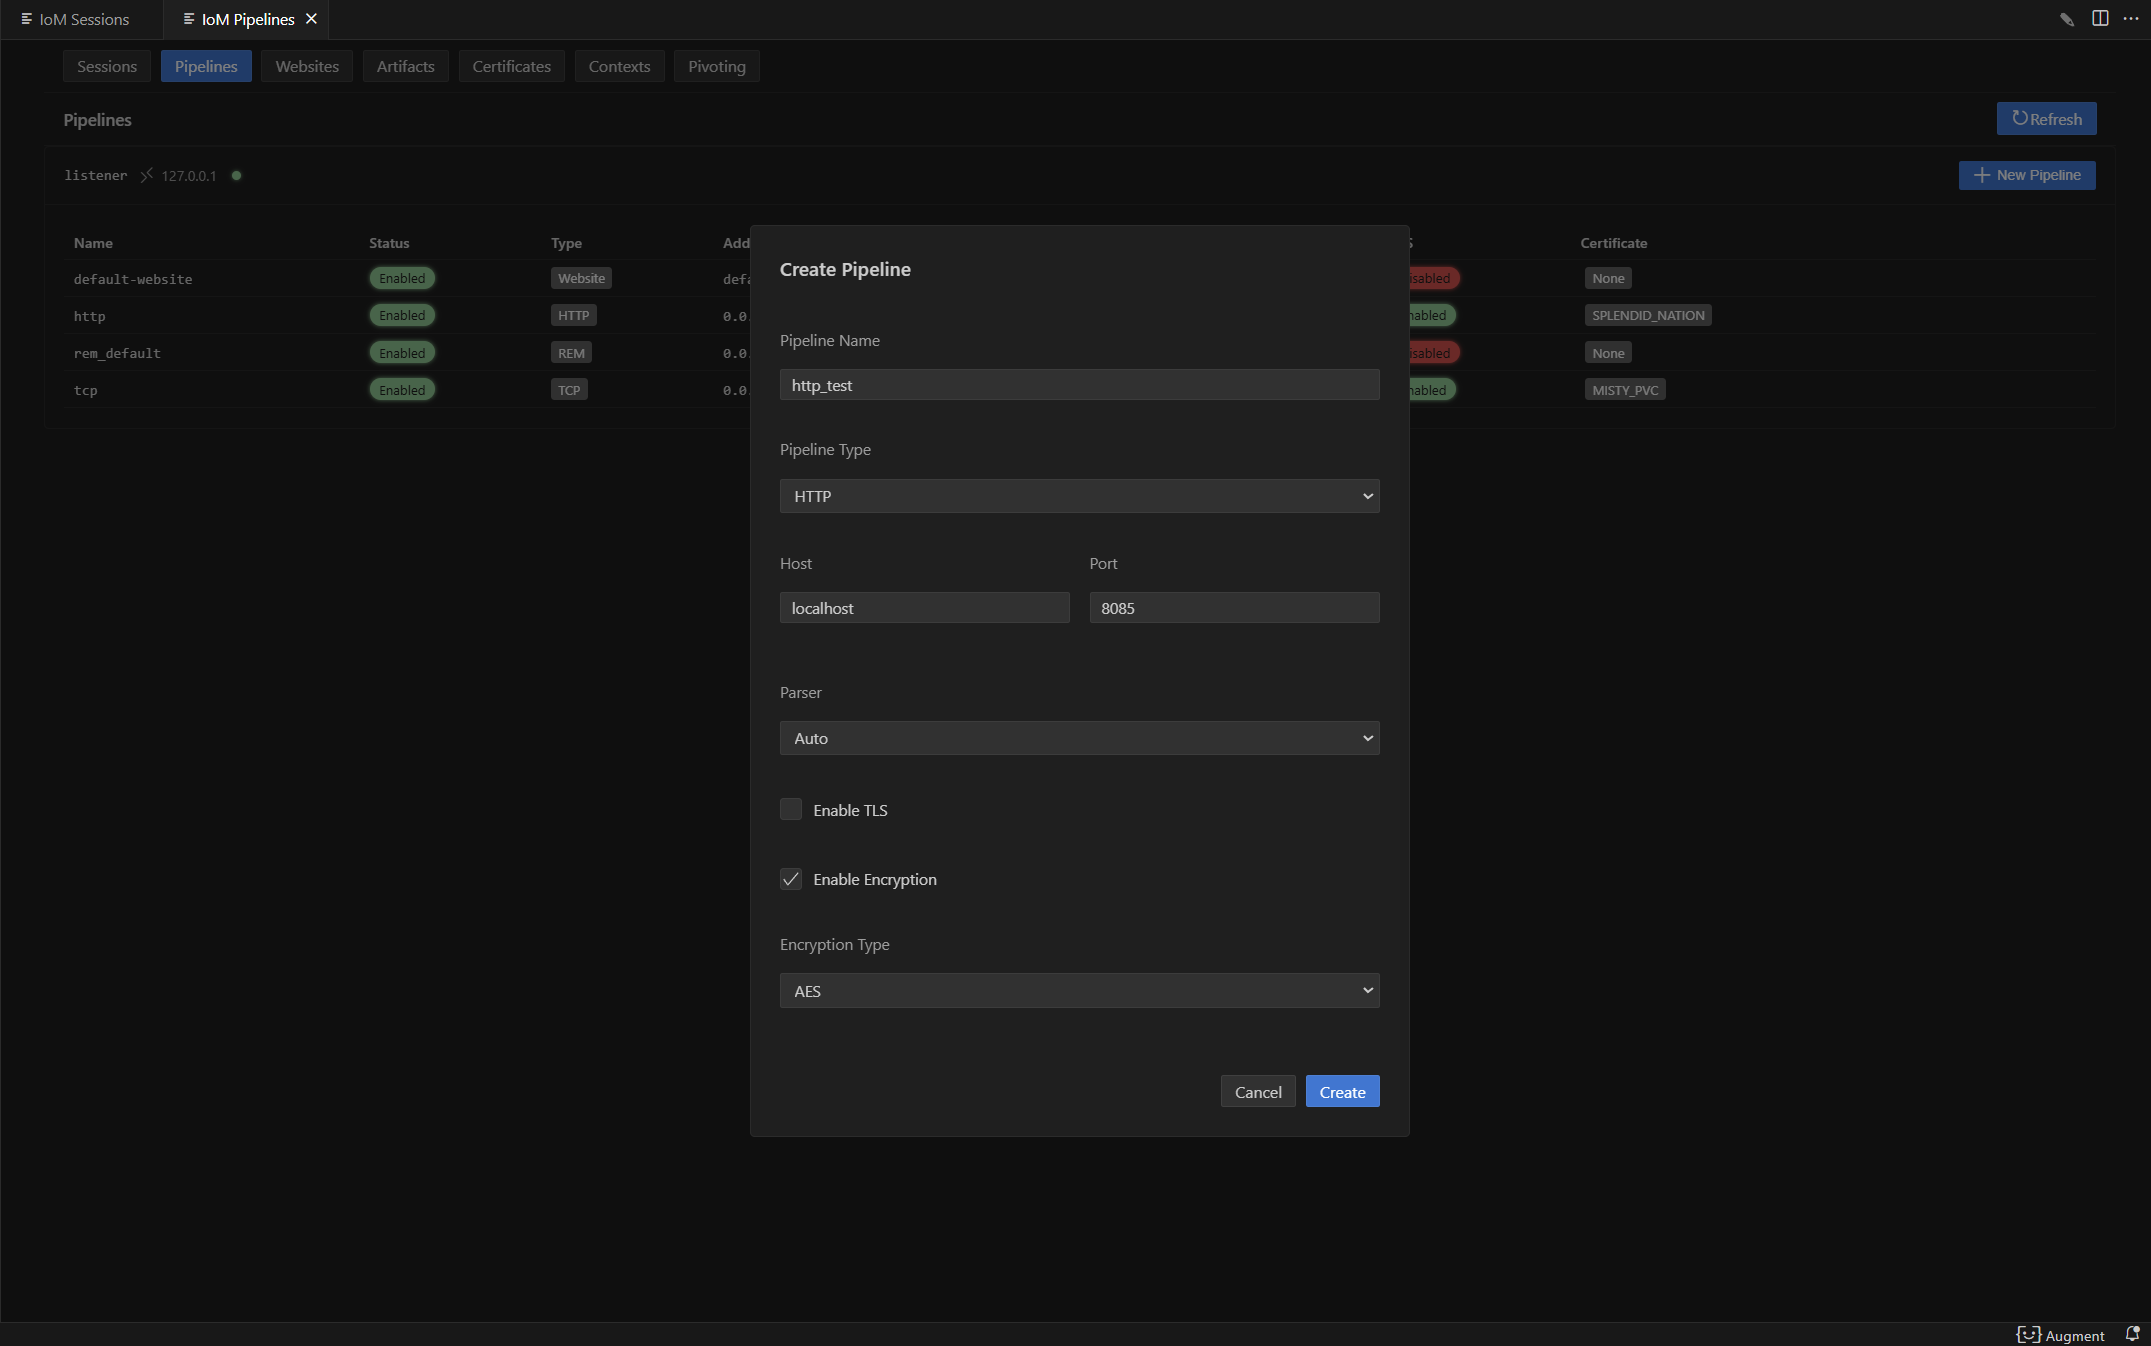
http --listener listener --host 127.0.0.1 --port 8083
gui:
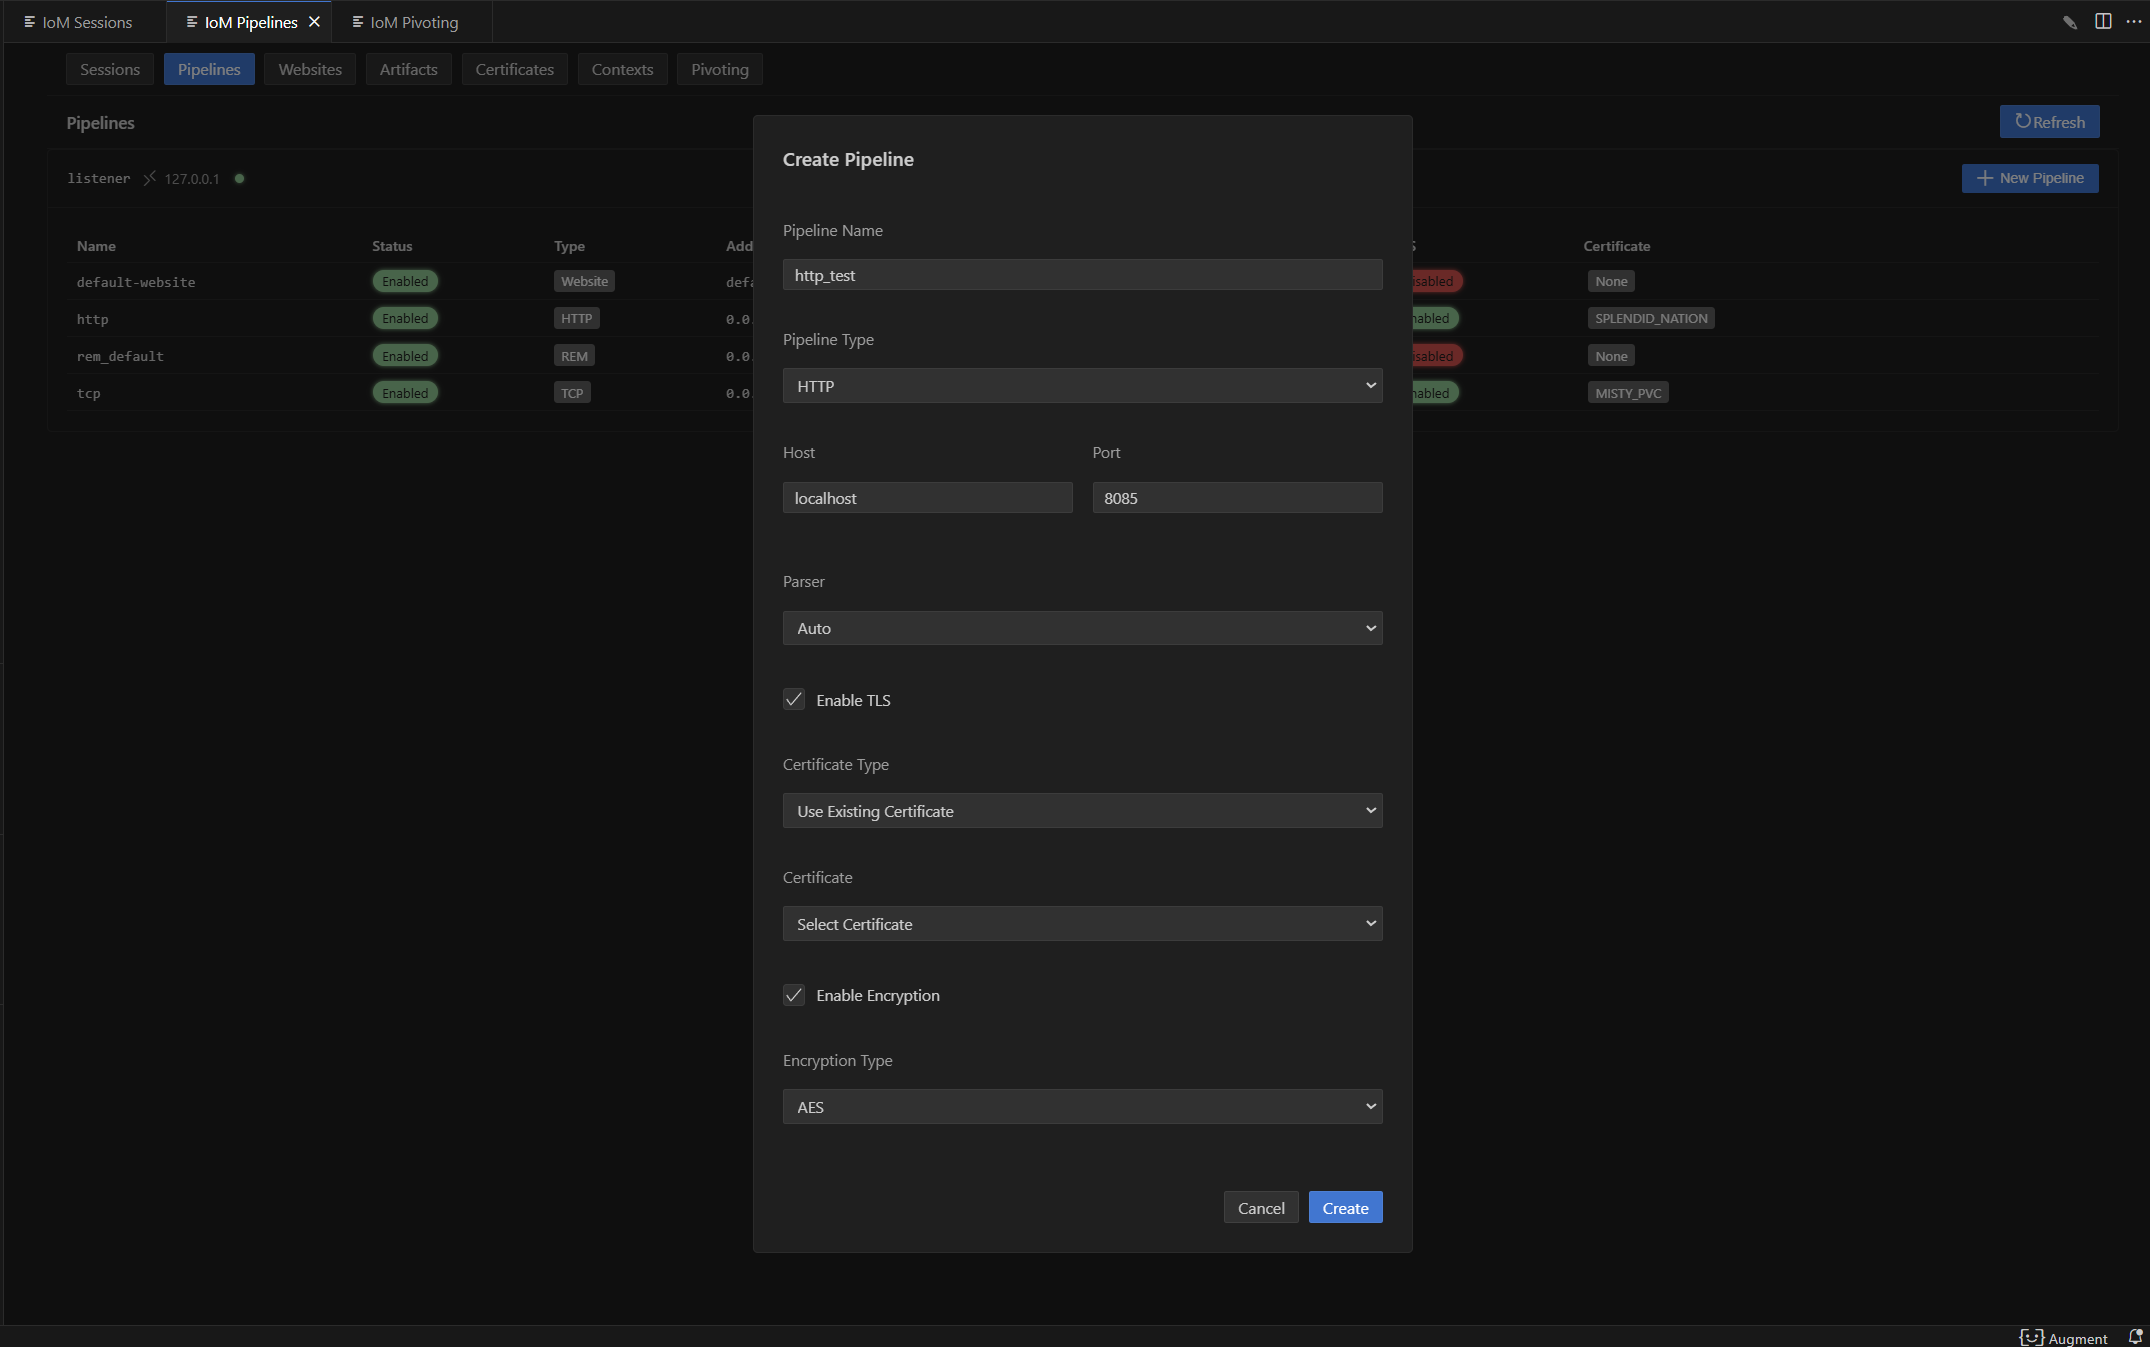
新建http并开启tls
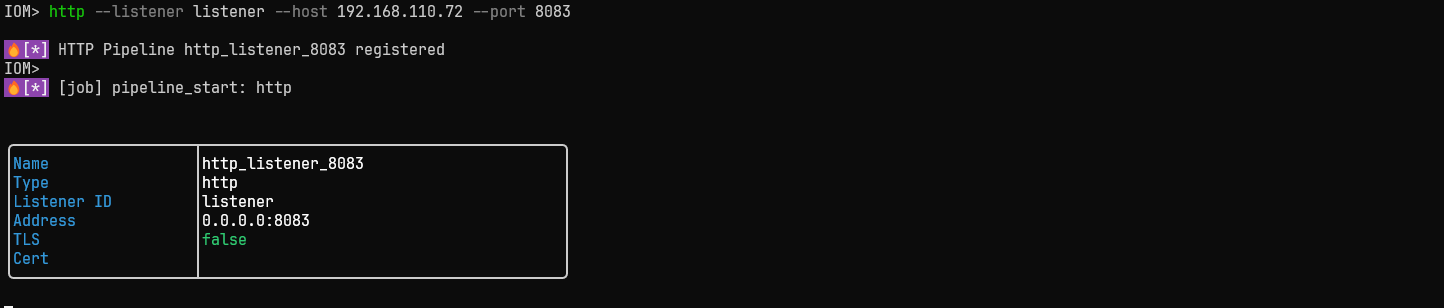
http --listener listener --host 192.168.110.72 --port 8083 --tls --cert-name DETERMINED_NIECE
 gui:
gui:
新建rem
rem new rem_test --listener listener -c tcp://127.0.0.1:19966

REM 生命周期管理
# 列出指定 listener 下的 REM
rem list listener_id

# 启动 REM
rem start rem_test

# 停止 REM
rem stop rem_test

# 删除 REM
rem delete rem_test
新建website
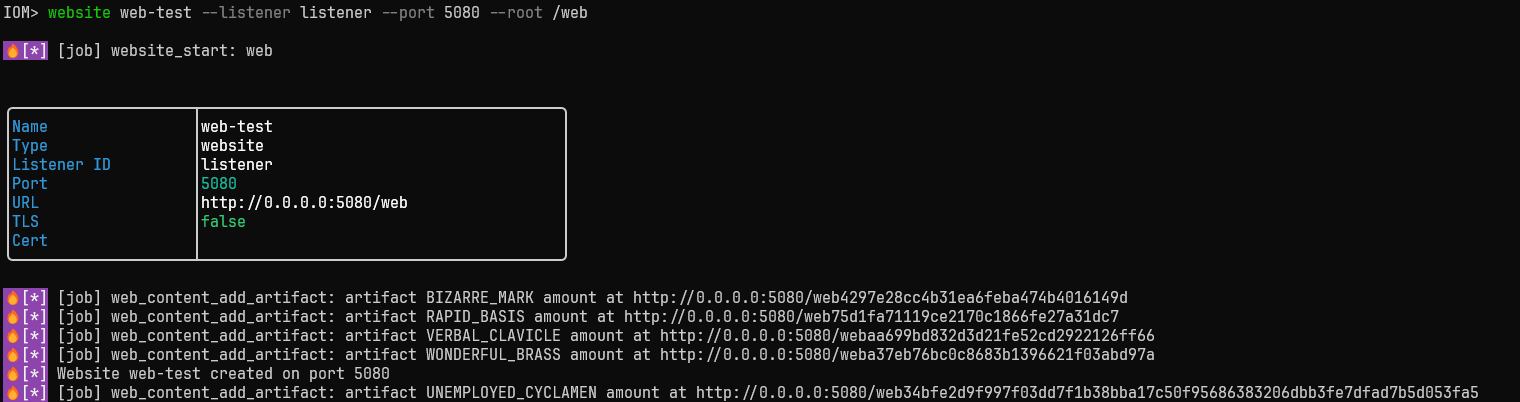
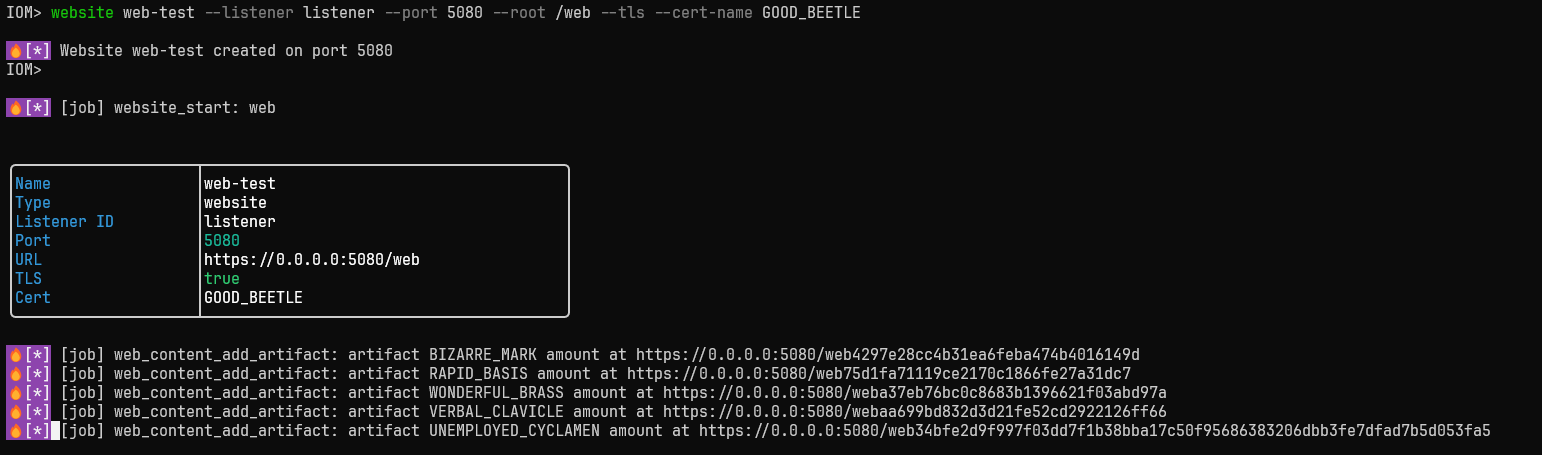
website web-test --listener listener --port 5080 --root /web
 gui:
gui:
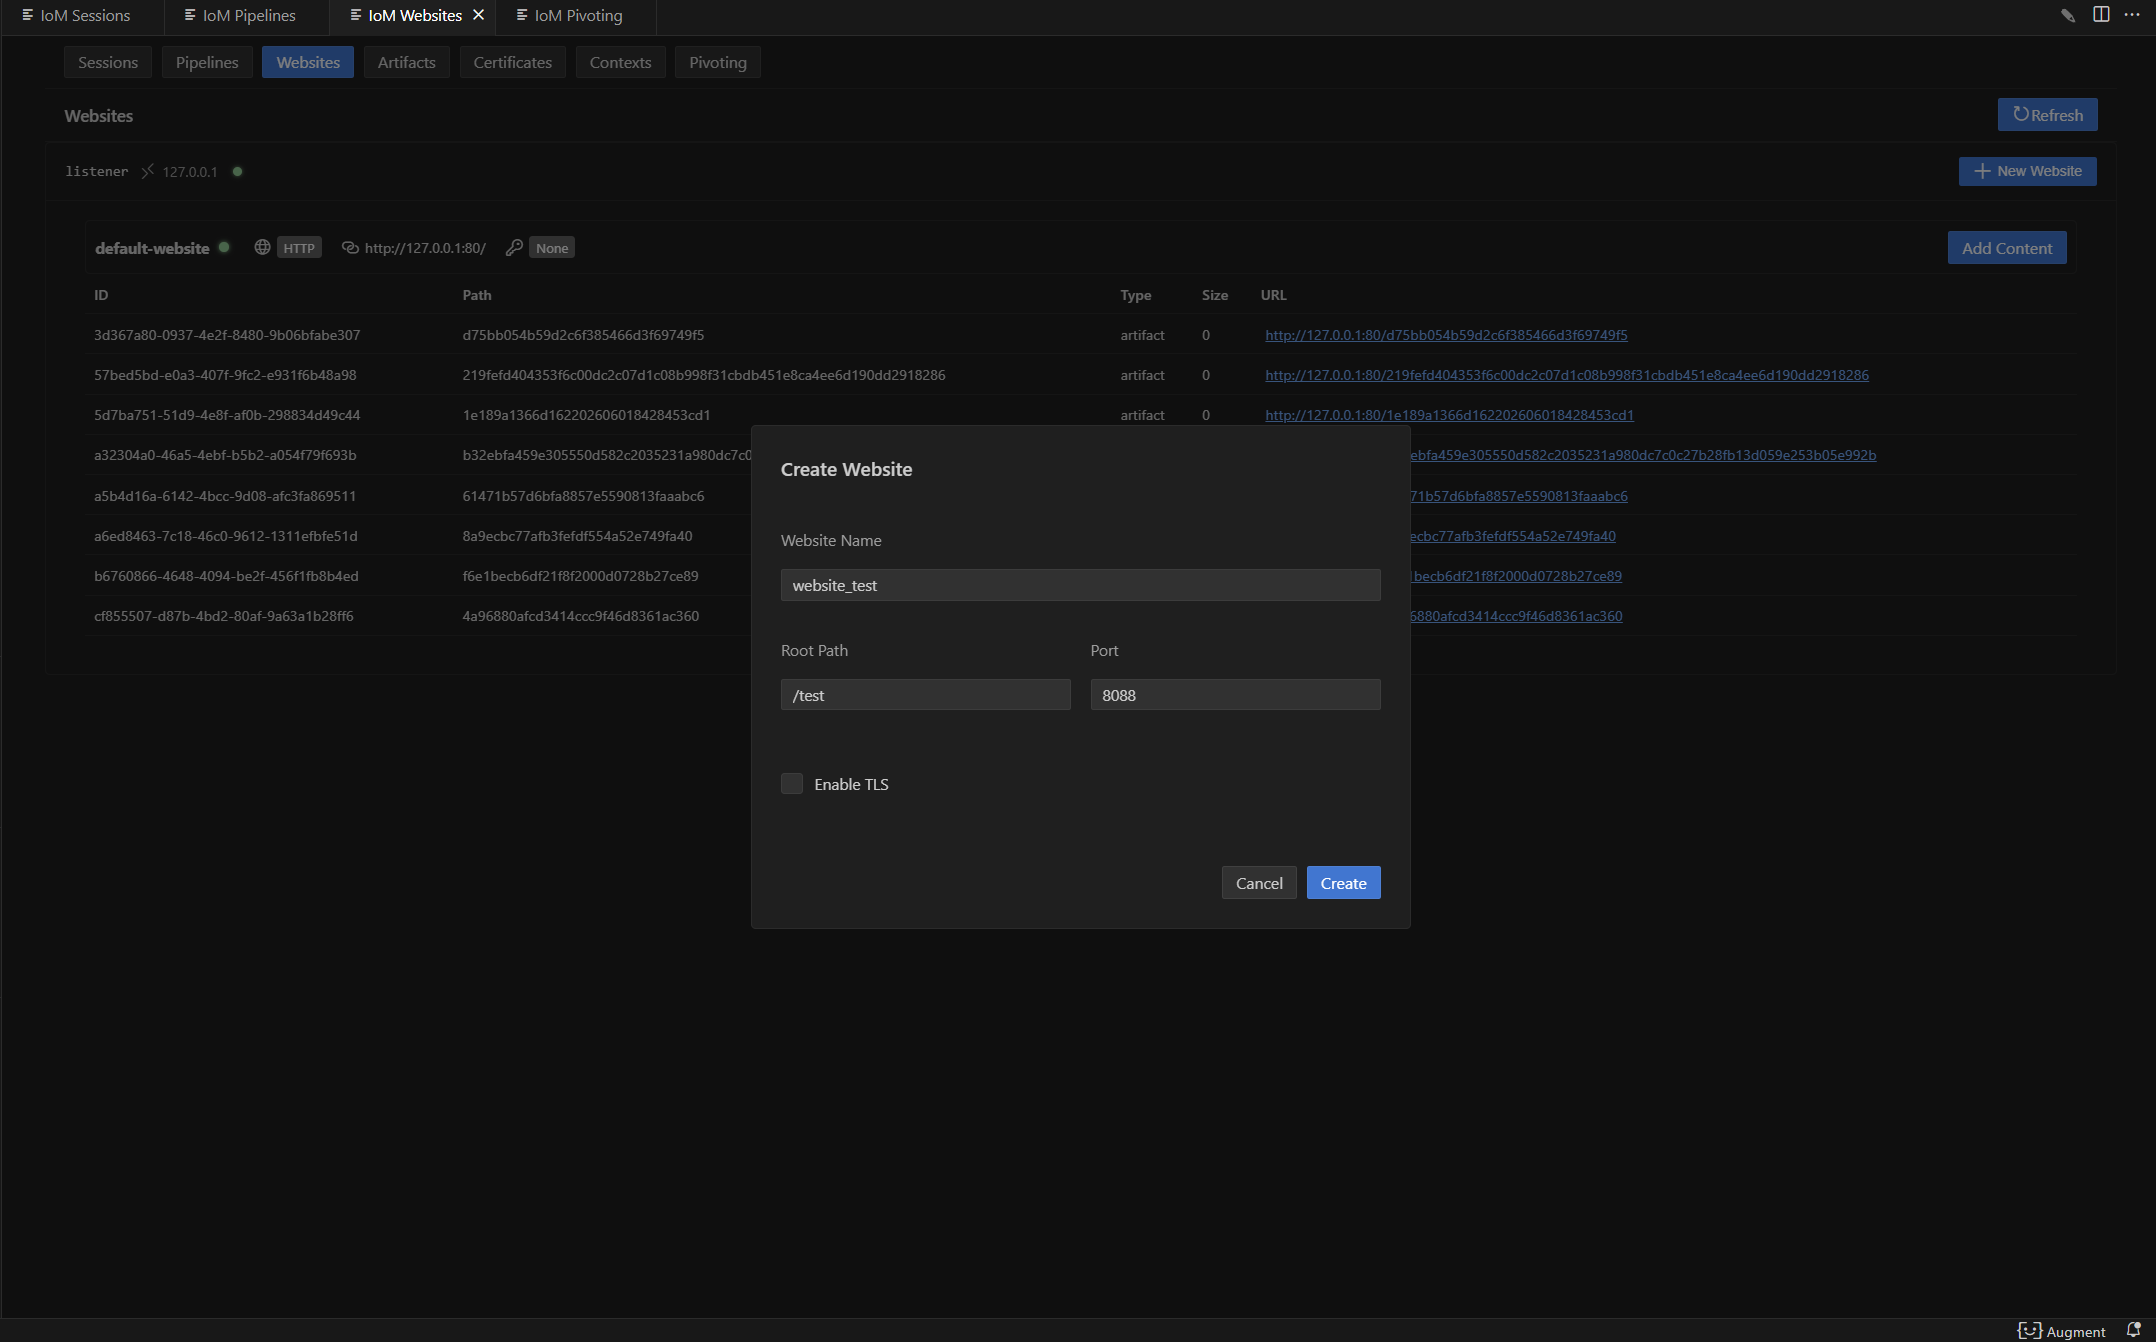
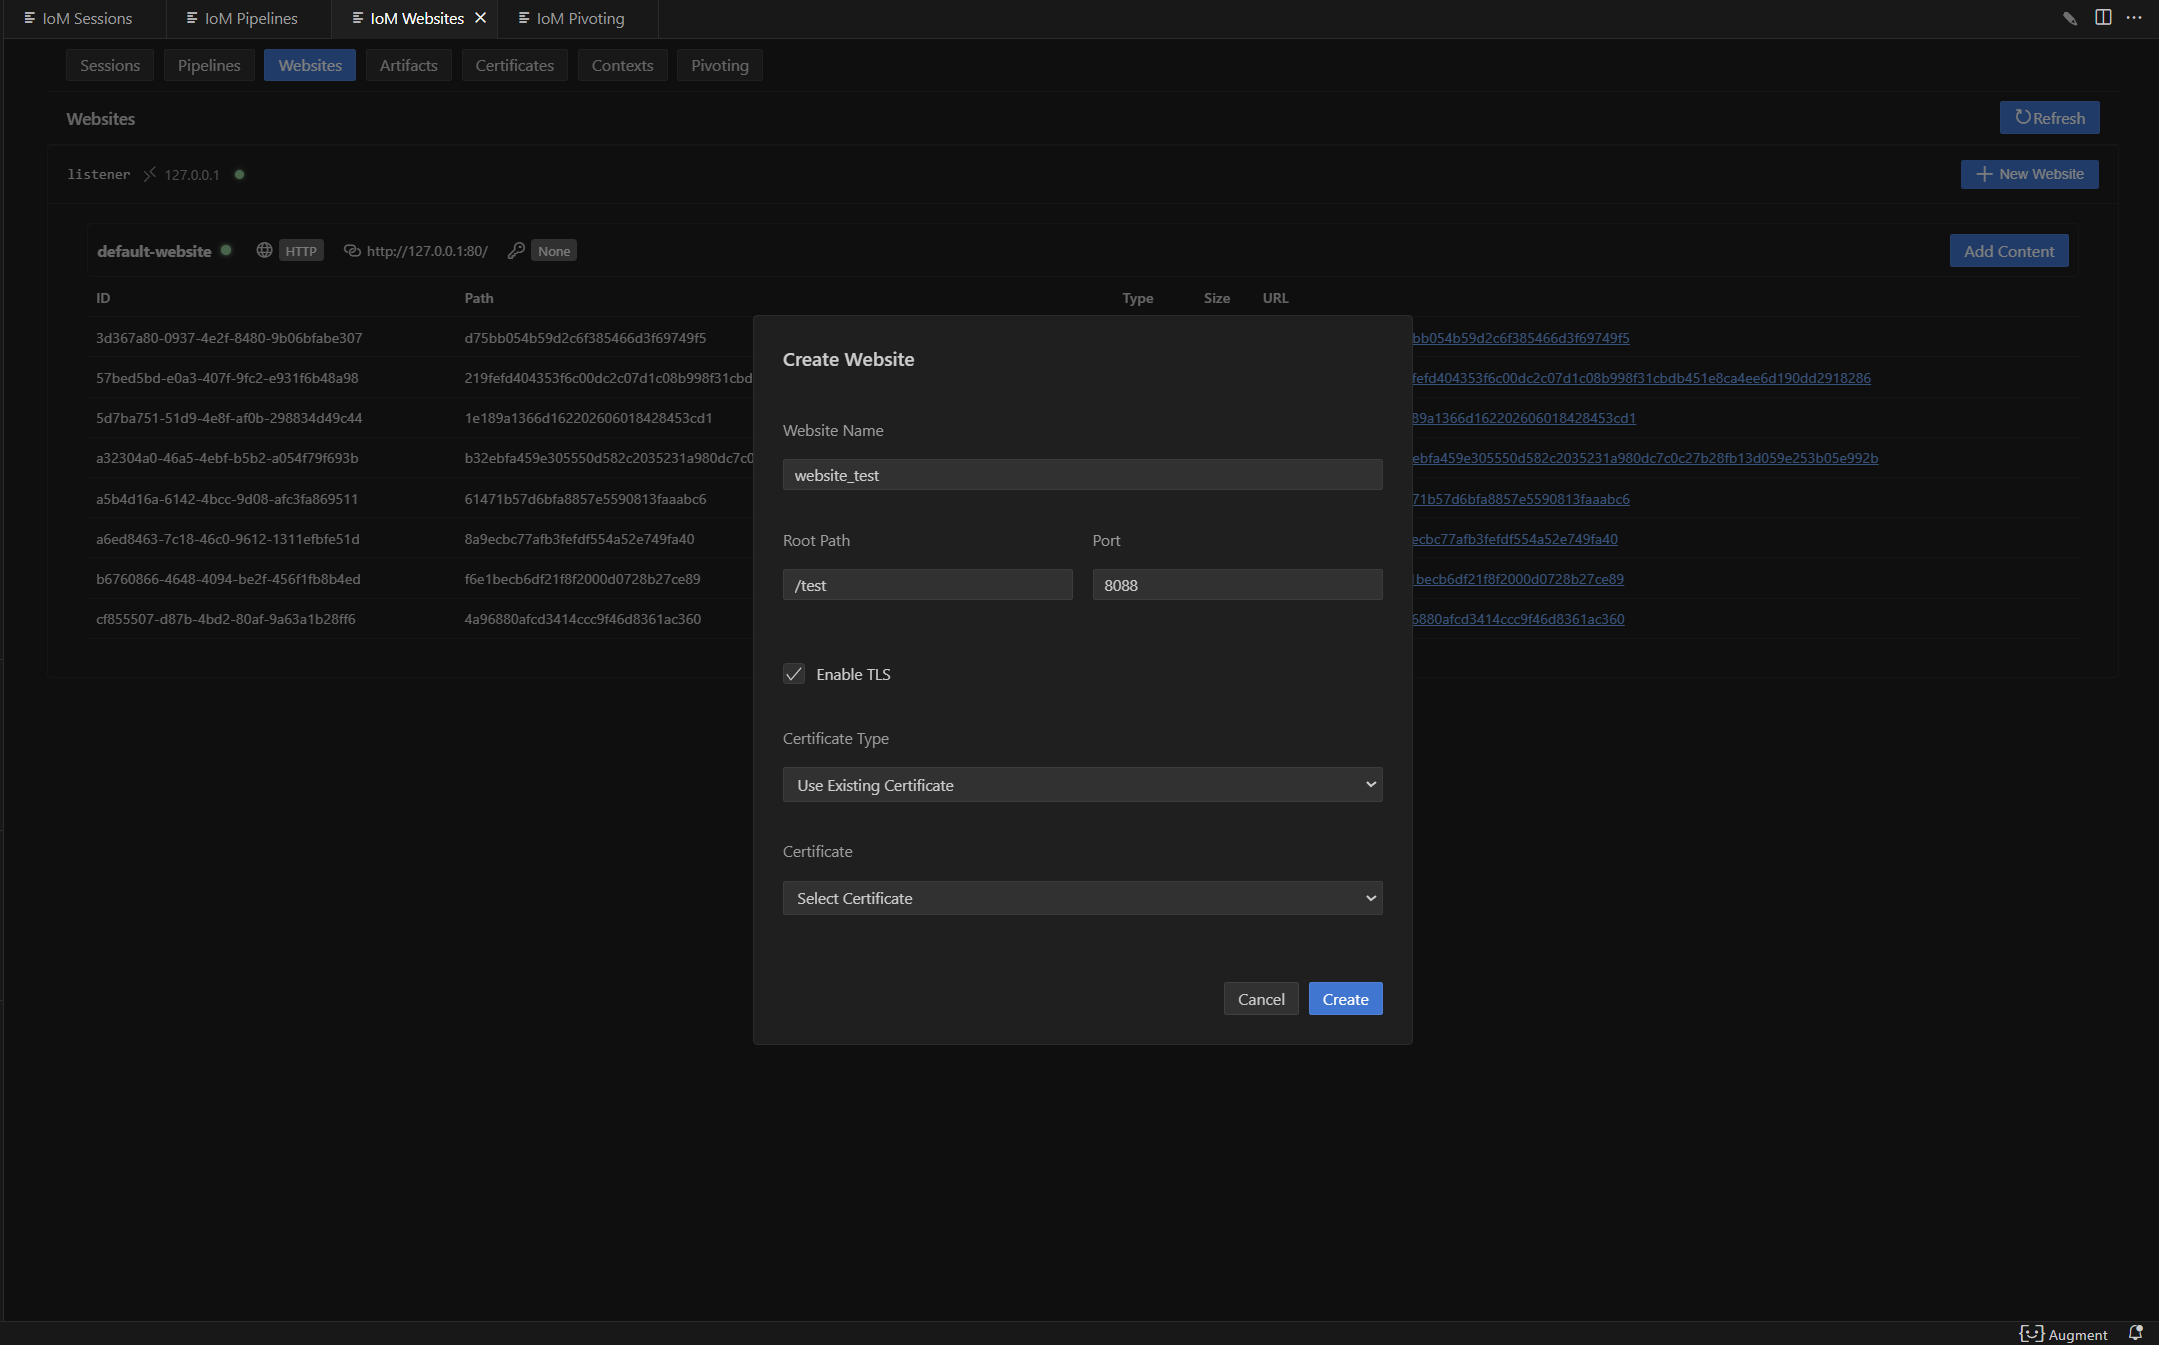
新建website并开启tls
website web-test --listener listener --port 5080 --root /web --tls --cert-name GOOD_BEETLE
 gui:
gui:
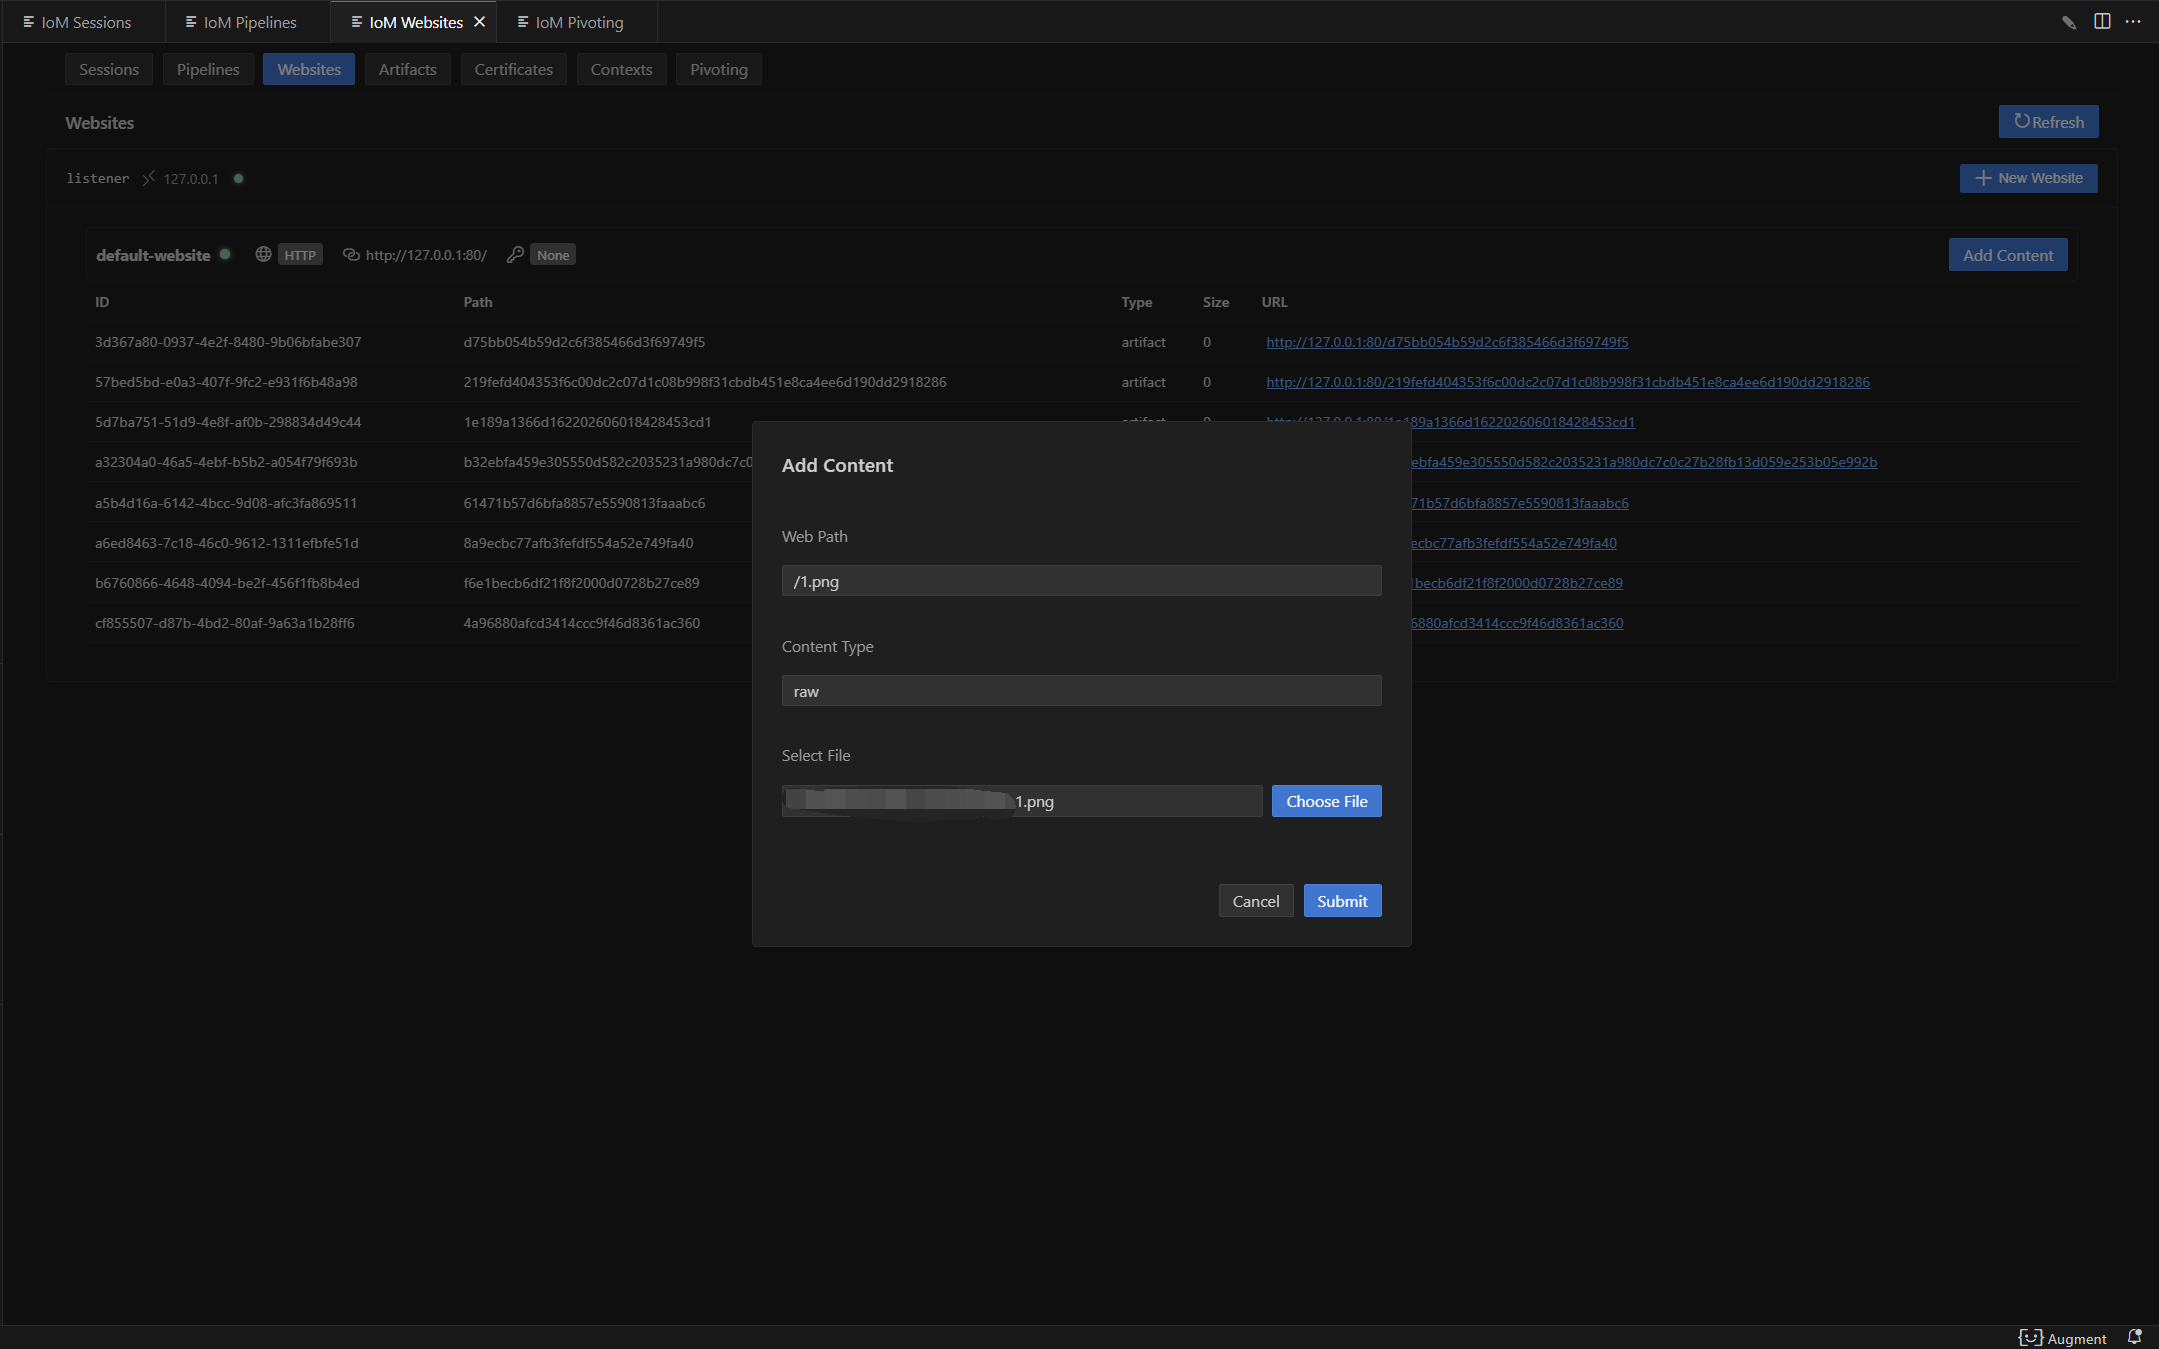
在对应website上传文件
website add /path/to/file --website web-test --path /path
 gui:
gui:
列出website
website list [listener]
启动/停止website
website start [name]
website stop [name] --listener [listener]
| 标志 | 说明 |
|---|---|
--cert-name |
启动时指定证书名称 |
--listener |
停止时指定 listener |
查看website内容
website list-content [website_name]
更新website内容
website update [content_id] [file_path] --website [name]
| 标志 | 说明 |
|---|---|
--website |
website 名称(必需) |
--type |
内容类型(默认:raw) |
移除website内容
website remove [content_id]
高级功能
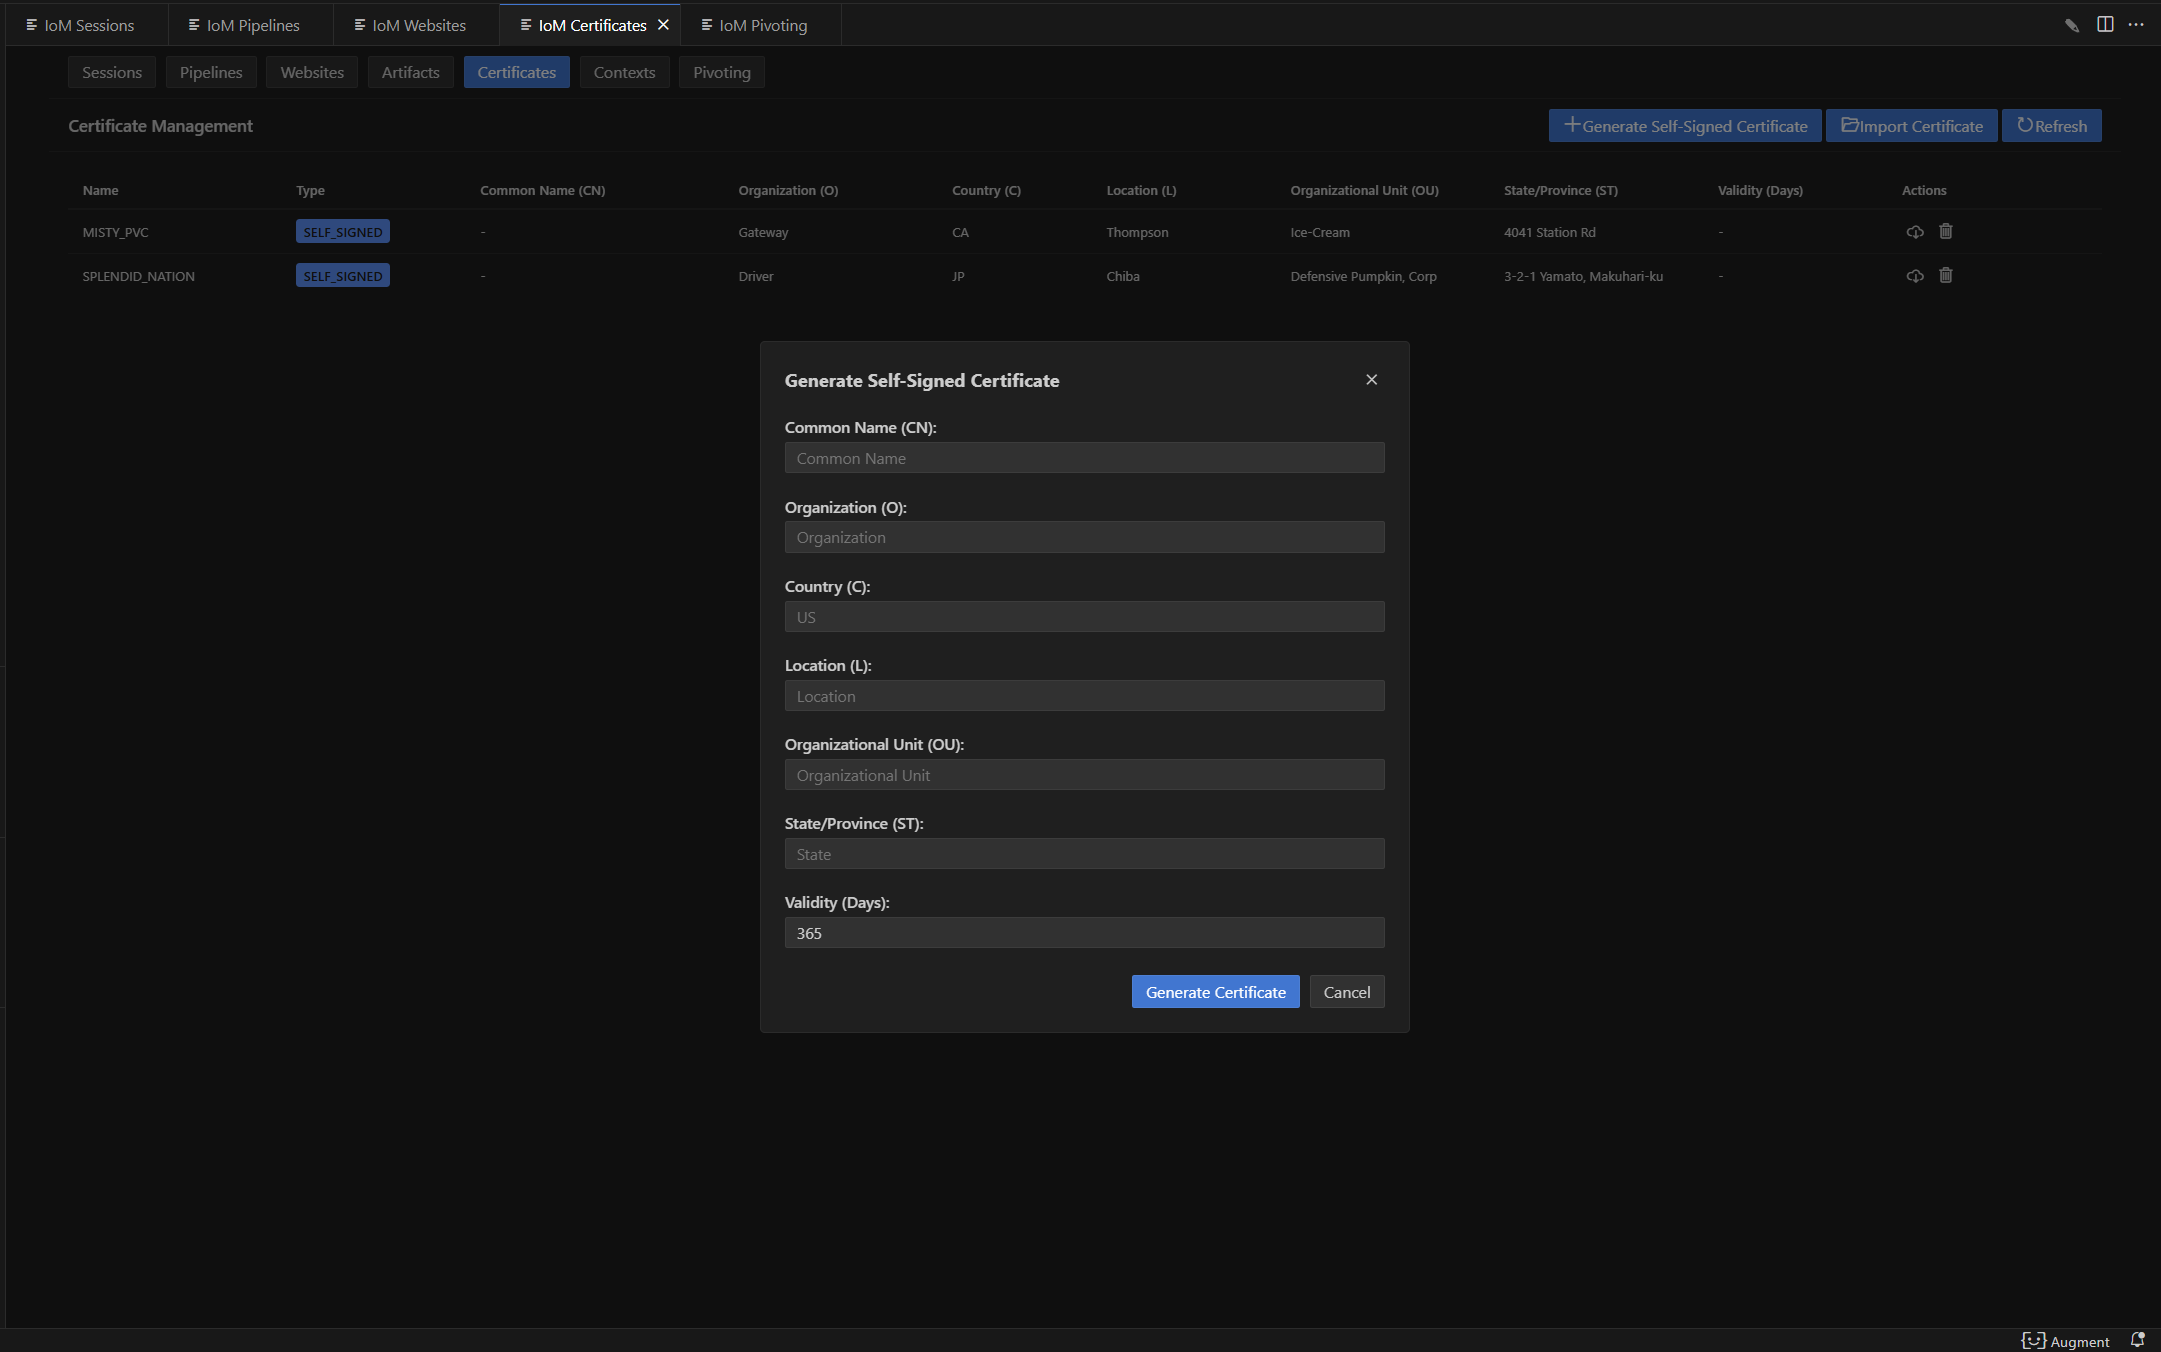
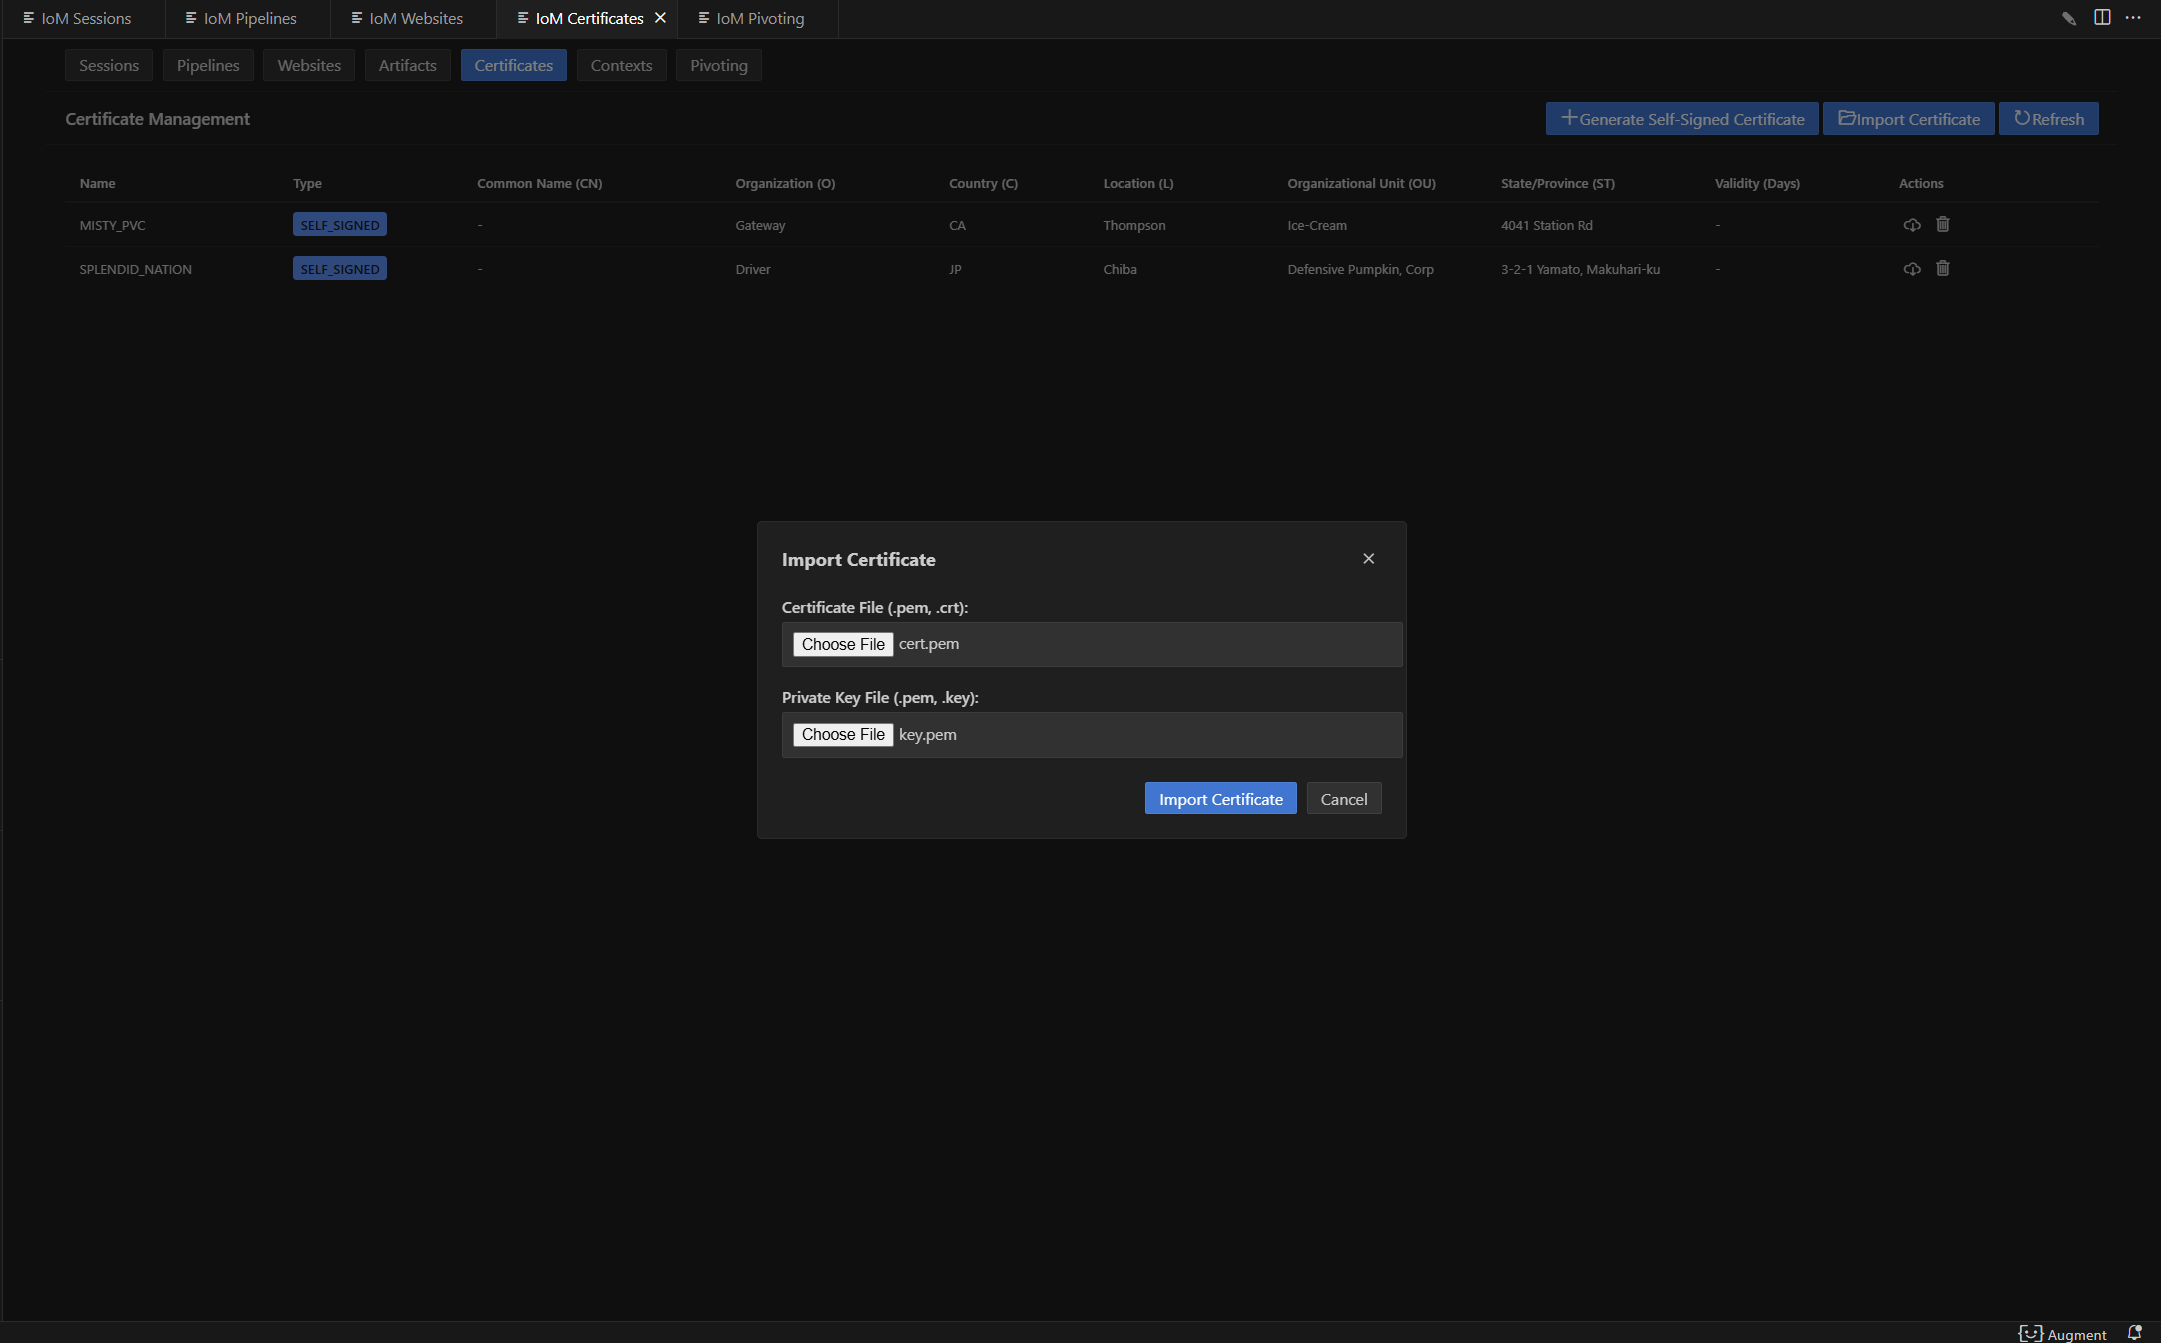
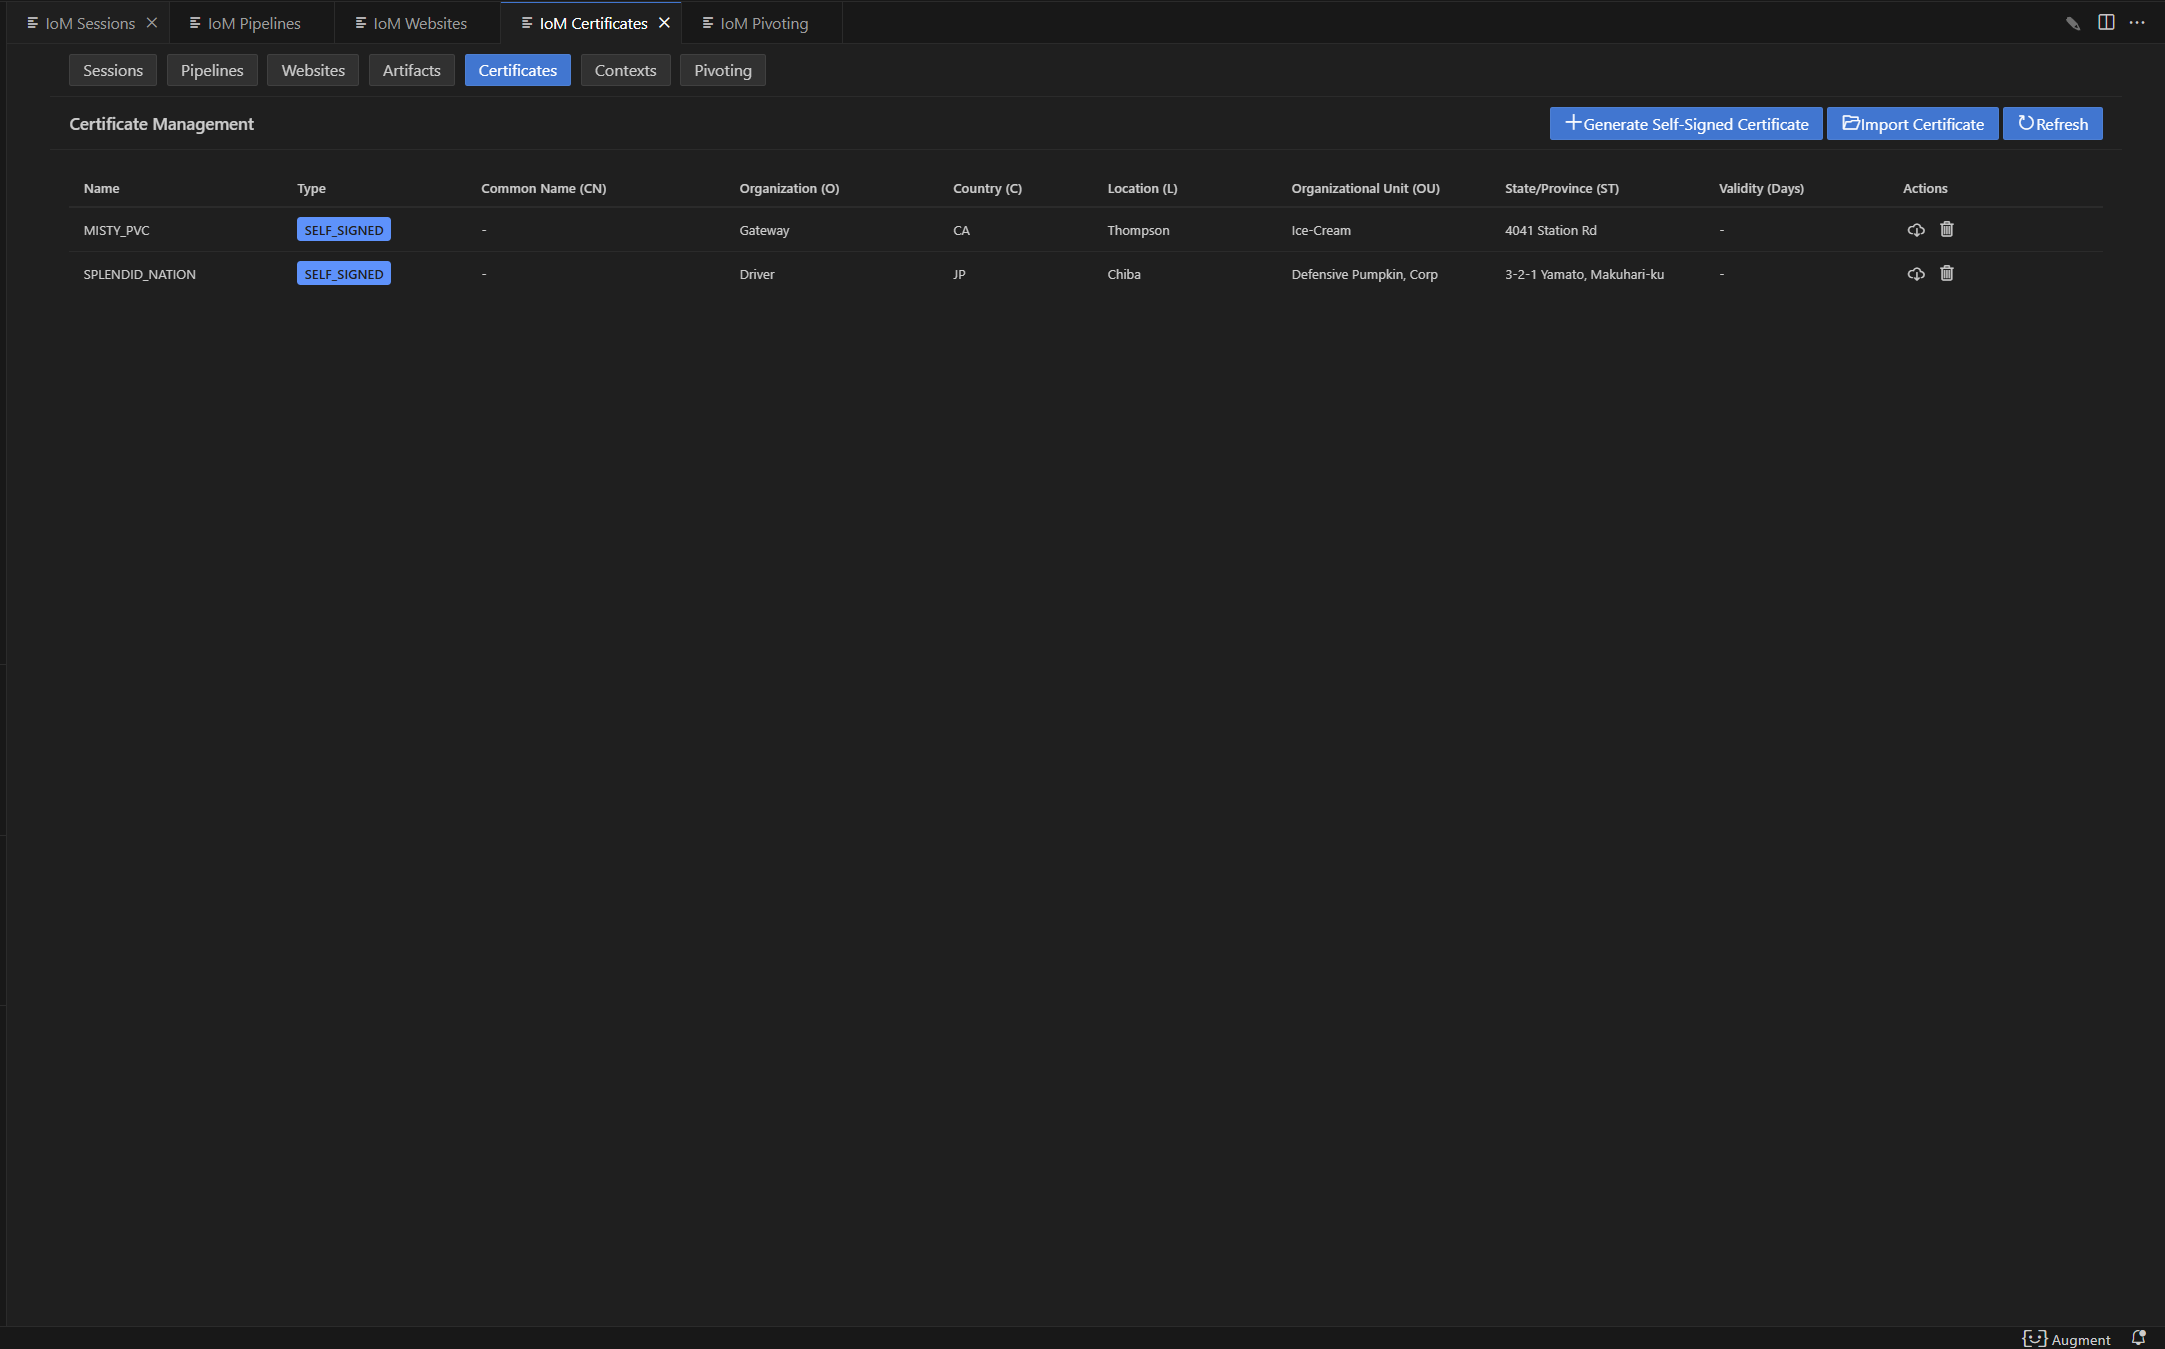
证书管理
当前证书管理支持通过多种方式配置证书。
- 随机生成自签名证书
- 指定参数生成自签名证书
- 导入已有证书
通过config配置证书
目前config.yaml主要由TLS的相关配置来控制证书。具体TLS配置如下:
tls:
  enable: true                    # 启用TLS加密传输
  # 自签名证书配置
  CN: "test"                      # 证书通用名称(Common Name),通常为域名或IP地址
  O: "Sharp Depth"                # 证书组织名称(Organization)
  C: "US"                         # 证书国家代码(Country),使用ISO 3166-1标准
  L: "Houston"                    # 证书地区/城市名称(Locality)
  OU: "Persistent Housework, Limited"  # 证书组织单位名称(Organizational Unit)
  ST: "State of Texas"            # 证书州/省名称(State/Province)

  # 导入证书配置
  cert_file: path\to\cert         # 证书文件路径,支持PEM格式的证书文件
  key_file: path\to\key           # 私钥文件路径,支持PEM格式的私钥文件
  ca_file: path\to\ca             # CA证书文件路径(可选),用于验证客户端证书的CA证书
自签名证书:
自签名证书配置如下,只需要将config.yaml中需要对应pipeline的tls的 enable 设为true。
tcp:
  - name: tcp
    enable: true
    port: 5001
    host: 0.0.0.0
    protocol: tcp
    parser: auto
    tls:
      enable: true
    encryption:
      - enable: true
        type: aes
        key: maliceofinternal
      - enable: true
        type: xor
        key: maliceofinternal
如果有自己的证书生成信息,可按以下配置填写:
tcp:
  - name: tcp
    enable: true
    port: 5001
    host: 0.0.0.0
    protocol: tcp
    parser: auto
    tls:
      enable: true
      CN: "test"
      O: "Sharp Depth"
      C: "US"
      L: "Houston"
      OU: "Persistent Housework, Limited"
      ST: "State of Texas"
    encryption:
      - enable: true
        type: aes
        key: maliceofinternal
      - enable: true
        type: xor
        key: maliceofinternal
导入已有证书
导入证书配置如下:
tcp:
  - name: tcp
    enable: true
    port: 5001
    host: 0.0.0.0
    protocol: tcp
    parser: auto
    tls:
      enable: true
      cert_file: path\to\cert
      key_file: path\to\key
      ca_file: path\to\ca    (非必须填写)
    encryption:
      - enable: true
        type: aes
        key: maliceofinternal
      - enable: true
        type: xor
        key: maliceofinternal
client配置证书
启动listener之后,可以给已有的pipeline使用新的证书,使用新的证书前,需要保证服务器已经存储了需要的证书。
添加自签名证书
cert self_signed

gui:
 添加导入证书
cert import --cert /path/to/cert --key /path/to/key --ca-cert /path/to/ca
 gui:
gui:
 如果不确认证书信息,可以list证书,来确认是否是需要的证书。
cert
 gui:
gui:
cert 完整命令参考
生成自签名证书(完整标志):
cert self_signed [flags]
| 标志 | 说明 |
|---|---|
--CN |
通用名称(Common Name) |
--O |
组织名称 |
--C |
国家代码 |
--L |
城市 |
--OU |
组织单位 |
--ST |
州/省 |
--validity |
有效期(天) |
示例:
cert self_signed --CN example.com --O "My Org" --C US --validity 365
更新证书:
cert update [cert-name] --cert [path] --key [path]
| 标志 | 说明 |
|---|---|
--cert |
证书文件路径 |
--key |
私钥文件路径 |
--ca-cert |
CA 证书路径 |
--type |
证书类型 |
下载证书:
cert download [cert-name] -o [save-path]
删除证书:
cert delete [cert-name]
使用指定证书启动pipeline
当服务器已存储所需证书后,可以通过以下命令,将pipeline使用新的证书配置启动。
pipeline start tcp --cert-name cert-name

Parser
parser 协议用来区分对应的 implant 类型,pulse 与 malefic 目前的传输协议略有不同,所以parser当前可设置值为auto/malefic/pulse,如果为auto,则会自动区分pulse和malefic的传输协议。当需要配置一个 pulse 时,需要单独的 parser 配置。以下是pulse配置示例:
    - name: shellcode
      port: 5002
      host: 0.0.0.0
      parser: pulse    # 对应malefic-pulse上线
      enable: true
      encryption:
        enable: true
        type: xor
        key: maliceofinternal
Encryption
encryption用于配置 /pipeline 与 implant 之间的通信加密协议。
其作用是对 完整数据包进行加密/解密,从而避免明文传输被检测或篡改。
目前支持的加密算法:XOR和AES-CFB。
      encryption:
        - enable: true               # 是否启用该加密方式
          type: aes                  # 加密类型 (支持: aes / xor)
          key: maliceofinternal      # 密钥 (implant 需一致)
        - enable: true
          type: xor
          key: maliceofinternal
http自定义响应内容
http pipeline可以自定义配置对应的响应内容,可以在config.yaml中配置。
 http:
    - name: http          # http 名字
      enable: true        # http 是否开启
      host: 0.0.0.0       # http 监听的host
      port: 8080          # http 监听的端口
      parser: malefic     # implant协议
      tls:                # tls配置项,留空则自动生成
        enable: true
        CN: "test"
        O: "Sharp Depth"
        C: "US"
        L: "Houston"
        OU: "Persistent Housework, Limited"
        ST: "State of Texas"
        cert_file: ""
        key_file: ""
        ca_file: ""
      encryption:
        - enable: true
          type: aes
          key: maliceofinternal
        - enable: true
          type: xor
          key: maliceofinternal
      headers:                               # 自定义响应头 (map[string][]string)
        Server: ["nginx/1.22.0"]
        Content-Type: ["text/html; charset=utf-8"]
        Cache-Control: ["no-cache"]
      error_page: "/var/www/error.html"       # 404/500 错误页面路径
      body_prefix: "<!-- prefix marker -->"   # 每个 HTTP 响应 body 前缀内容
      body_suffix: "<!-- suffix marker -->"   # 每个 HTTP 响应 body 后缀内容
headers:可以定义多个 HTTP 响应头,例如伪装成 Nginx/Apache,或者返回自定义的 Content-Type。 -
error_page:指定一个文件路径作为错误页面,返回时可替代默认的错误内容。 -
body_prefix / body_suffix:在 HTTP 响应体的最前/最后拼接额外内容,用于混淆流量或伪装网页。
pipeline 创建命令标志参考
TCP / HTTP 共享标志
| 标志 | 简写 | 类型 | 默认值 | 说明 |
|---|---|---|---|---|
--listener |
-l |
string | listener 名称(必填) | |
--host |
string | 0.0.0.0 |
监听地址 | |
--port |
-p |
uint32 | 随机 | 监听端口(未指定则从 10000-15000 随机选取) |
--ip |
string | 外部 IP 地址 | ||
--tls |
-t |
bool | false | 启用 TLS |
--cert |
string | TLS 证书文件路径 | ||
--key |
string | TLS 私钥文件路径 | ||
--cert-name |
string | 使用已存储的证书名称 | ||
--secure |
bool | false | 启用安全模式 | |
--parser |
string | default |
协议解析器(auto/malefic/pulse) | |
--encryption-type |
string | 加密类型(aes/xor) | ||
--encryption-key |
string | 加密密钥 |
HTTP 额外标志
| 标志 | 类型 | 说明 |
|---|---|---|
--headers |
map | 自定义 HTTP 响应头(key=value 格式) |
--error-page |
string | 自定义错误页面文件路径 |
REM 标志
| 标志 | 简写 | 类型 | 默认值 | 说明 |
|---|---|---|---|---|
--listener |
-l |
string | listener 名称(必填) | |
--console |
-c |
string | tcp://0.0.0.0 |
REM 控制台连接地址和协议 |
Bind 标志
| 标志 | 类型 | 说明 |
|---|---|---|
--listener |
string | listener 名称 |
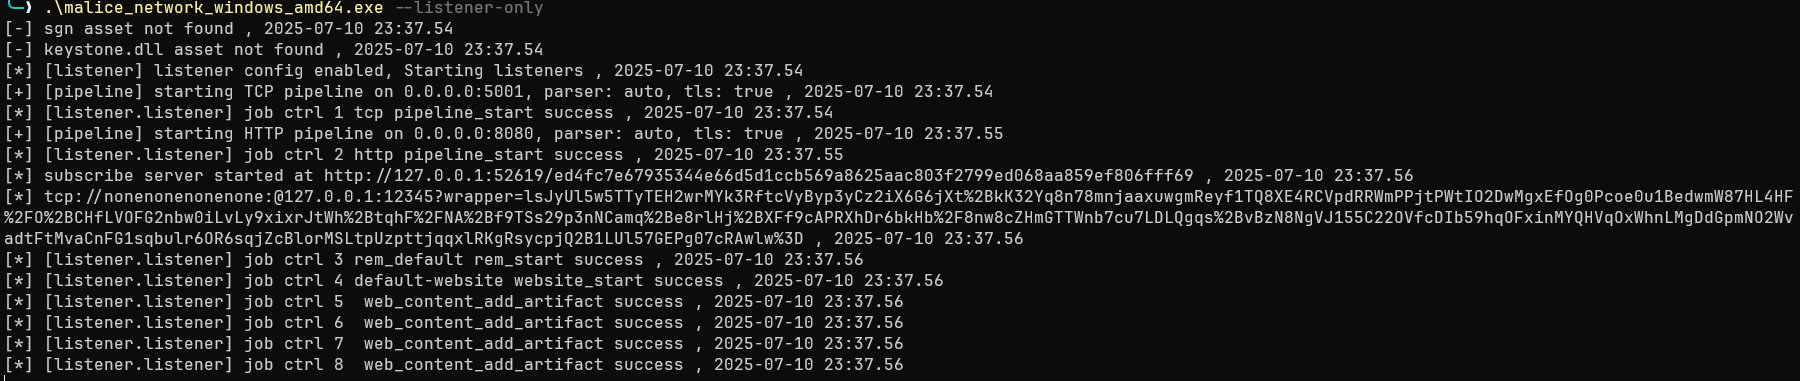
独立部署listener
从项目设计开始,我们就将listener和server解耦,可以通过启动命令独立部署listener。
./malice-network --listener-only